Tag: Liquid Leather

Butter London Wallis

I was super excited this morning because I landed an interview for tomorrow morning and then I got called back to see if I could come in on Monday instead. WAH WAH WAH!!!

I swear that I heard that noise in my head when I got that call. Sometimes I think that my life truly has a soundtrack and, sadly, most of the sounds can be found on Looney Toons Cartoons. Anyway, I am glad they called to reschedule and not cancel so now I just have to wait until Monday. I was already planning out my outfit–black suit, cream colored blouse and some “sensible” black pumps. Oh my God I am a grown up!!!!!!!! I was also trying to decided what to do with my nails. I was vacillating between a french manicure or Butter London All Hail The Queen but since the interview got rescheduled, I decided to do something a little more interesting today. I was already looking through my Butter Londons so I decided to use Wallis.

1

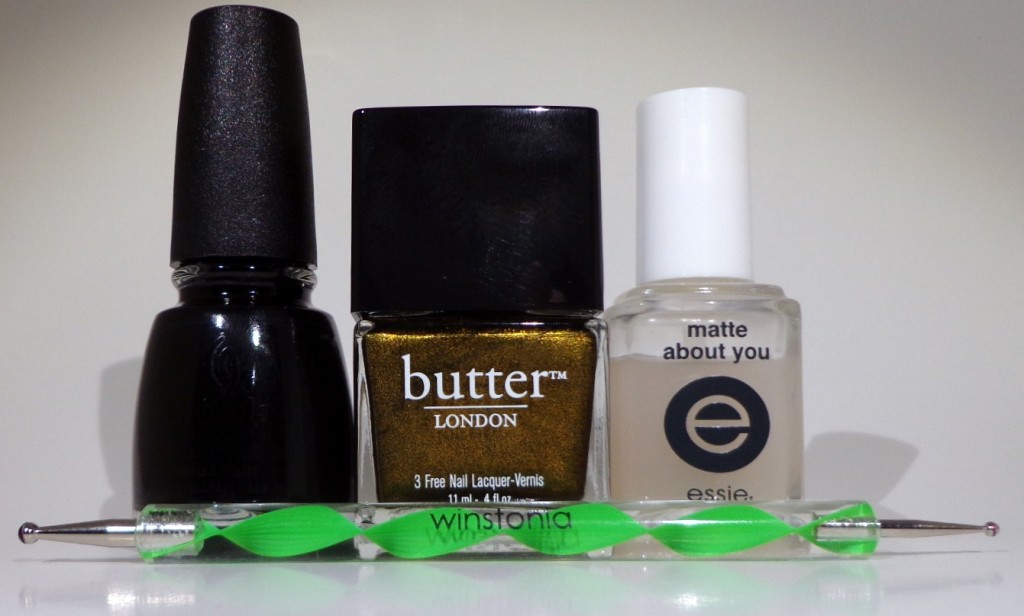
I knew I wanted to do some dots and also mattify everything so I took at out polishes and tools that I would need: Butter London Wallis, China Glaze Liquid Leather, Essie Matte About You and a dotting tool.

Butter London Wallis Swatch

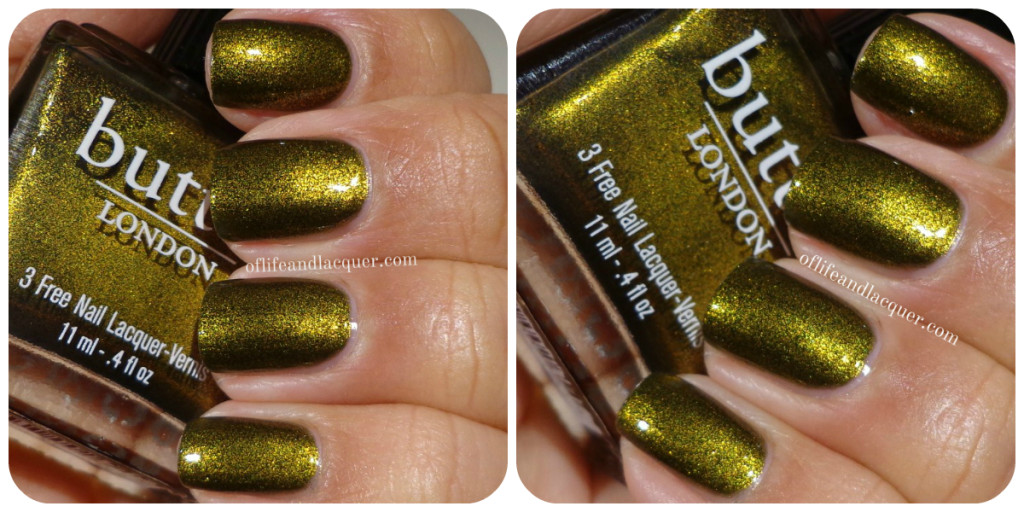
When I first bought Butter London Wallis, I honestly thought that it was kind of ugly: one of those polishes I wouldn’t buy from looking at it in the bottle unless it was on super sale.  I love this brand so I decided to give it a chance because that’s what polish hoarders do. This polish is pretty darn pigmented and easy to apply so all I needed was two coats.

Butter London Wallis Matte

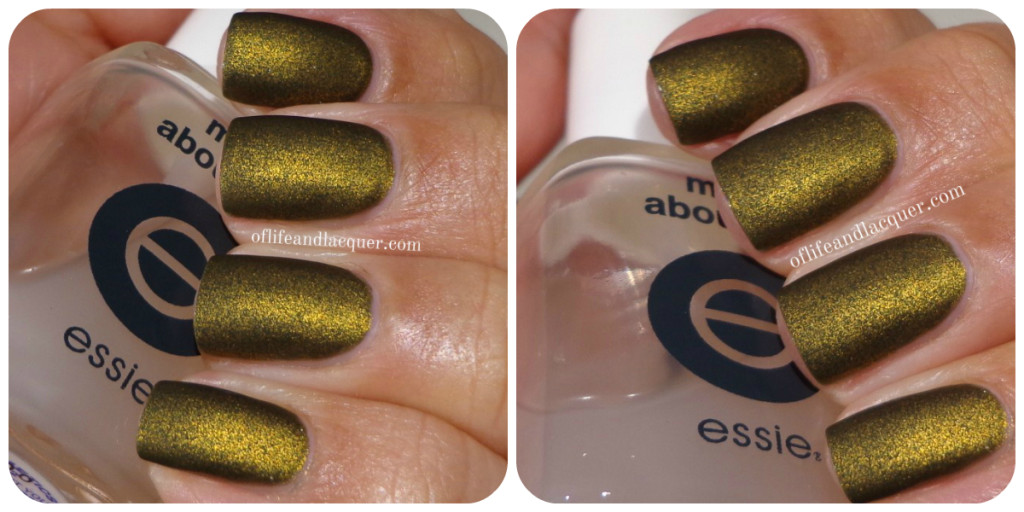
I can’t remember where I first saw Wallis mattified, but I fell in love with it. Look at it!!! It has this amazing depth to it and the color changes and looks almost velvety. I have a few mattifying top coats that I rotate but they all pretty much work the same. If you’re looking for an inexpensive matte top coat, I recommend NYC Matte Me Crazy which can be purchased for $2–can’t beat that price!

Butter London Wallis Black Dots

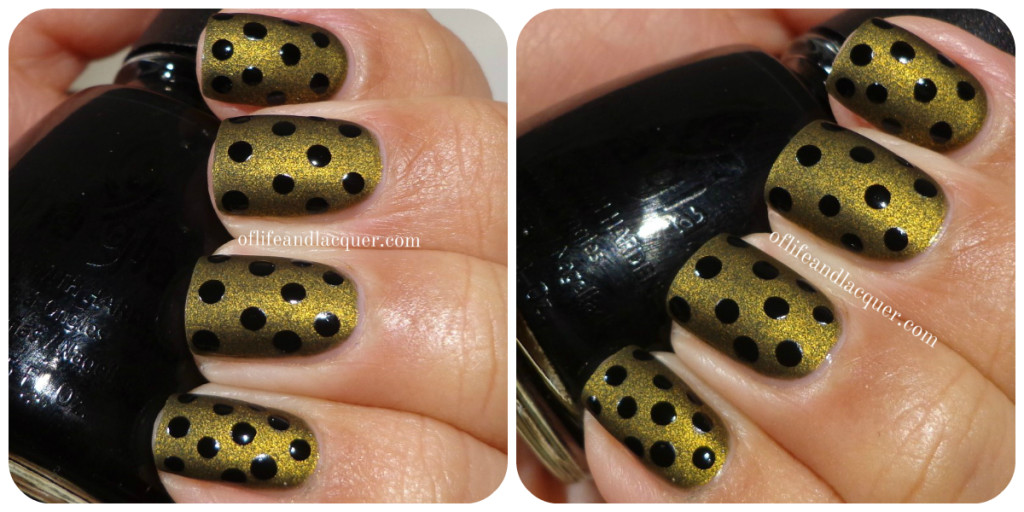
Can you tell that I love dots? I am really diggin’ this dotticure. I thought about mattifying the whole thing but I ended up liking the contrast of the shiny black dots. There is seriously no easier way to spruce up a manicure than to bust out a dotting tool.

While I was editing this post, I was also talking to Nicole on twitter and I told her that I was going to make an egg and chorizo burrito. We then proceeded to have a conversation about what kind of chorizo to use and how to prepare it. Nicole likes to say that she’s Mexican on the inside…I guess I can let her keep that honorary title since she did try to use the word “carniceria” nonchalantly during our conversation. You may thank Nicole for the following…

collage1

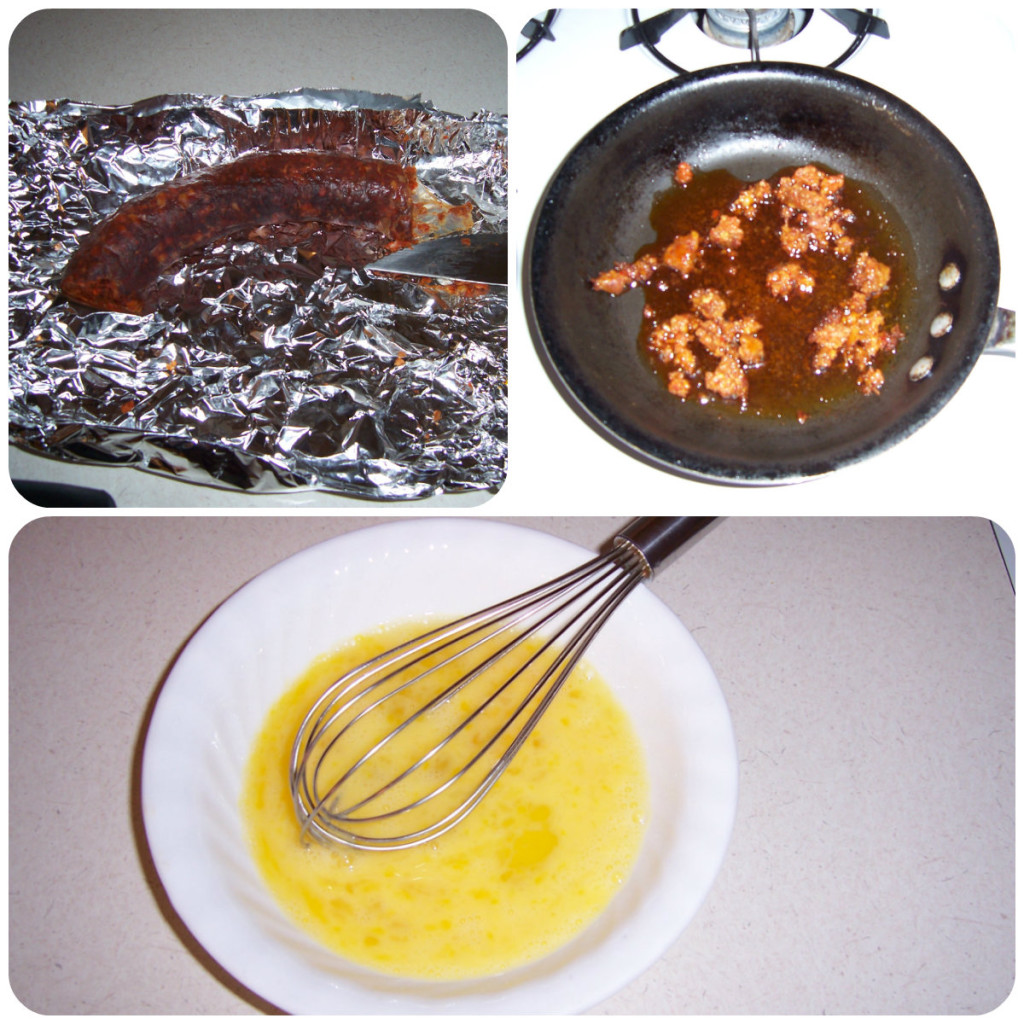
Crumble some chorizo and cook it in a skillet. This is my special omelette skillet! You should drain some of the fat that the chorizo releases because it’s A LOT. I use 1 egg yolk and 3 egg whites and scramble them.

collage2

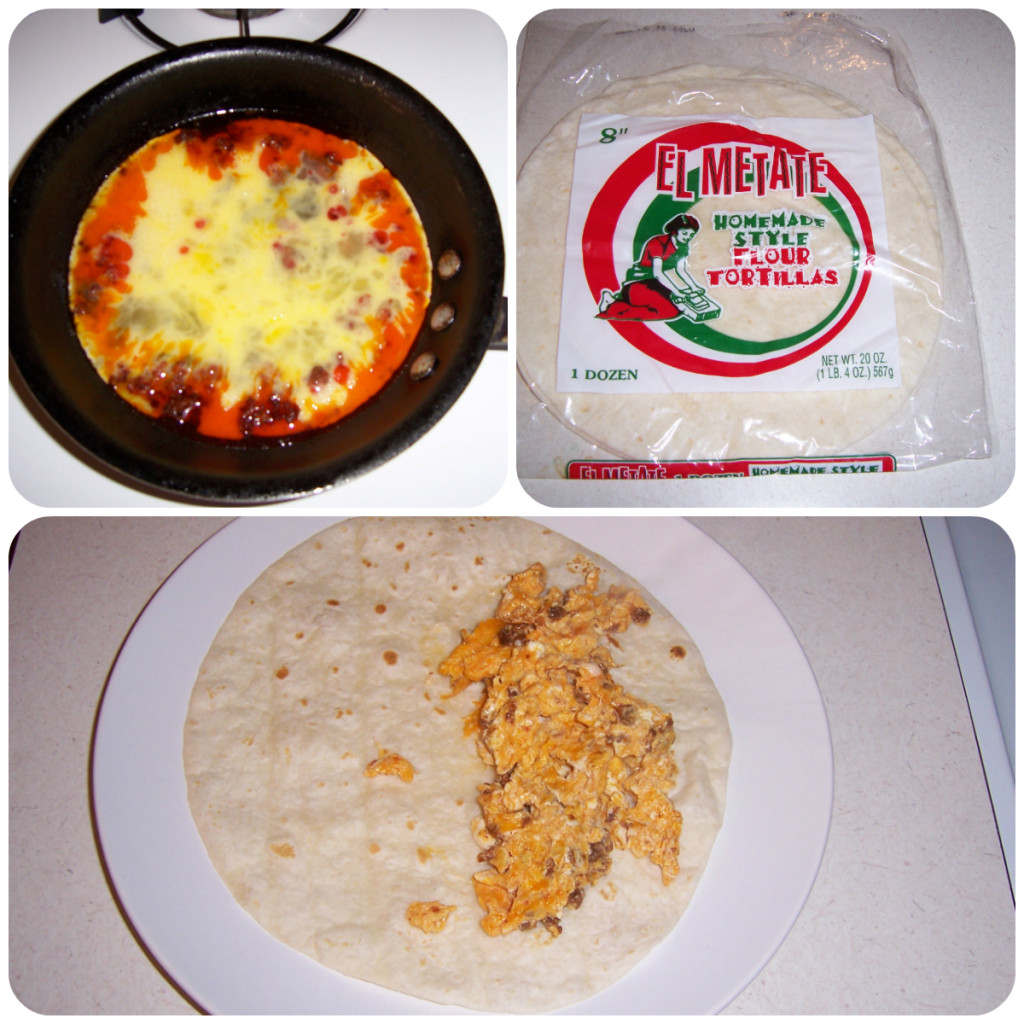
I then pour the beaten eggs into the hot skillet with the chorizo and scramble them together. You can add salt and pepper at this time if you like. Take your favorite flour tortilla and warm it up. Once the tortilla is warm, place the egg and chorizo filling on the flour tortilla. Some people might want to add some cheese but I prefer it without. Make sure that you don’t overcook the eggs because they will continue to cook when you roll the whole thing up.

7

And voilà…here is your egg and chorizo burrito. I love this for breakfast, but I really felt like eating this tonight for dinner. The egg and chorizo mixture will make 2 burritos in case you were wondering.

Well, I hope you liked my Wallis dotticure and my burrito! Thanks for catching up with me today and talk to you soon.


Disclosure: All items featured in this post were purchased by me except for the Winstonia Store dotting tool which was provided to me by the manufacturer. For more information, please visit my disclosure policy tab.


31 Inspired Days of Nail Art – Day 27: Movie Inspired Nails

Ok my nail peeps, after my previous royal screw up which ended up with me not even posting any challenge nails, I had promised that I would post my manicure no matter what. I am still on the fence about my mani but let me tell you a little bit about why I chose the movie I did. Some of my fondest childhood movie/book memories revolve around Dr. Seuss. Even as an adult, my love for his work has not diminished. In fact, I credit Dr. Seuss for getting me my first Au Pair job when I was in France. My first interview was with a family with two little girls and after my interview with the parents, I was introduced to the 2 young girls. I talked to them and one of them demanded that I read a book to her so I looked at her little collection and zeroed in on The Lorax. I new I had them. Once I opened up the book, I remembered how much fun I had reading that book so I shared that with them..even singing some of the song from the movie version. Of course they loved me and I got the job.  So while I racked my brain to figure out what to do for today’s movie inspired nails challenge, I knew I had to find a way to use How The Grinch Stole Christmas. Hey, it’s nearly December, and I just bought my Christmas tree today. I was telling Nicole that I got a tiny tree and that it was still $30. $30 for a sad little Charlie Brown tree!!!! I don’t care how tiny it is. What counts is that it’s mine and that I’m going to have fun decorating it.

So without further ado, here is my How The Grinch Stole Christmas manicure:

How The Grinch Stole Christmas Nails

Do you want to know how I created this manicure and what products I used? Read on…

All the polishes I used are from China Glaze: White Out, Emerald Fitzgerald,Westside Warrior, Sunshine Pop, Adventure Red-y and Liquid Leather. I found that Westside Warrior was a little too dark so I lightened up the color a bit with Sunshine Pop. The only other tools I used were dotting tools and a very thin nail art brush. I can honestly tell you that doing free-hand nail art is getting a tiny bit easier and I am so glad to have participated in this challenge because it pushes me to try things I normally wouldn’t. I’m totally not happy with the clean up on this mani, but I was tired and just wanted to get them done already!

How The Grinch Stole Christmas Nails          How The Grinch Stole Christmas Nails

So what do you think of my Grinch nails? Do you have any fond Dr. Seuss memories?

Don’t forget to check out Nicole’s nails–they are super cute. Thanks for stopping by and catching up with me.

Stamping Sunday: Red & Black

A few weeks ago, Jessica from Once Upon A Polish blogged about a facebook group called Adventures In Stamping where everyone votes for a particular look or color scheme and then all the ladies post their manis every Sunday. Well, I thought it sounded really fun so I joined! I really didn’t know what to do so I started looking through my melmers and realized I hadn’t used Layla Flash Black.


Call me crazy, but I actually don’t really like Flash Black on me.  It just looks so weird on me, and I’m really disappointed…not to mention that Layla holos chip in 5 seconds on me.


I then stamped over Flash Black with Konad special polish in red and plate BM 322. I then used a dotting tool to add the black dots with China Glaze Liquid Leather. One word: barf. I hate how this turned out but not all manis are going to be winners, and you have to embrace the good with the bad. I have no idea why I thought that stamping over Flash Black would be a good idea. It just looks dingy and grey…not interesting at all. I’m annoyed that I spent so much time on this mani and ended up not even liking it; hey, at least now I know Flash Black isn’t what I thought it would be.

So I think my first Stamping Sunday Challenge is a big fat fail. Hopefully I will do better next week. Voting has already started and our three choices are:

  • Fun In The Sun
  • Olympics
  • Using silver, gold or bronze as a base, accent or stamping color

I voted for using silver, gold or bronze as a base, accent or stamping color. So far this choice is in the lead, and I hope it stays that way! Check out the look Jessica created here. I am in love with it!

Thanks for stopping by!