Tag: Spring 2015

OPI Infinite Shine Soft Shades Collection – Spring 2015

OPI Infinite Shine Soft Shades Collection – Spring 2015

PressSample


Hola! I feel tired today. I know it’s freaking Monday, but I had a busy weekend. My parents went back home after a long visit so I’m feeling kinda sad about that. I know I’m 35, but I can still miss my parents! They do tend to drive me nutso 90% of the time, but that’s what parents do so it doesn’t make me miss them any less when they aren’t here. Anyway, despite the business of trying to get them all packed and ready for their flight, I did manage to do some swatching. I have a pile of about 60 polishes to swatch and I only got through 18 but at least that is a start, right? I ended up starting with these because they are from a Spring collection that was sorely delayed, and I figured that I might as well get these out of the way before I start swatching Fall collections. The OPI Infinite Shine Soft Shades Collection for Spring 2015 is just what it sounds like: Spring appropriate soft shades. These are pretty heavy on the whites, but that doesn’t mean they are boring. Let me show you the six shades.

12
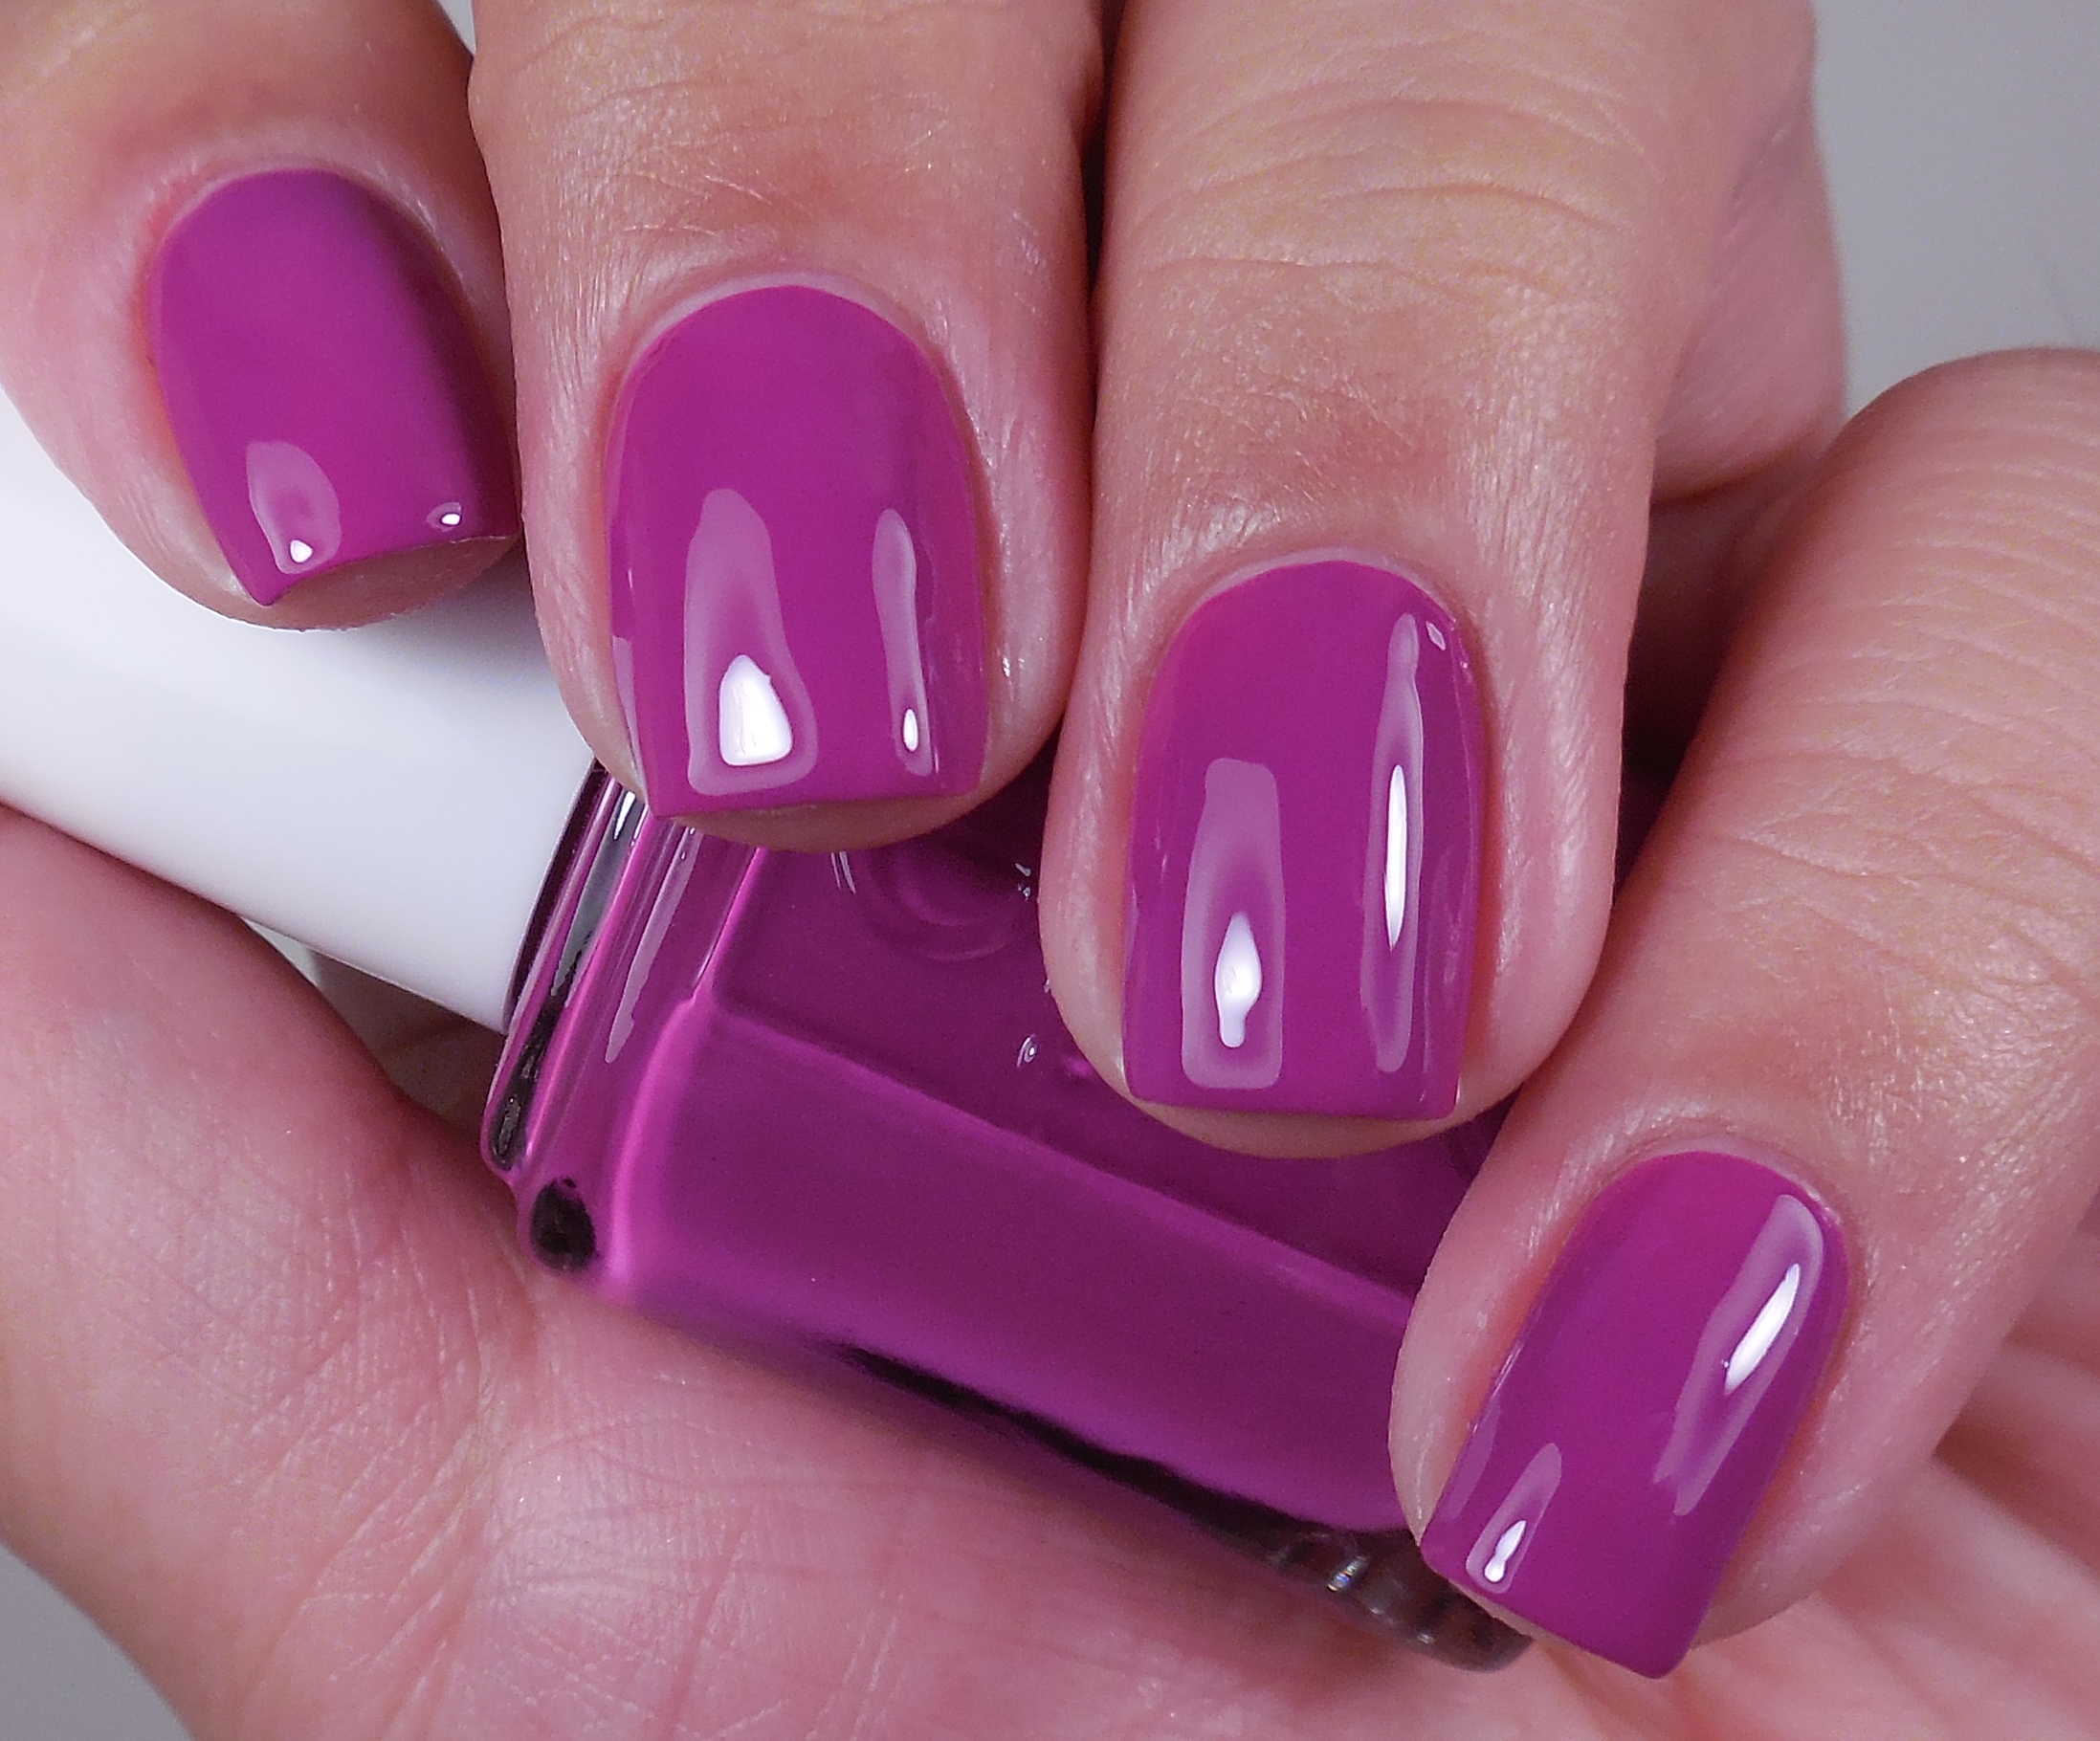
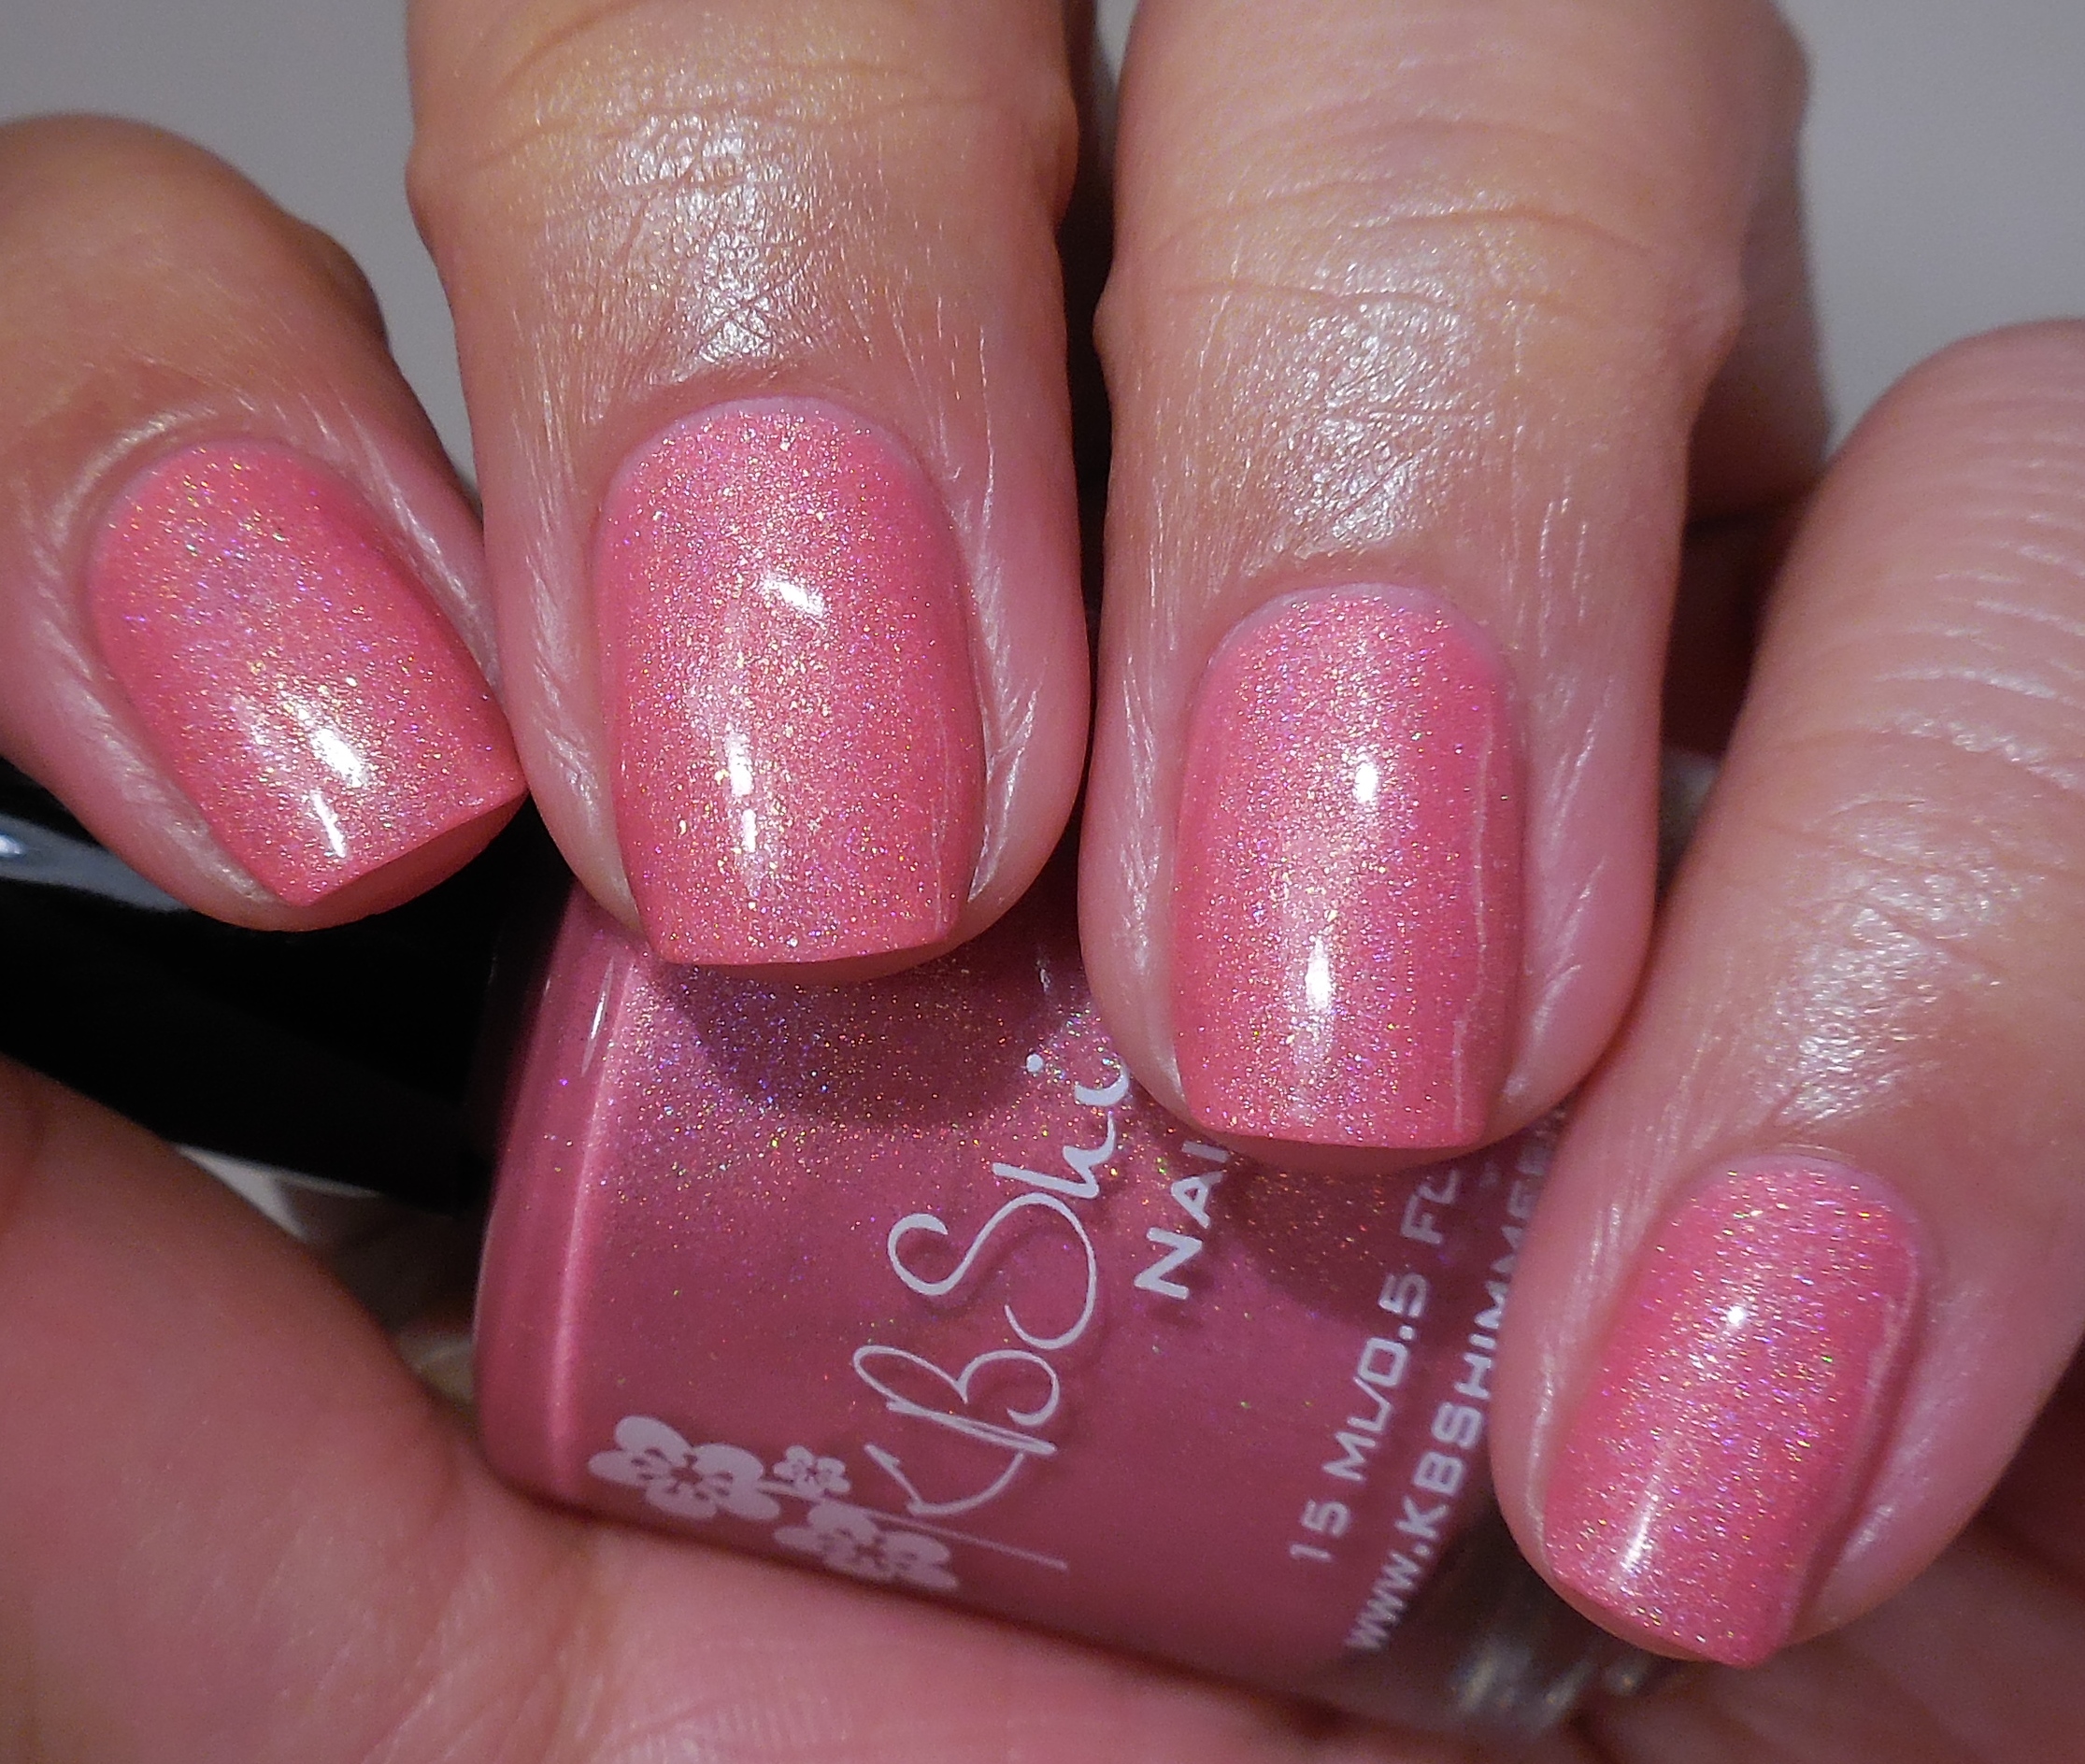
OPI Infinite Shine Pearl of Wisdom

34
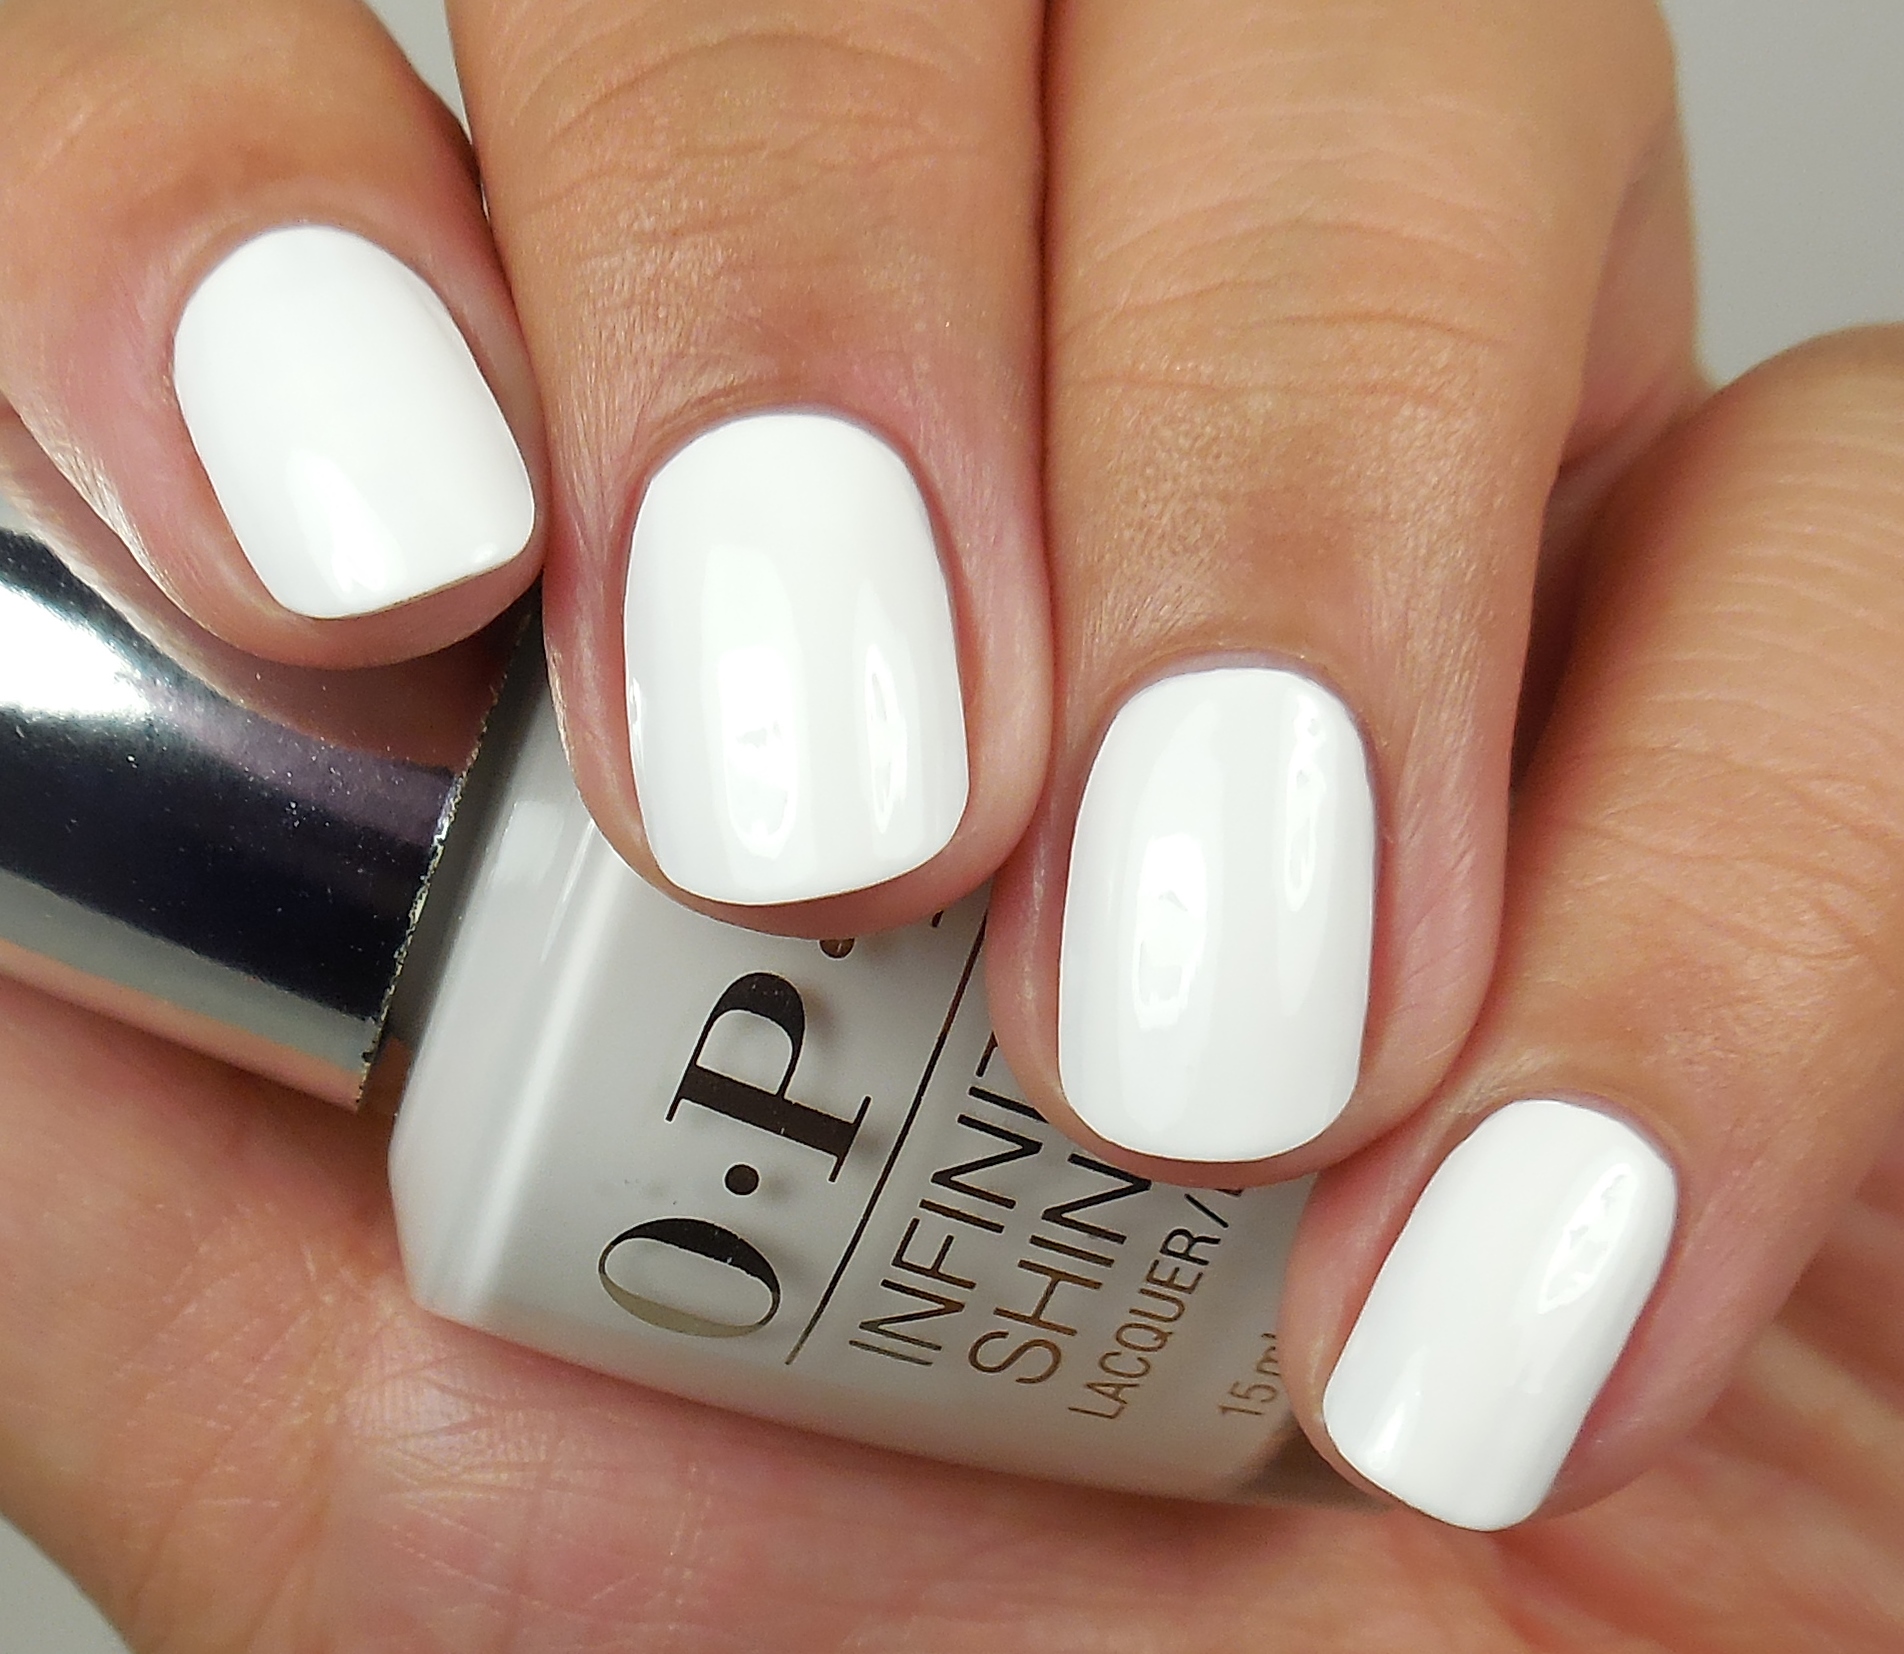
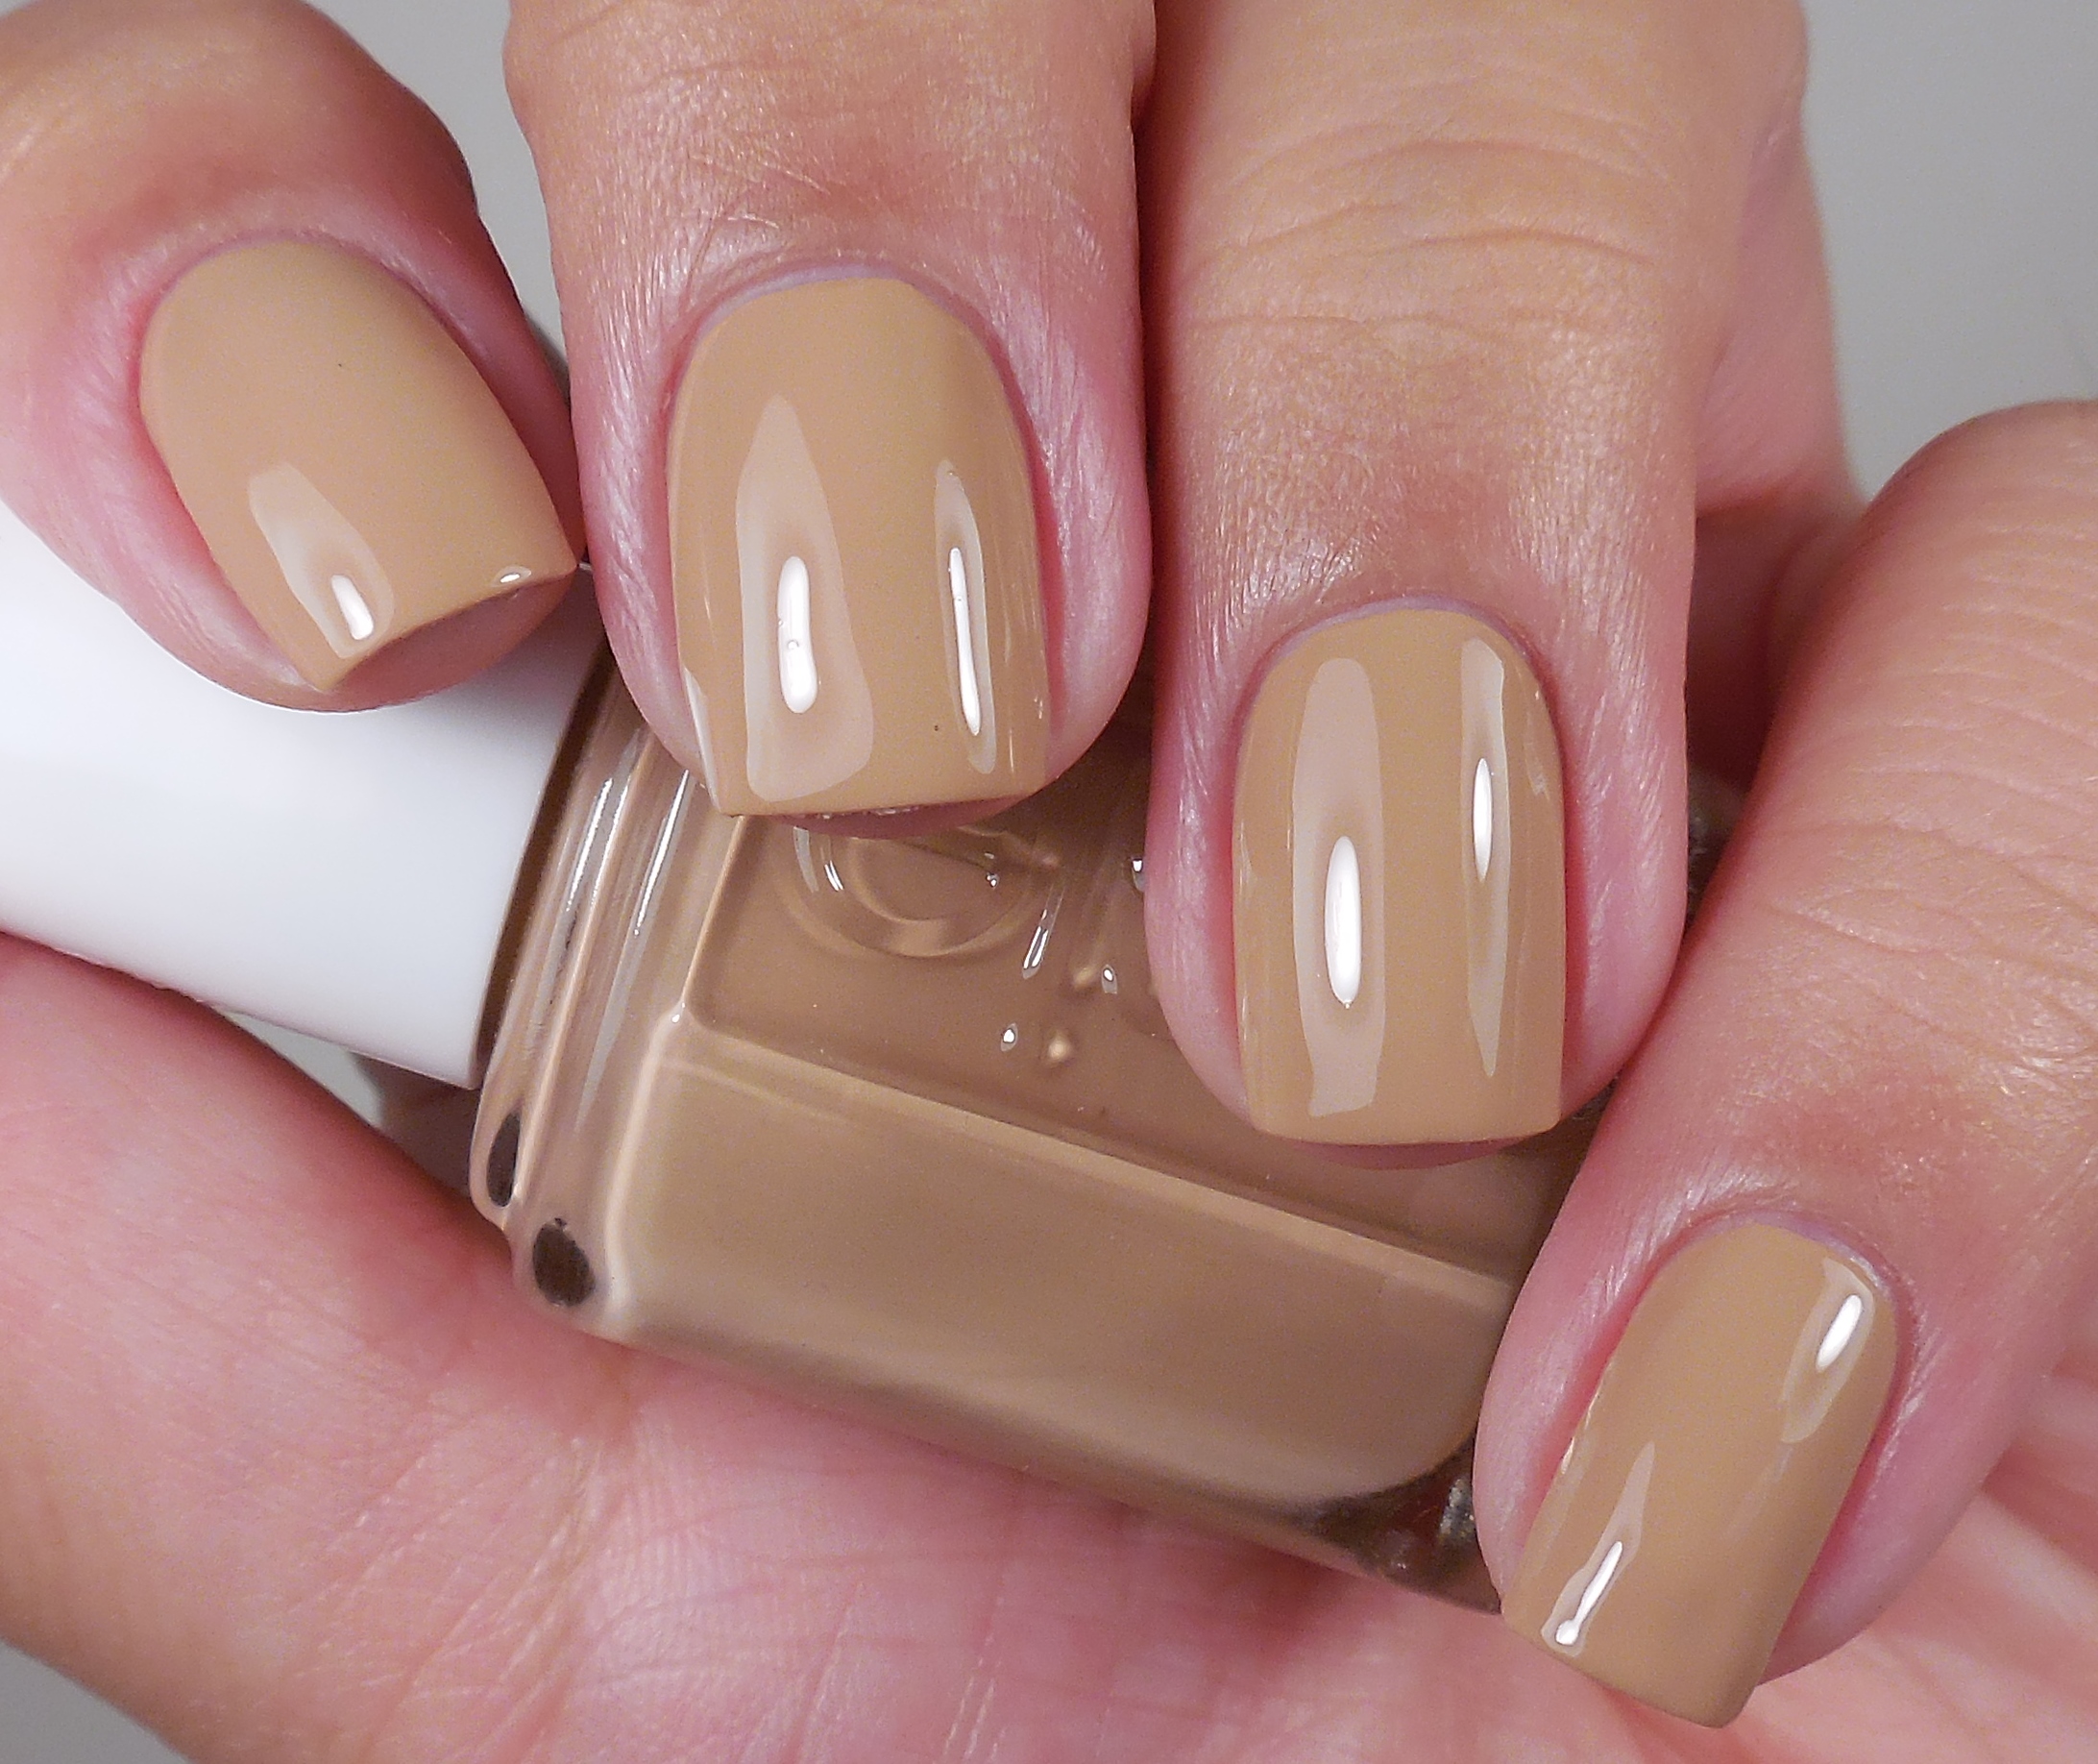
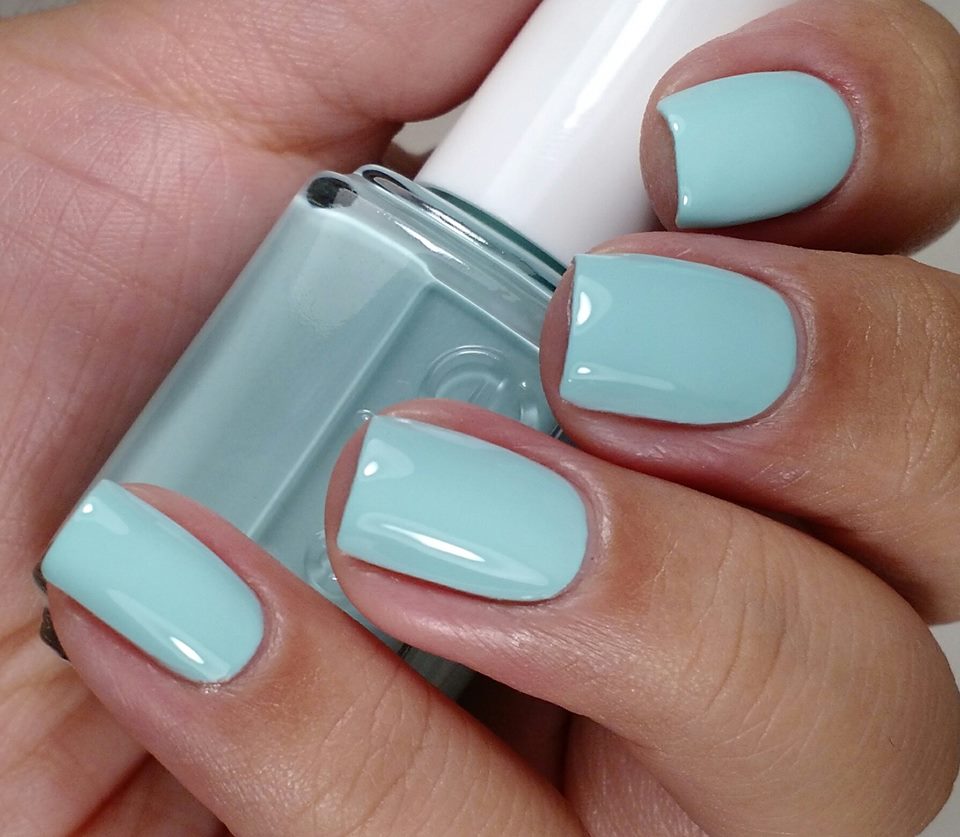
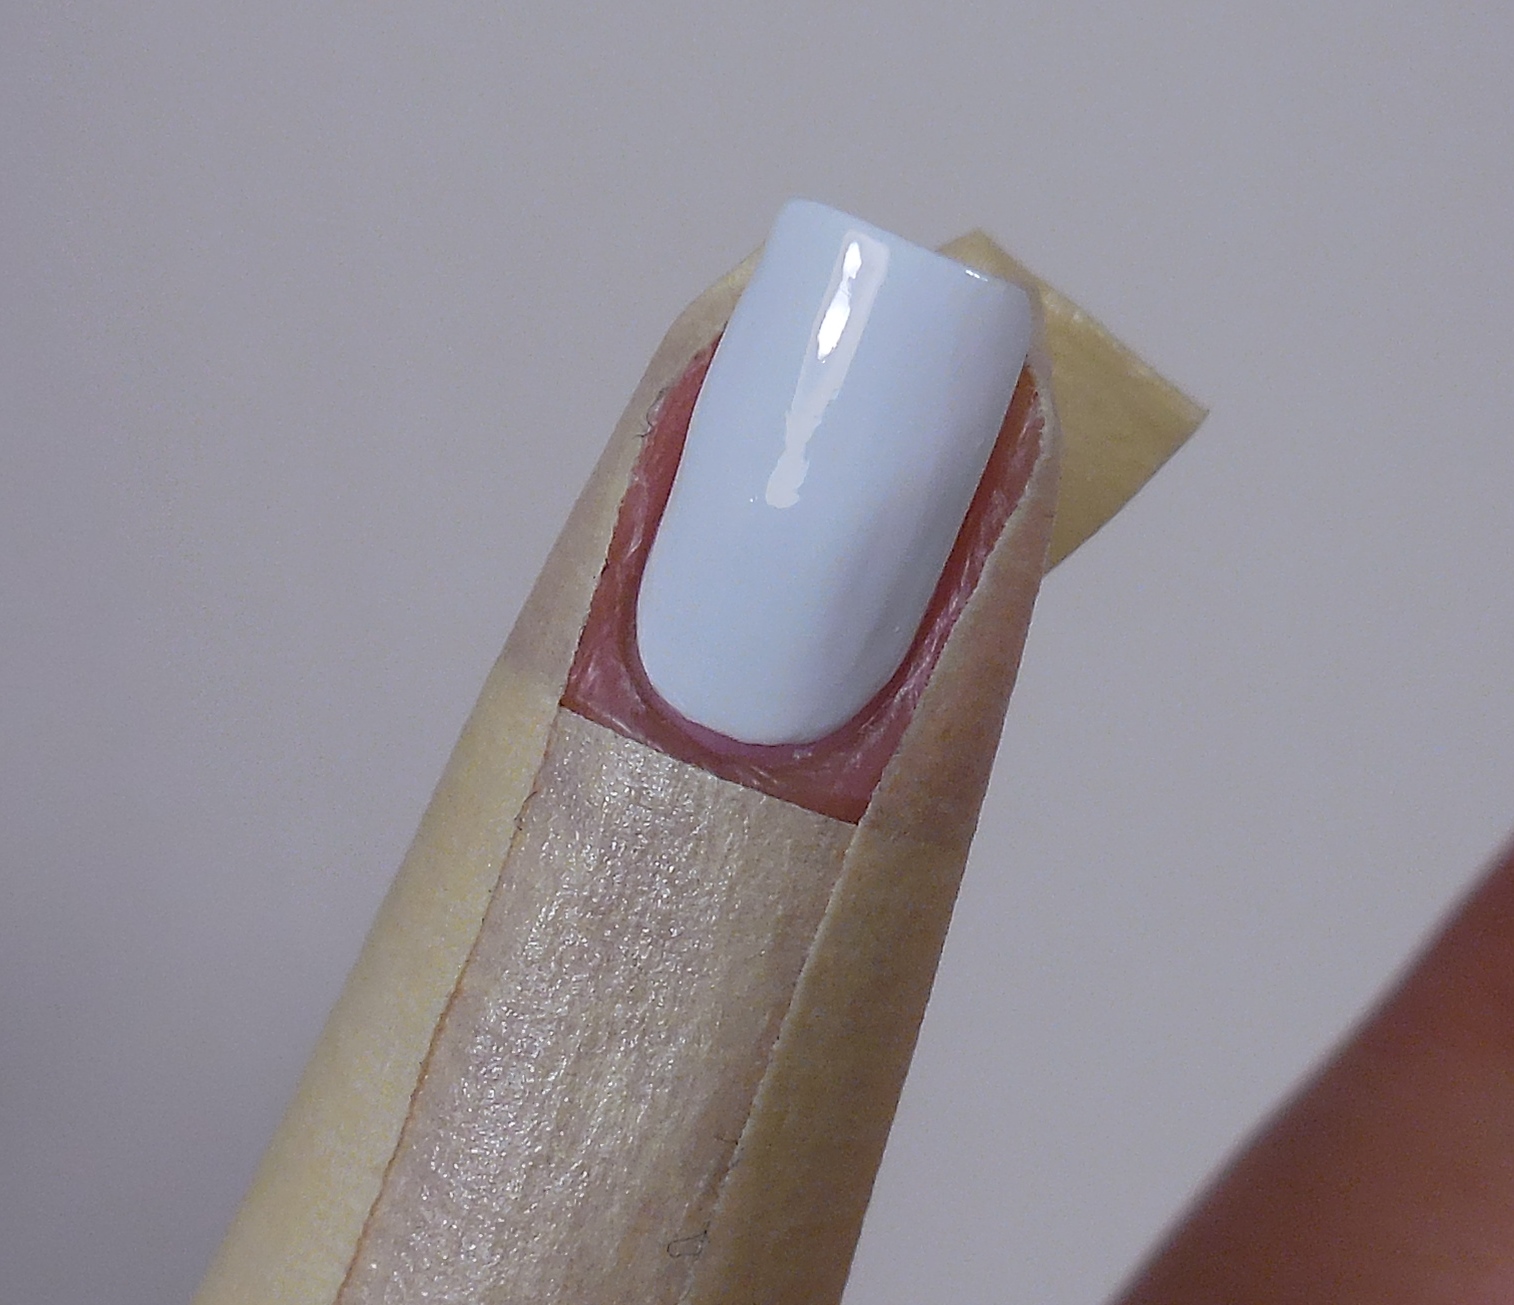
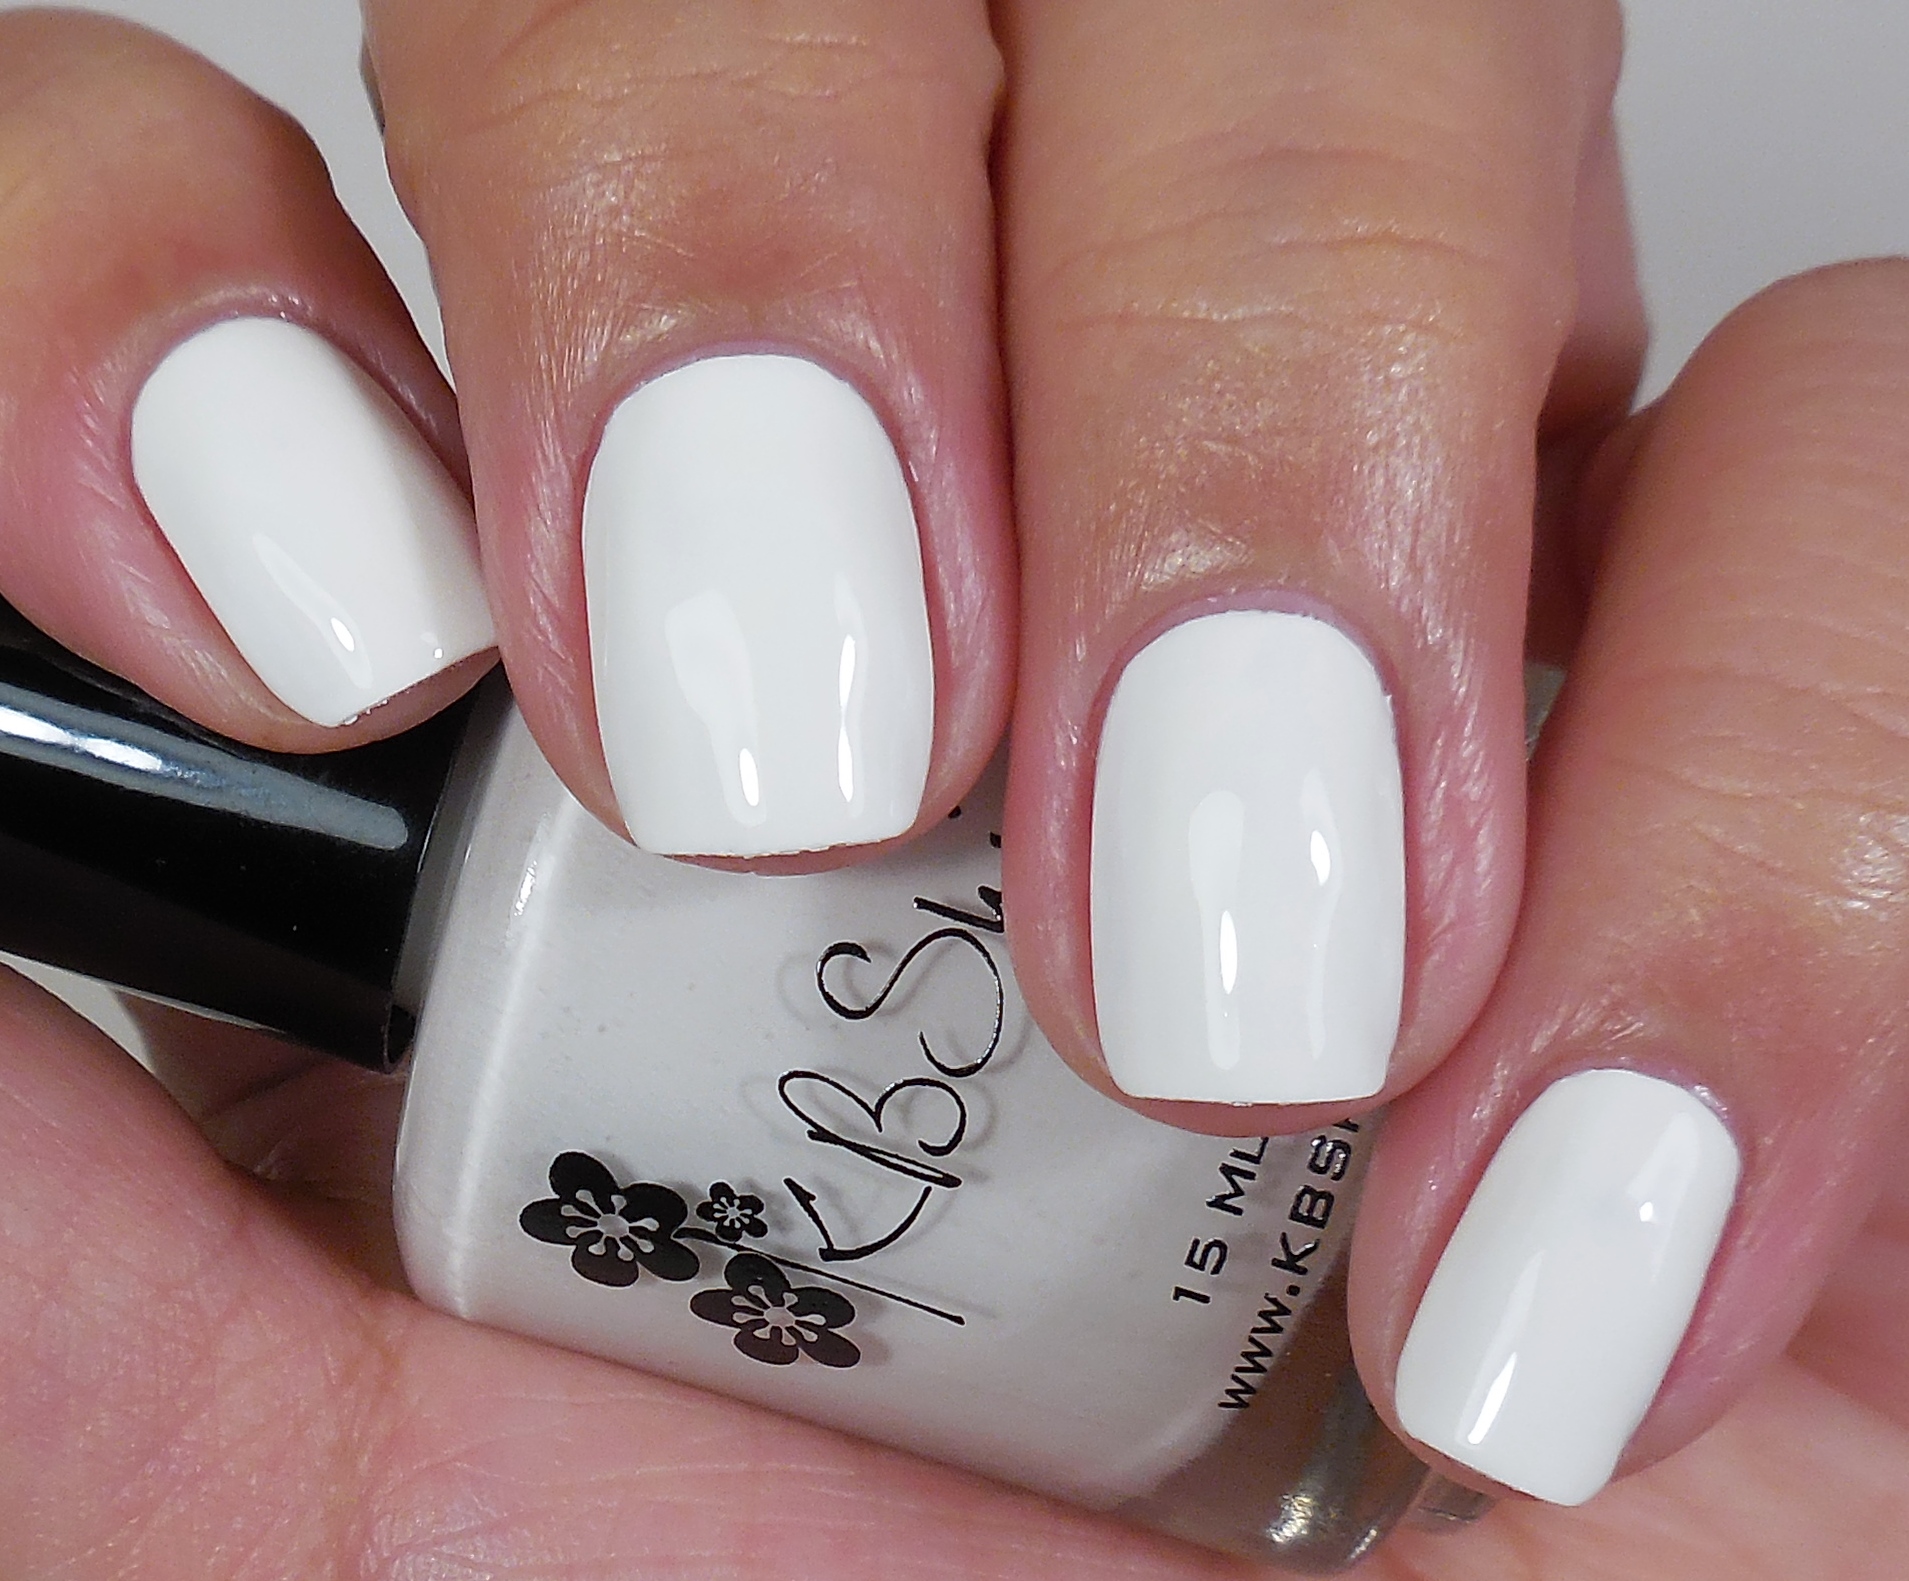
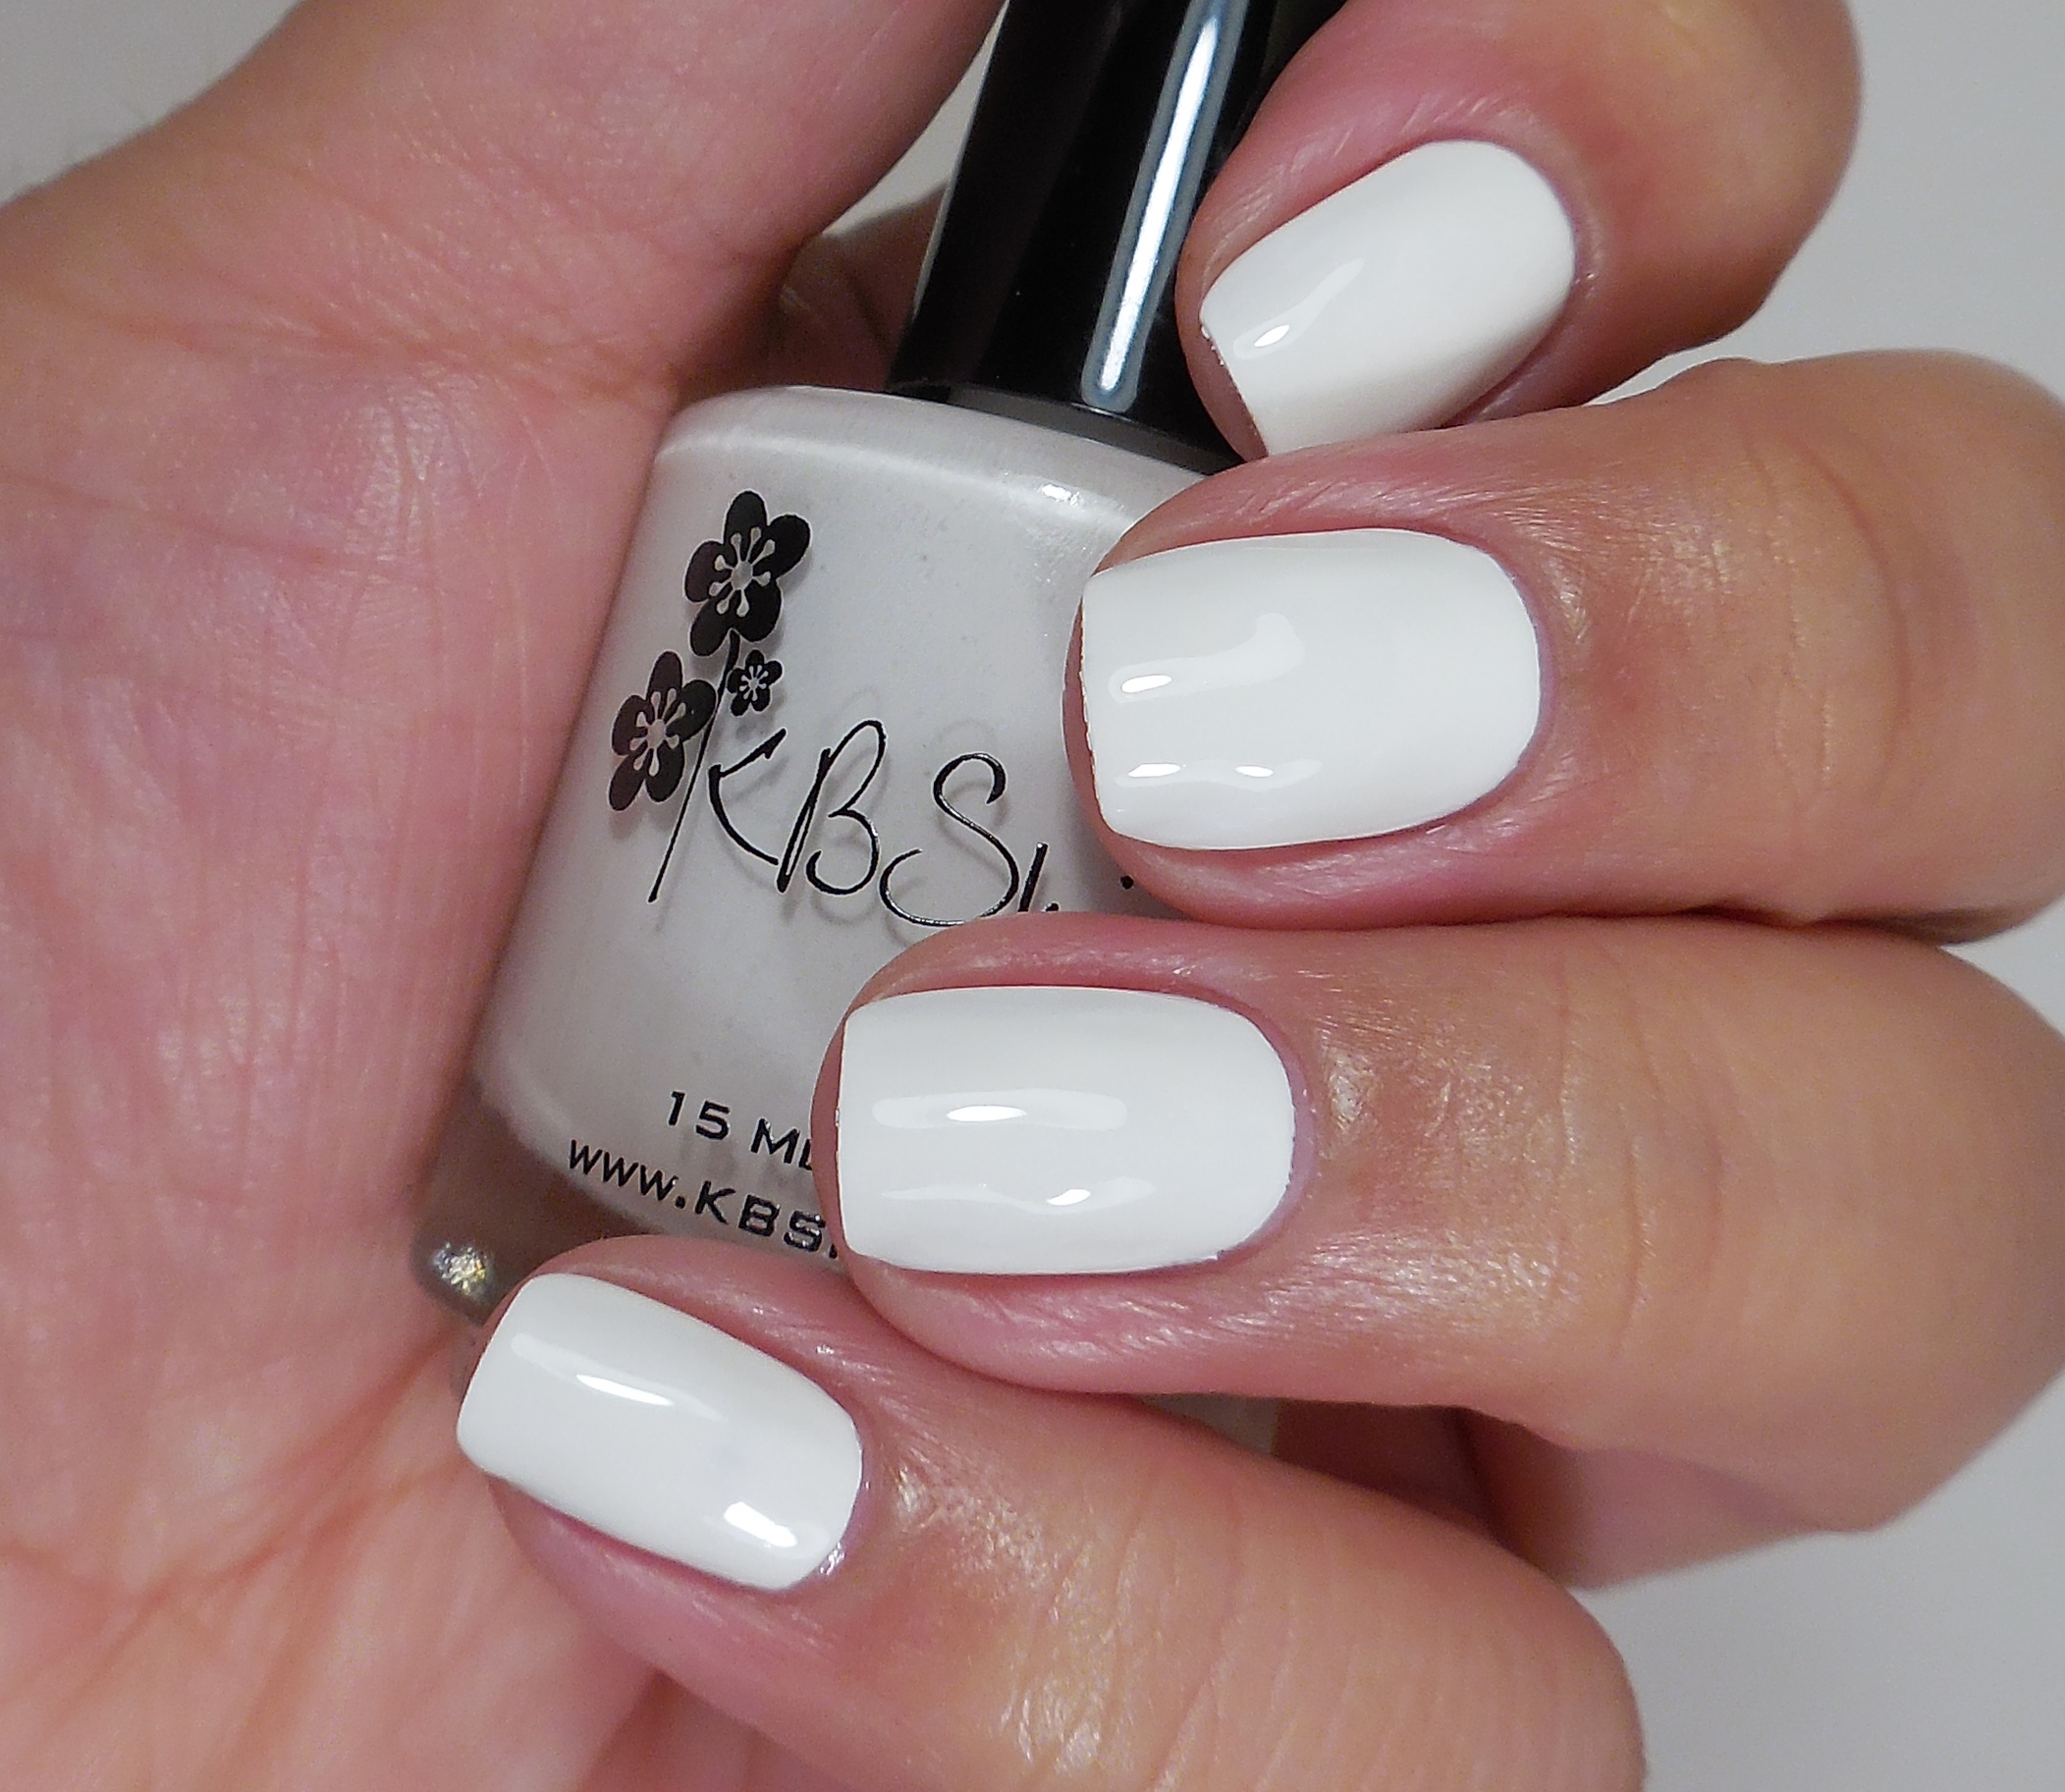
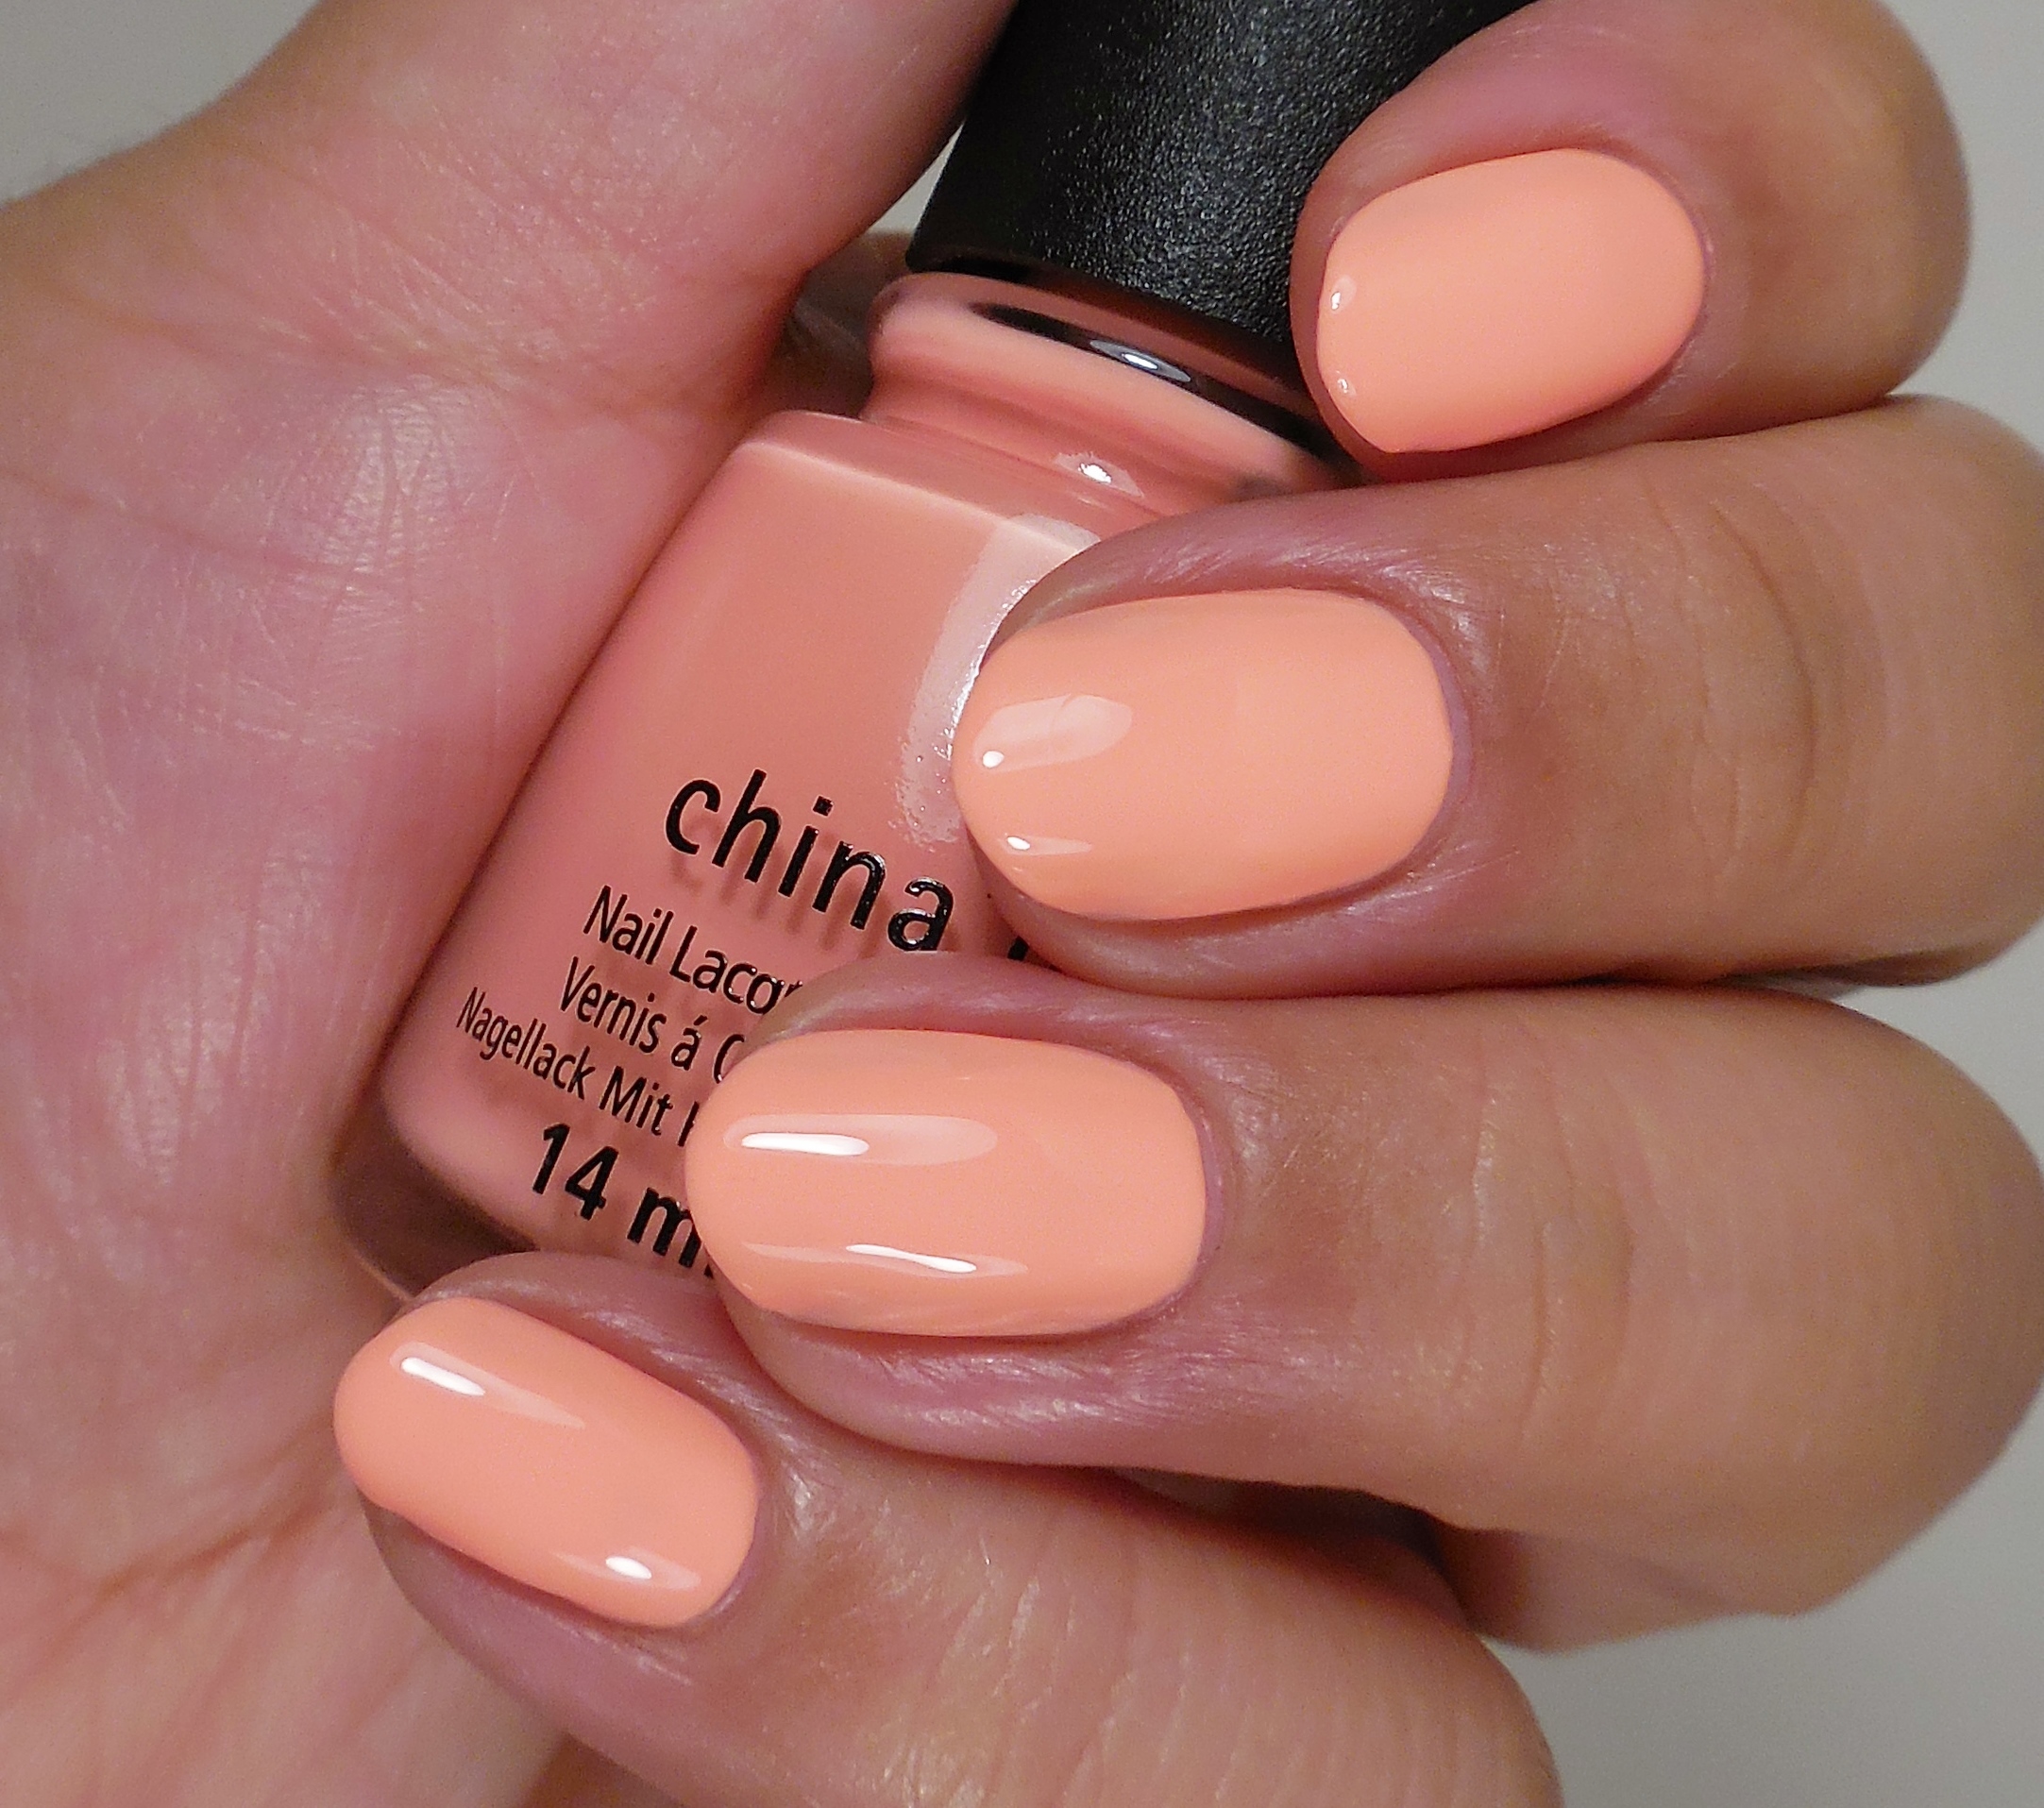
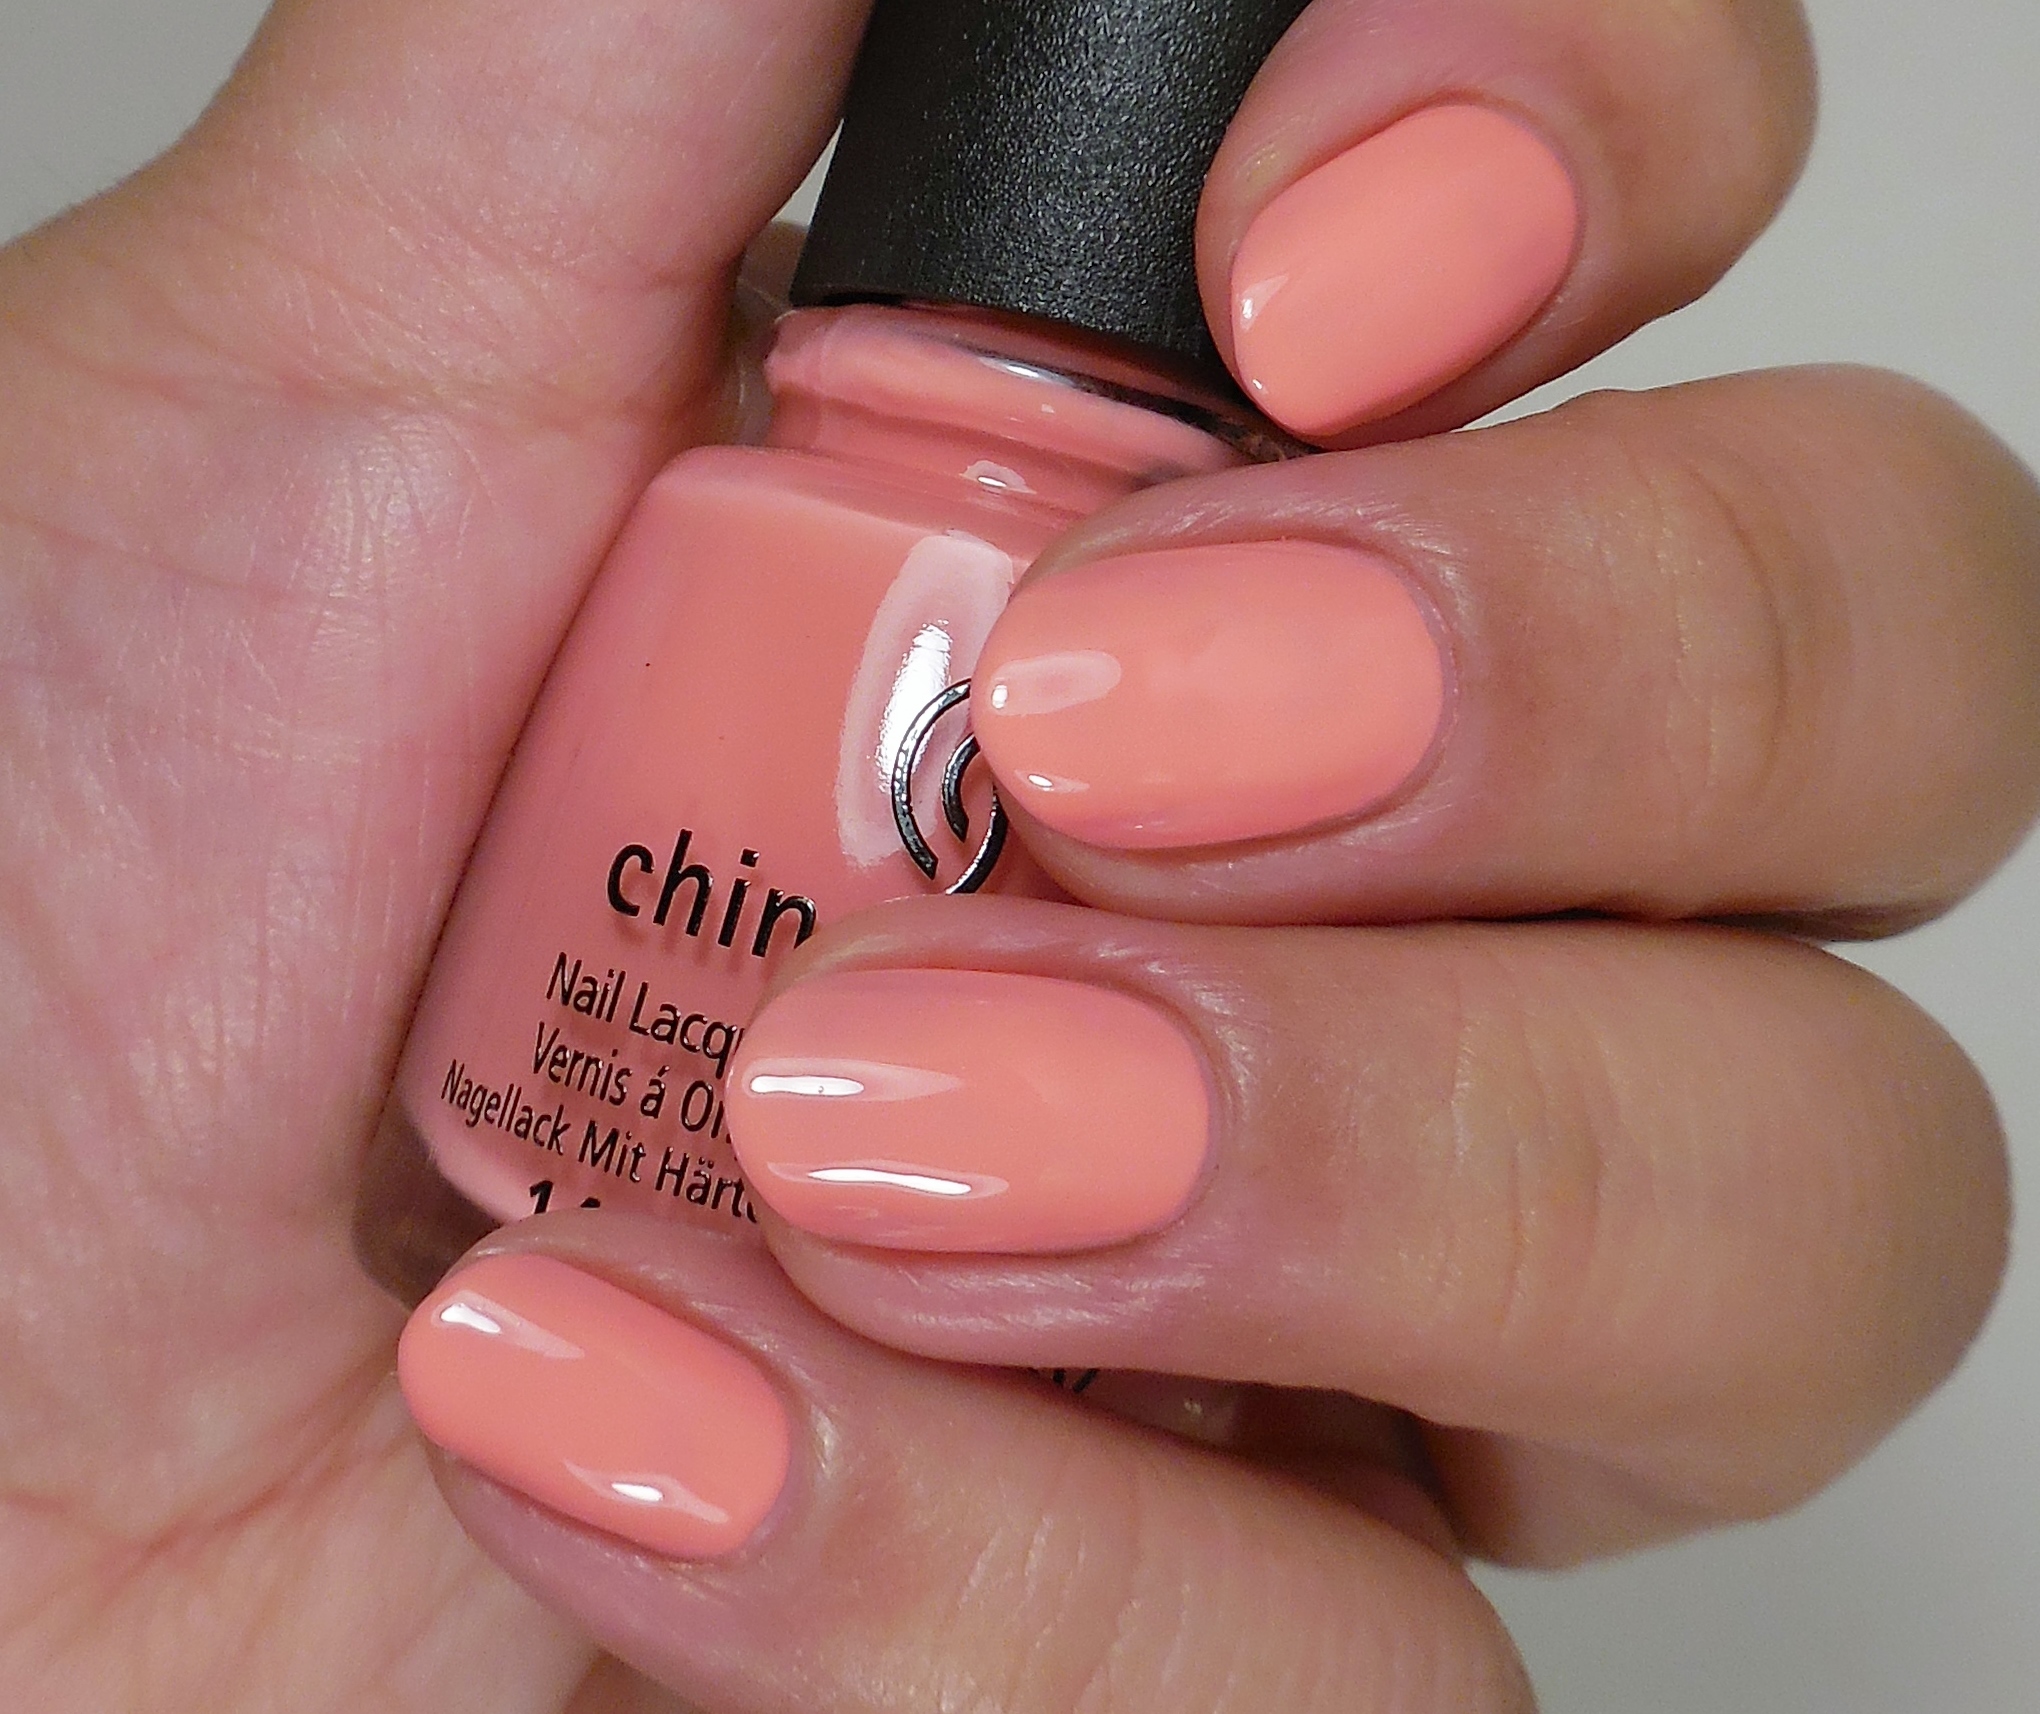
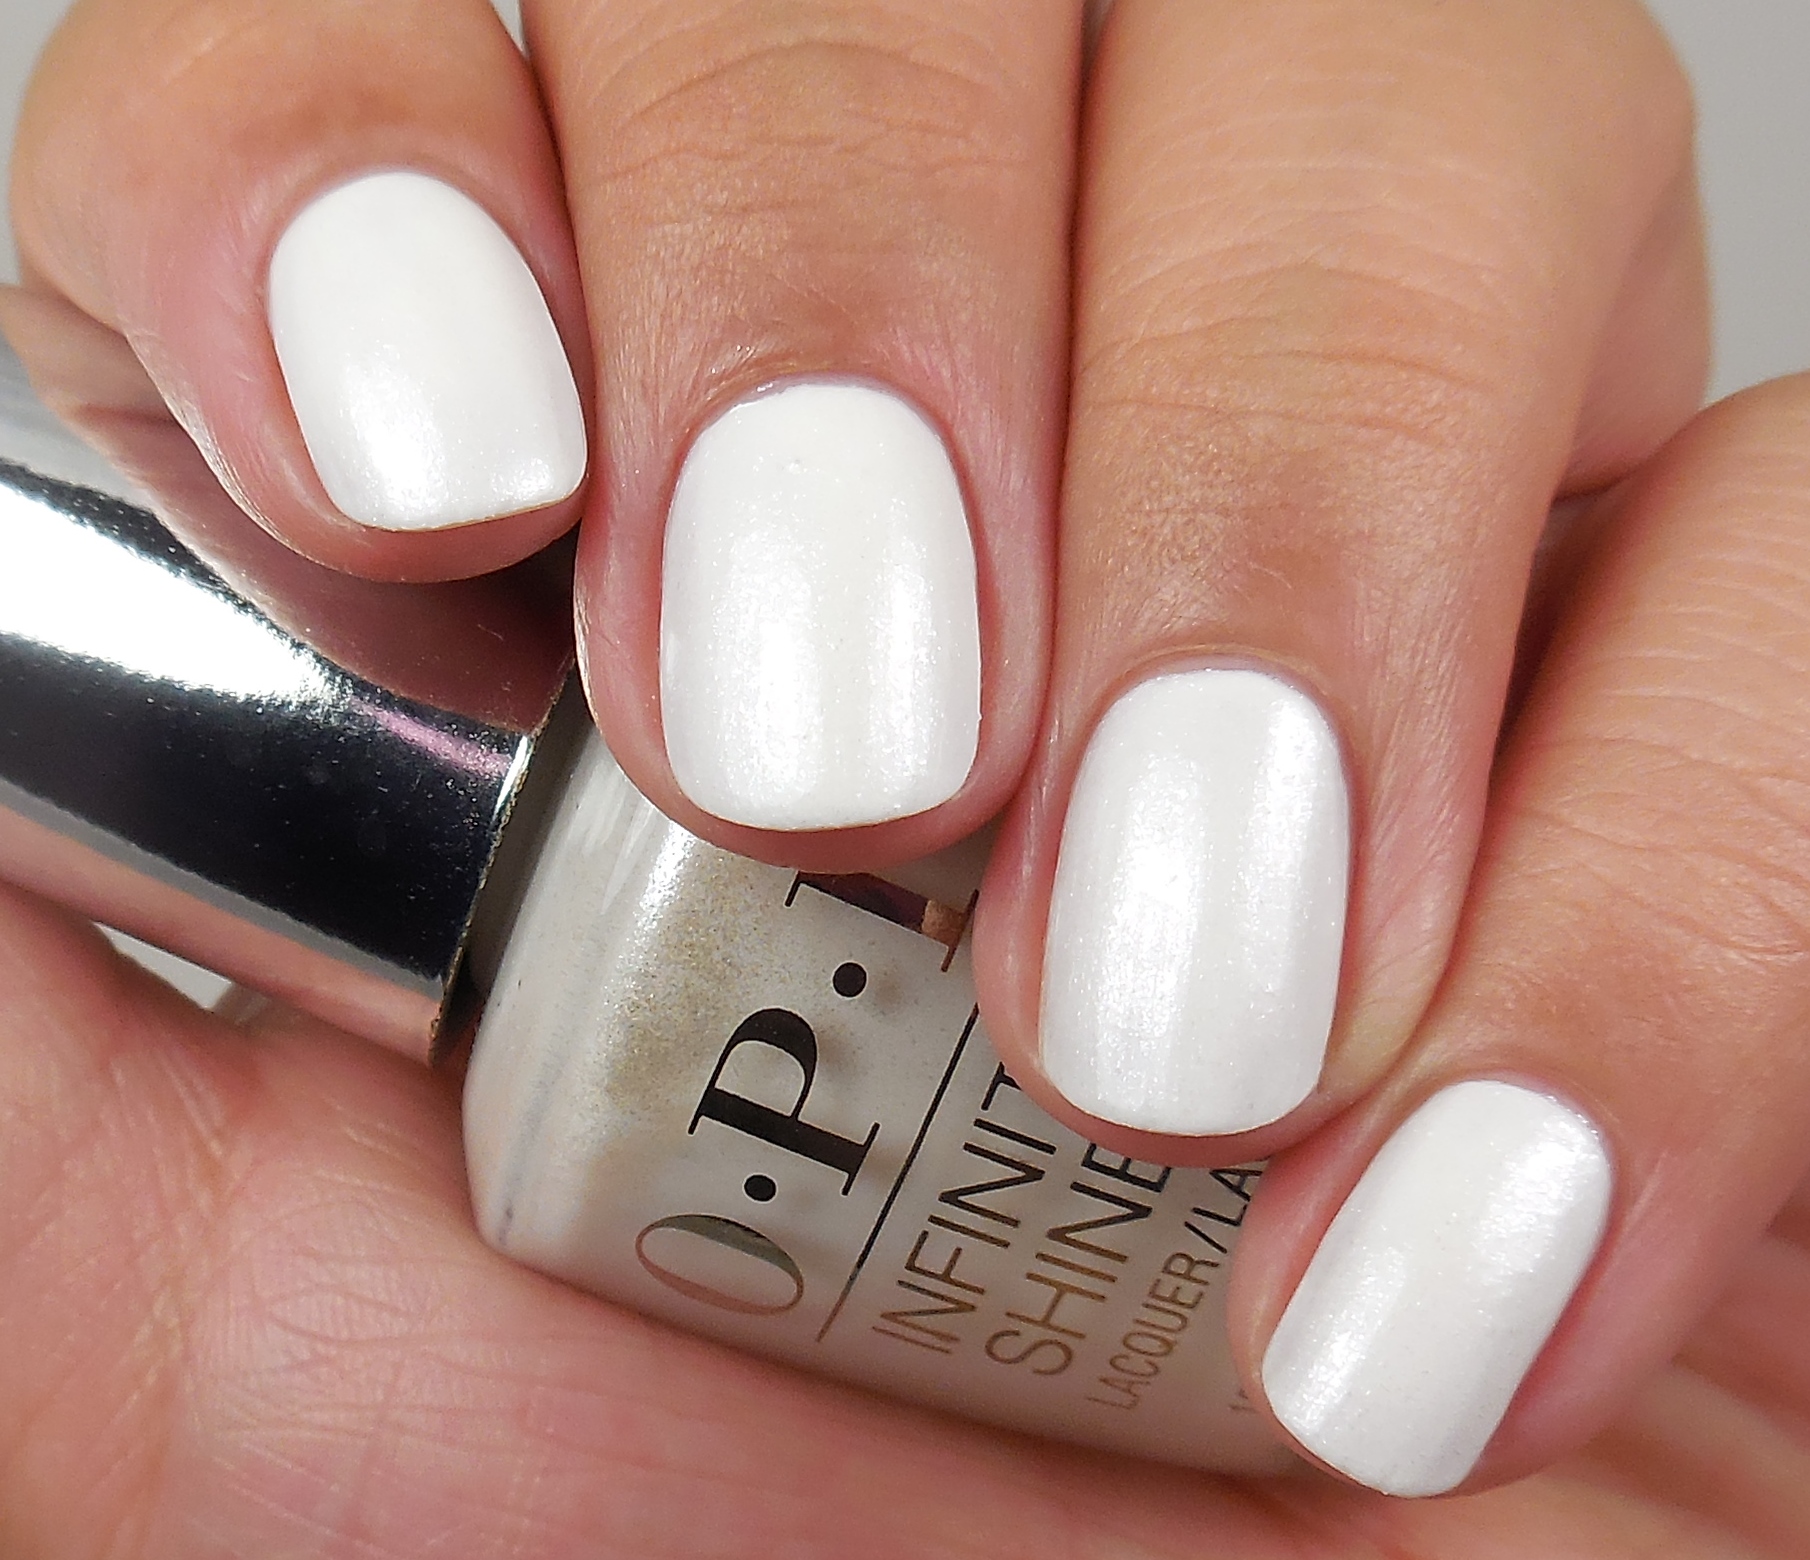
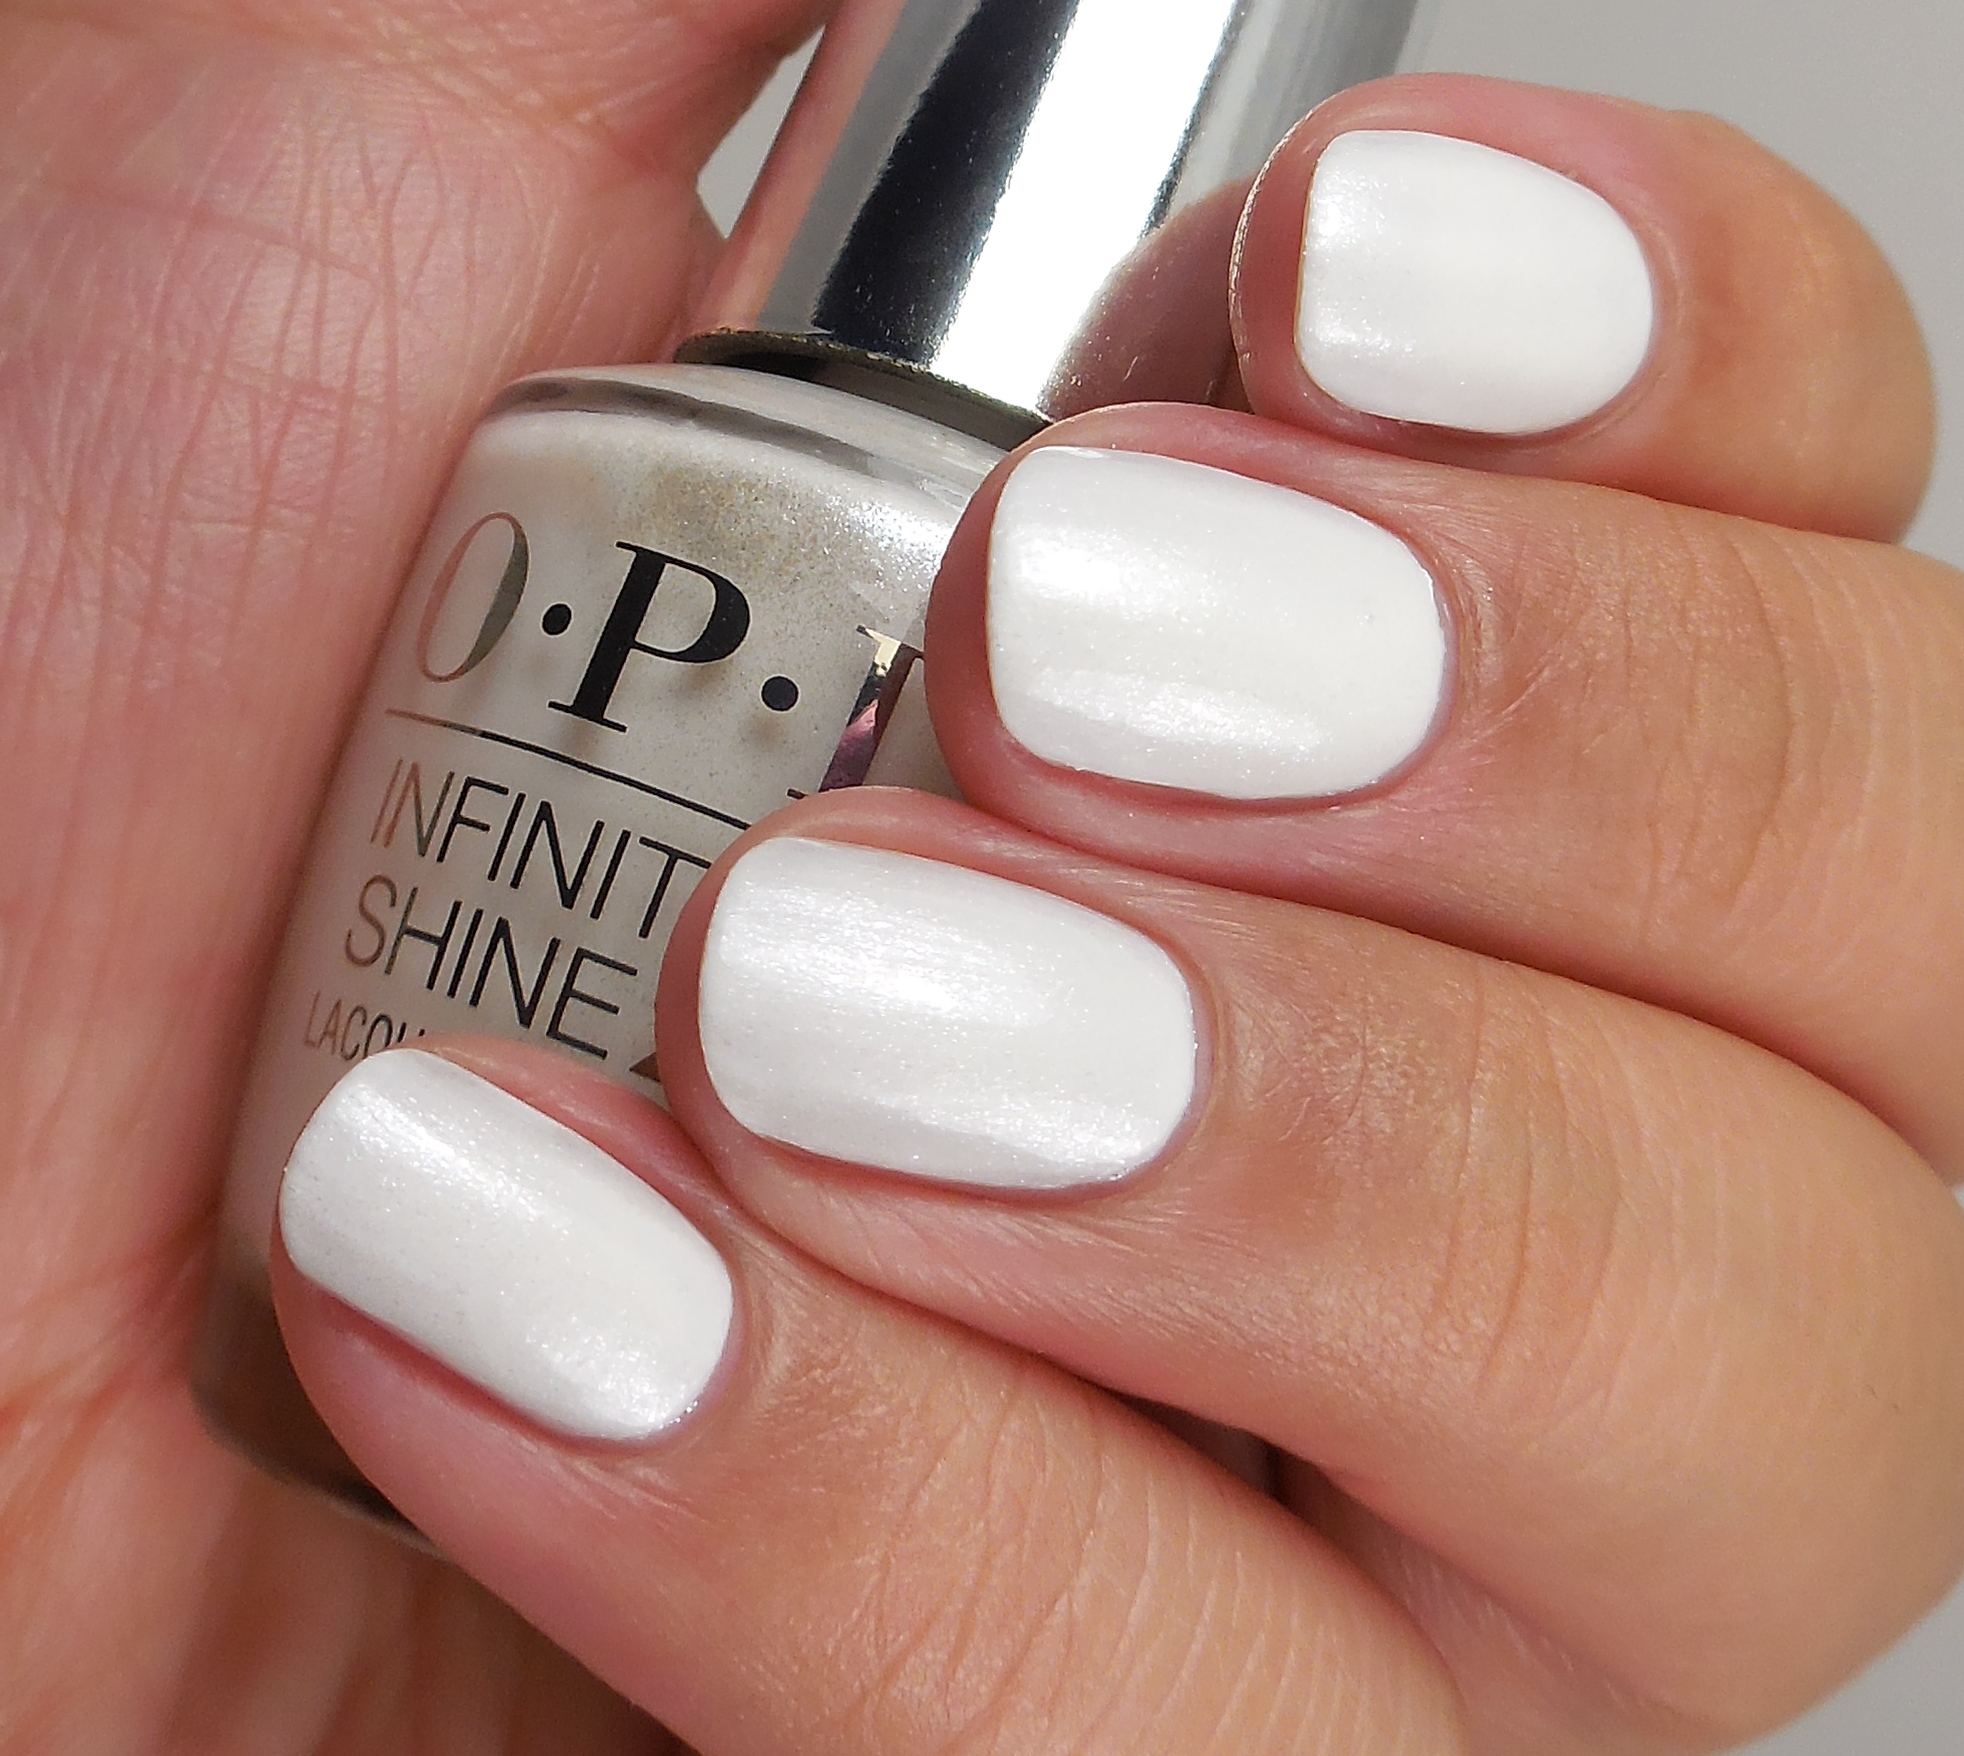
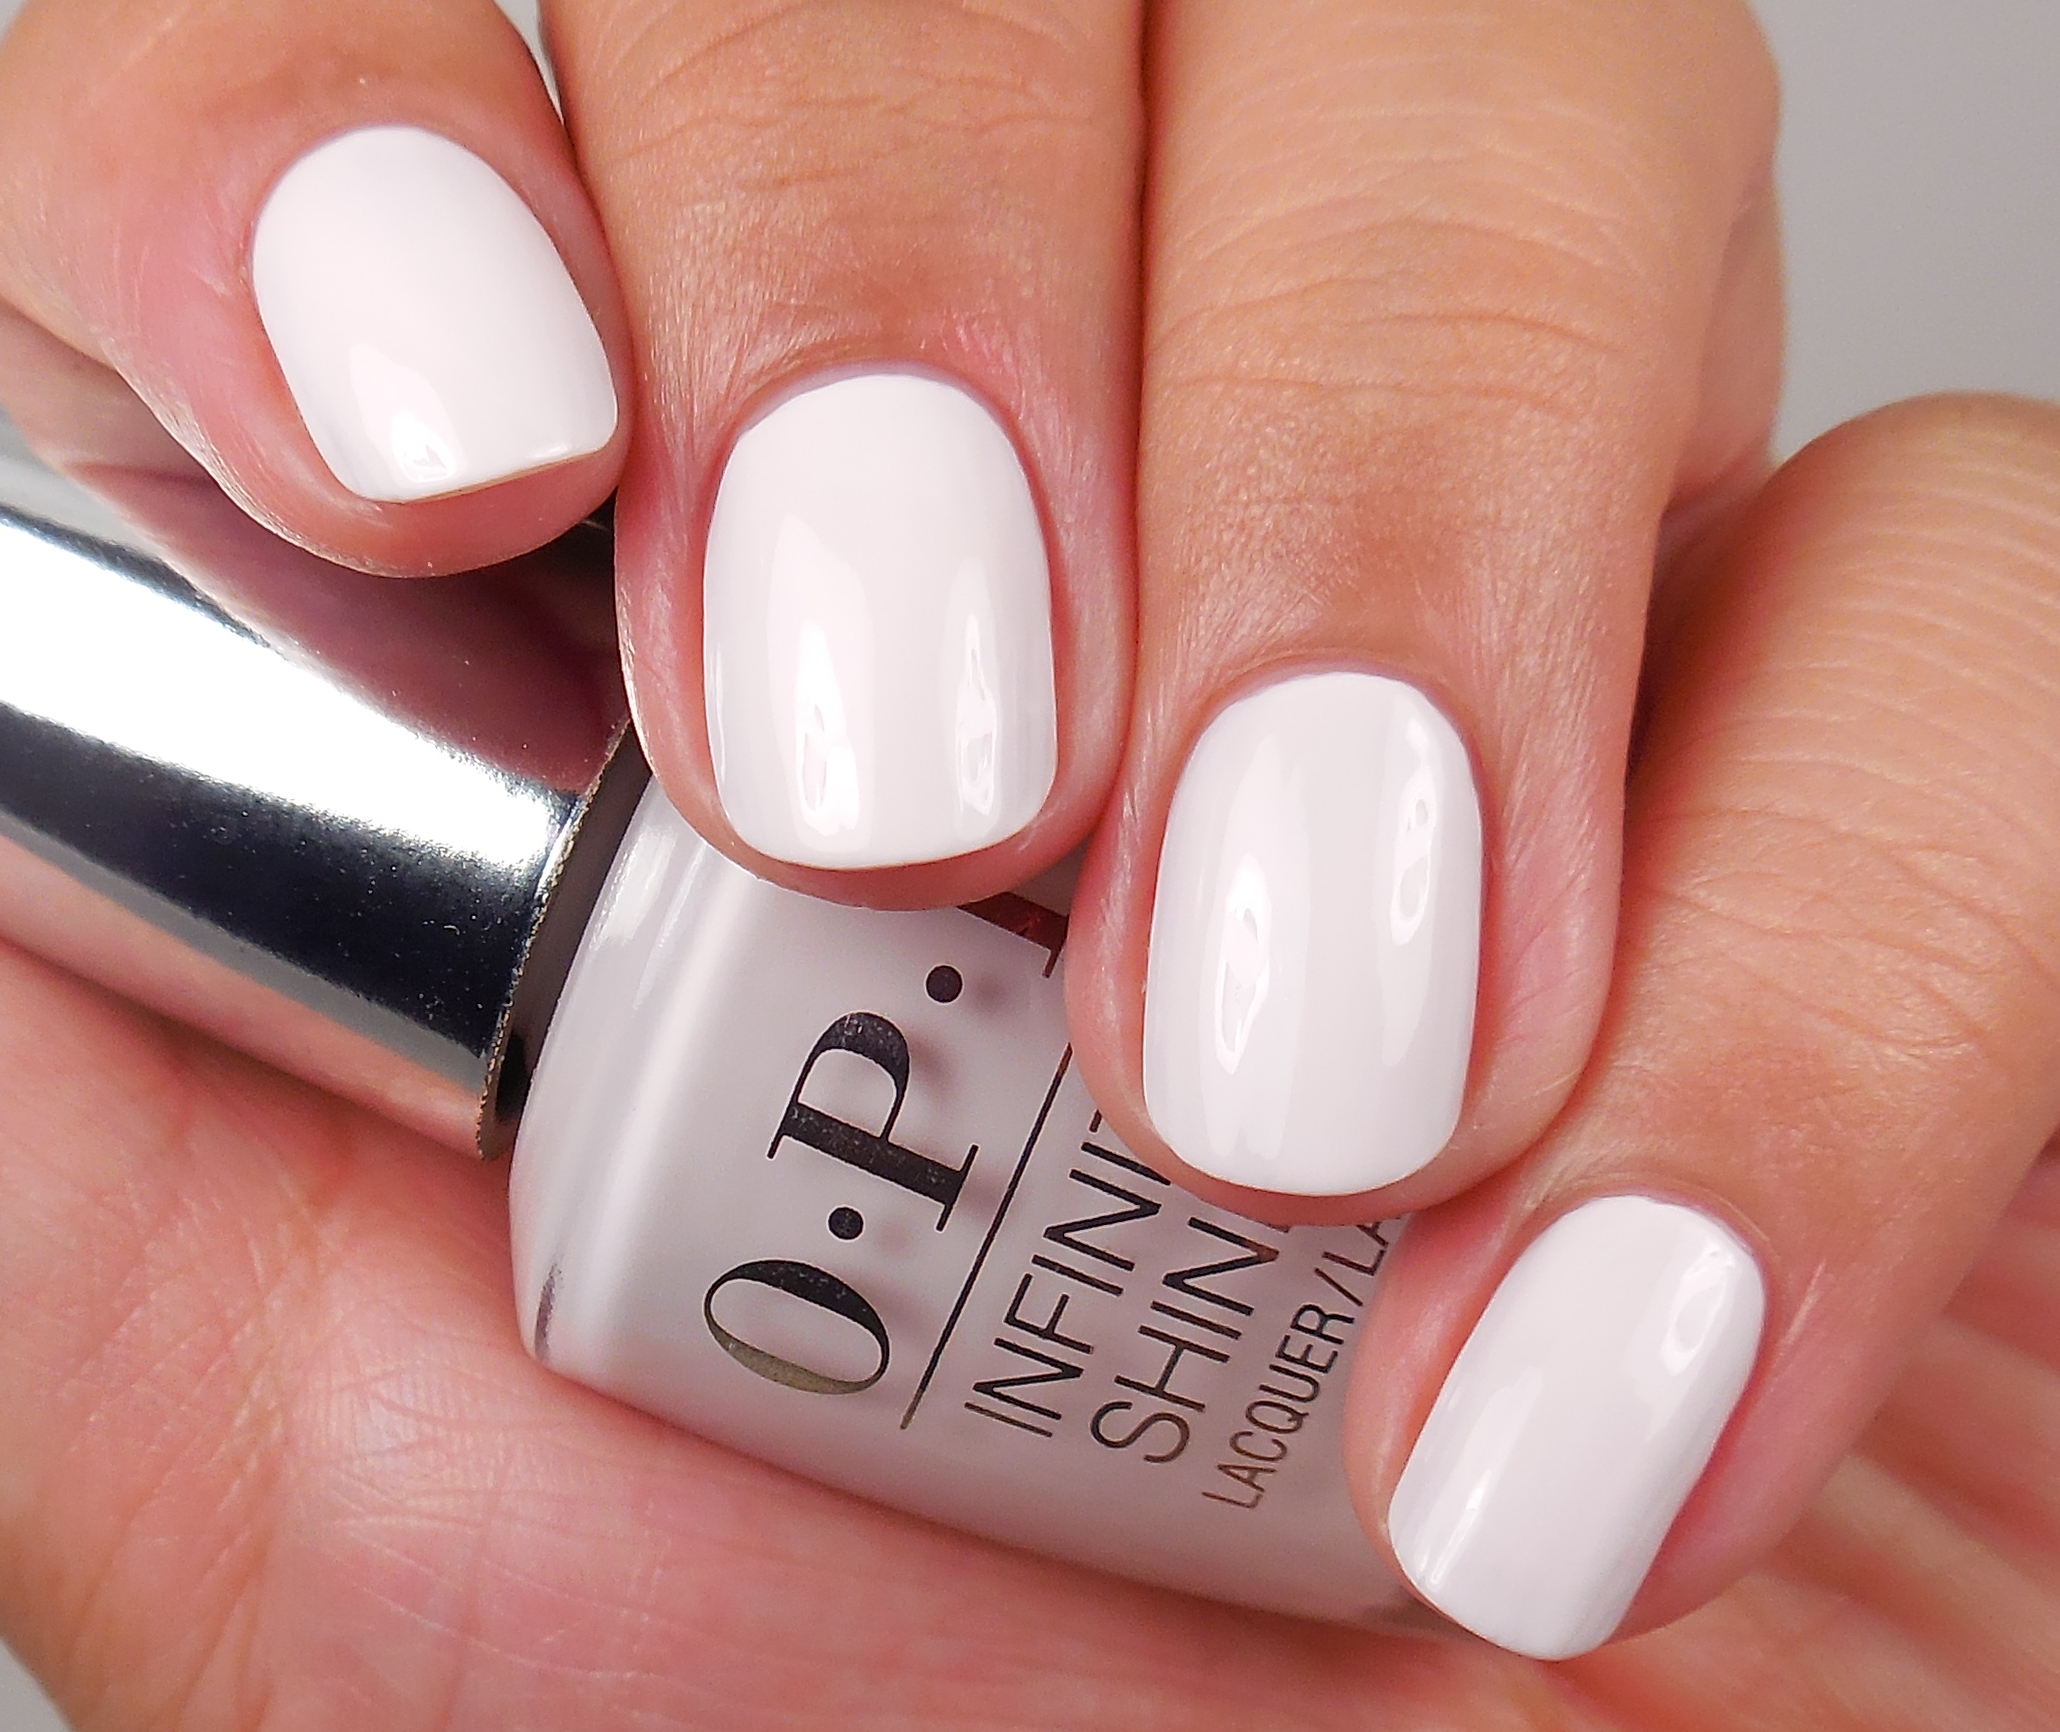
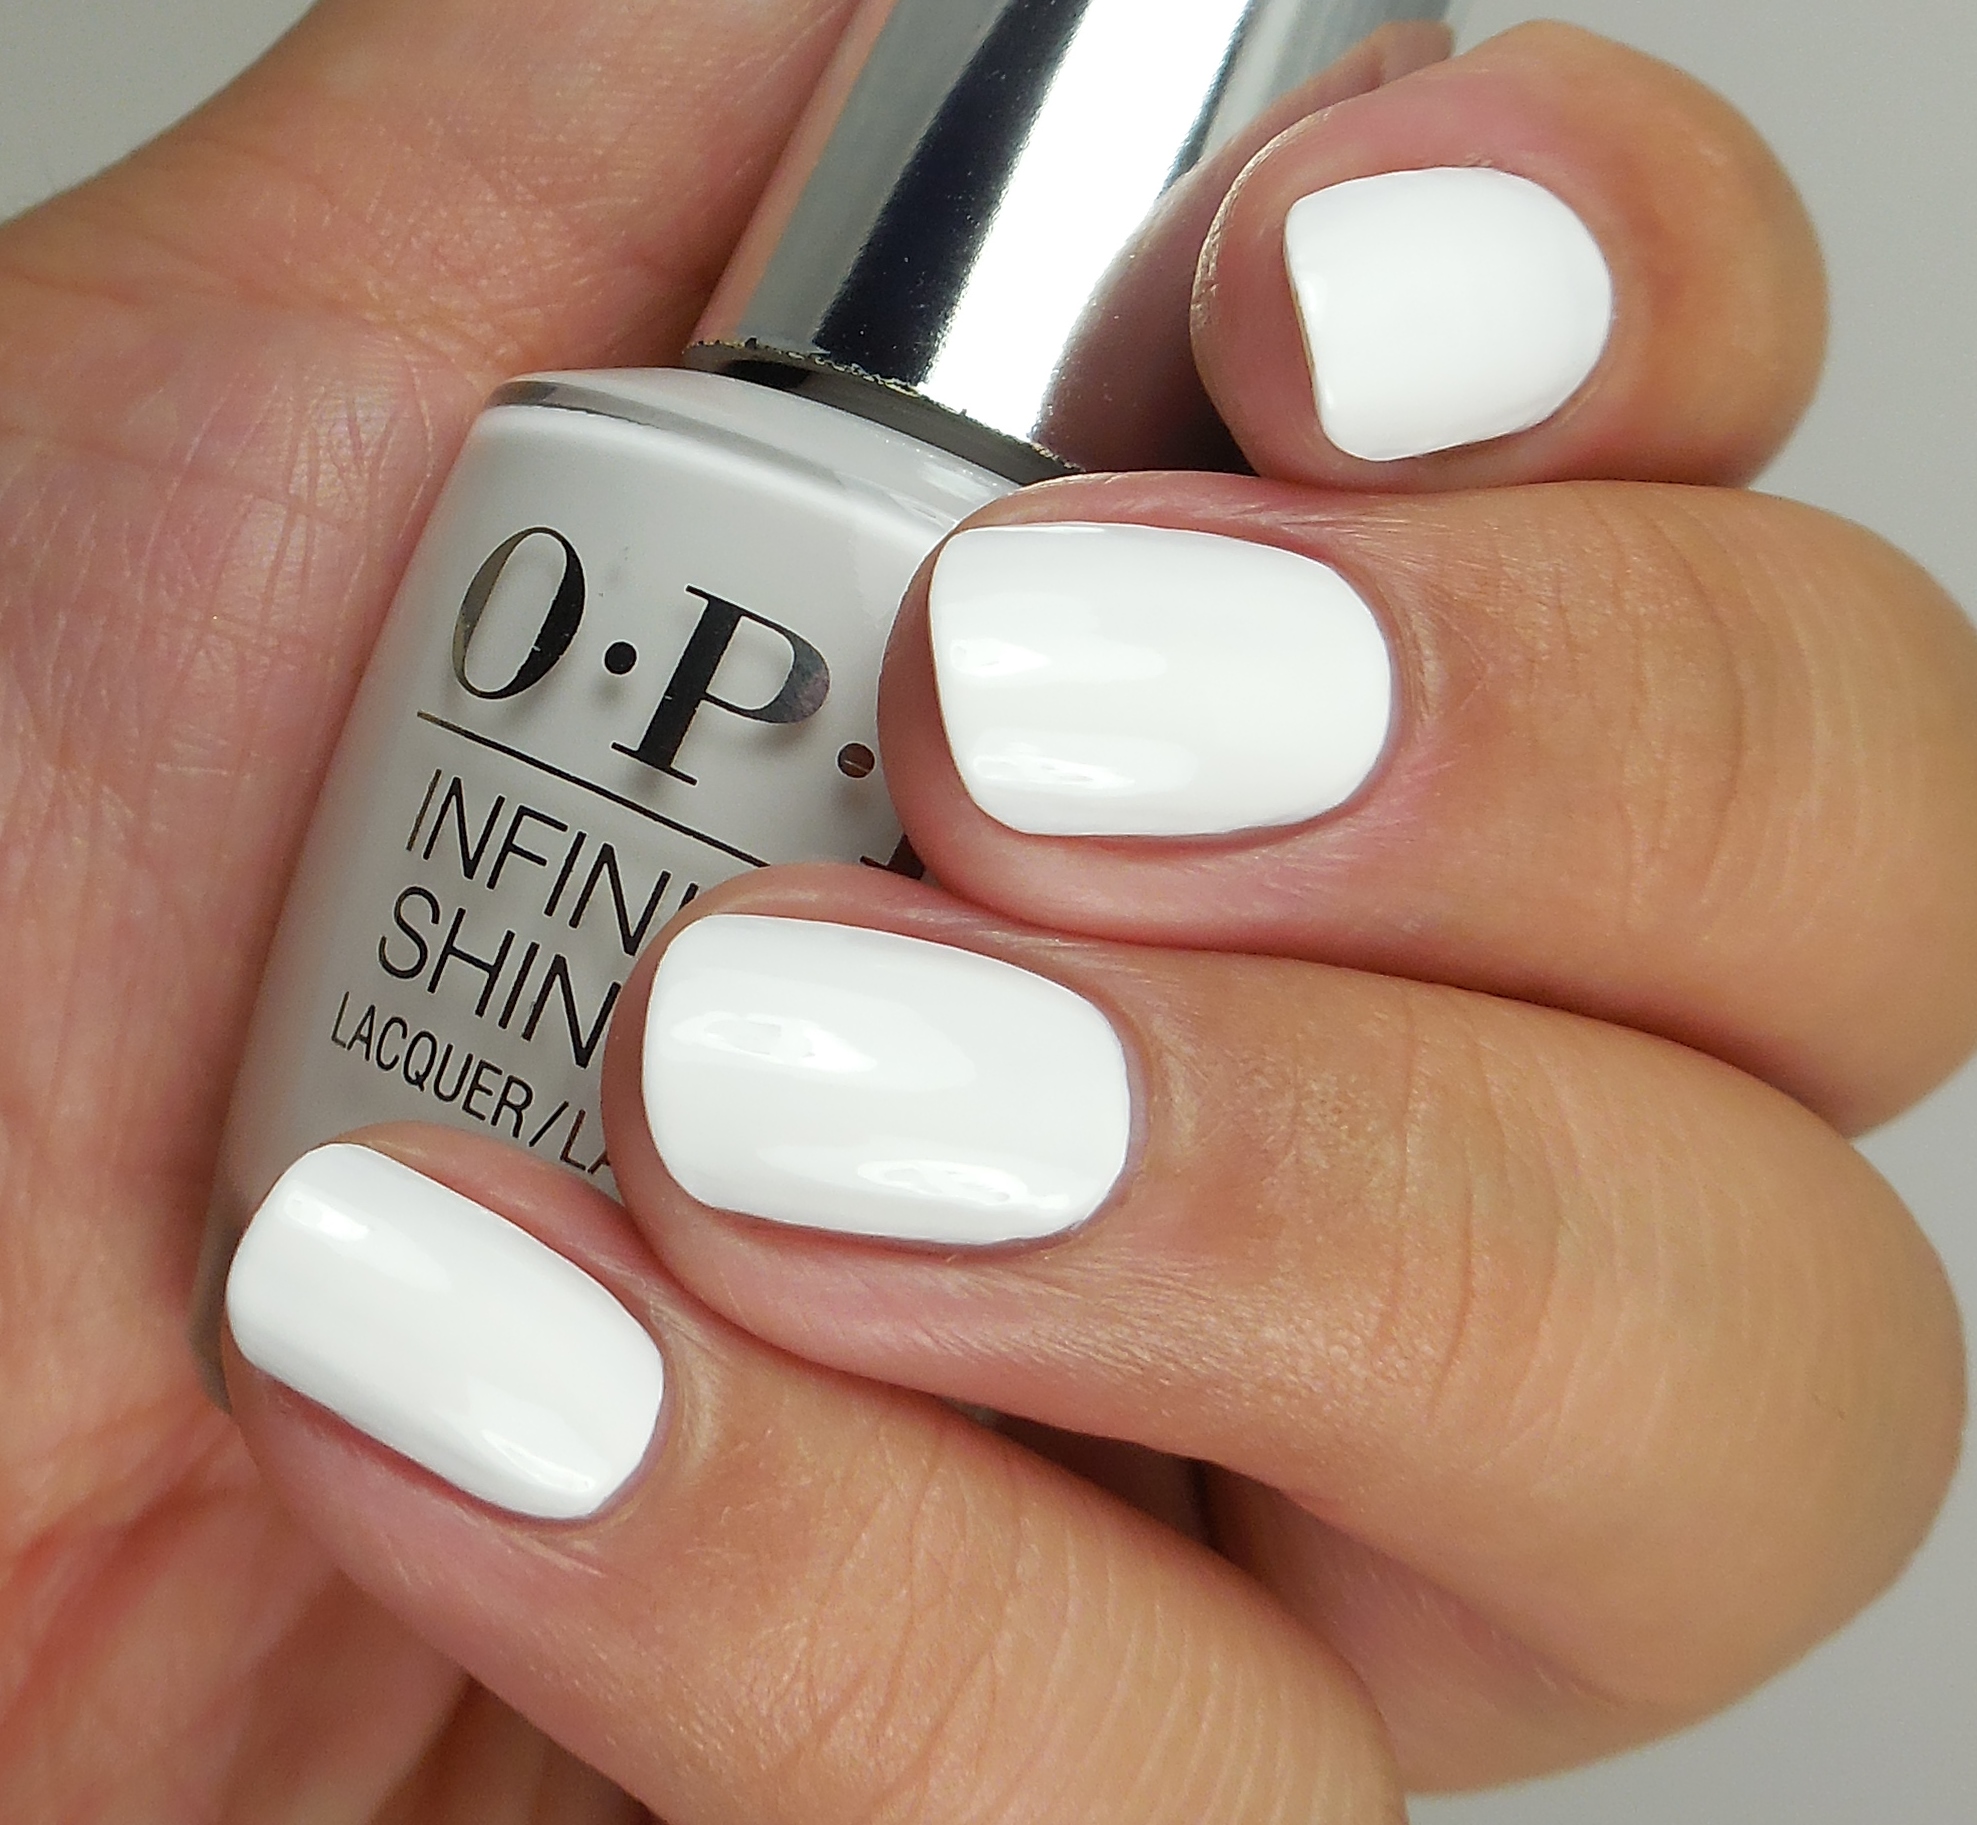
OPI Infinite Shine Non-Stop White

56
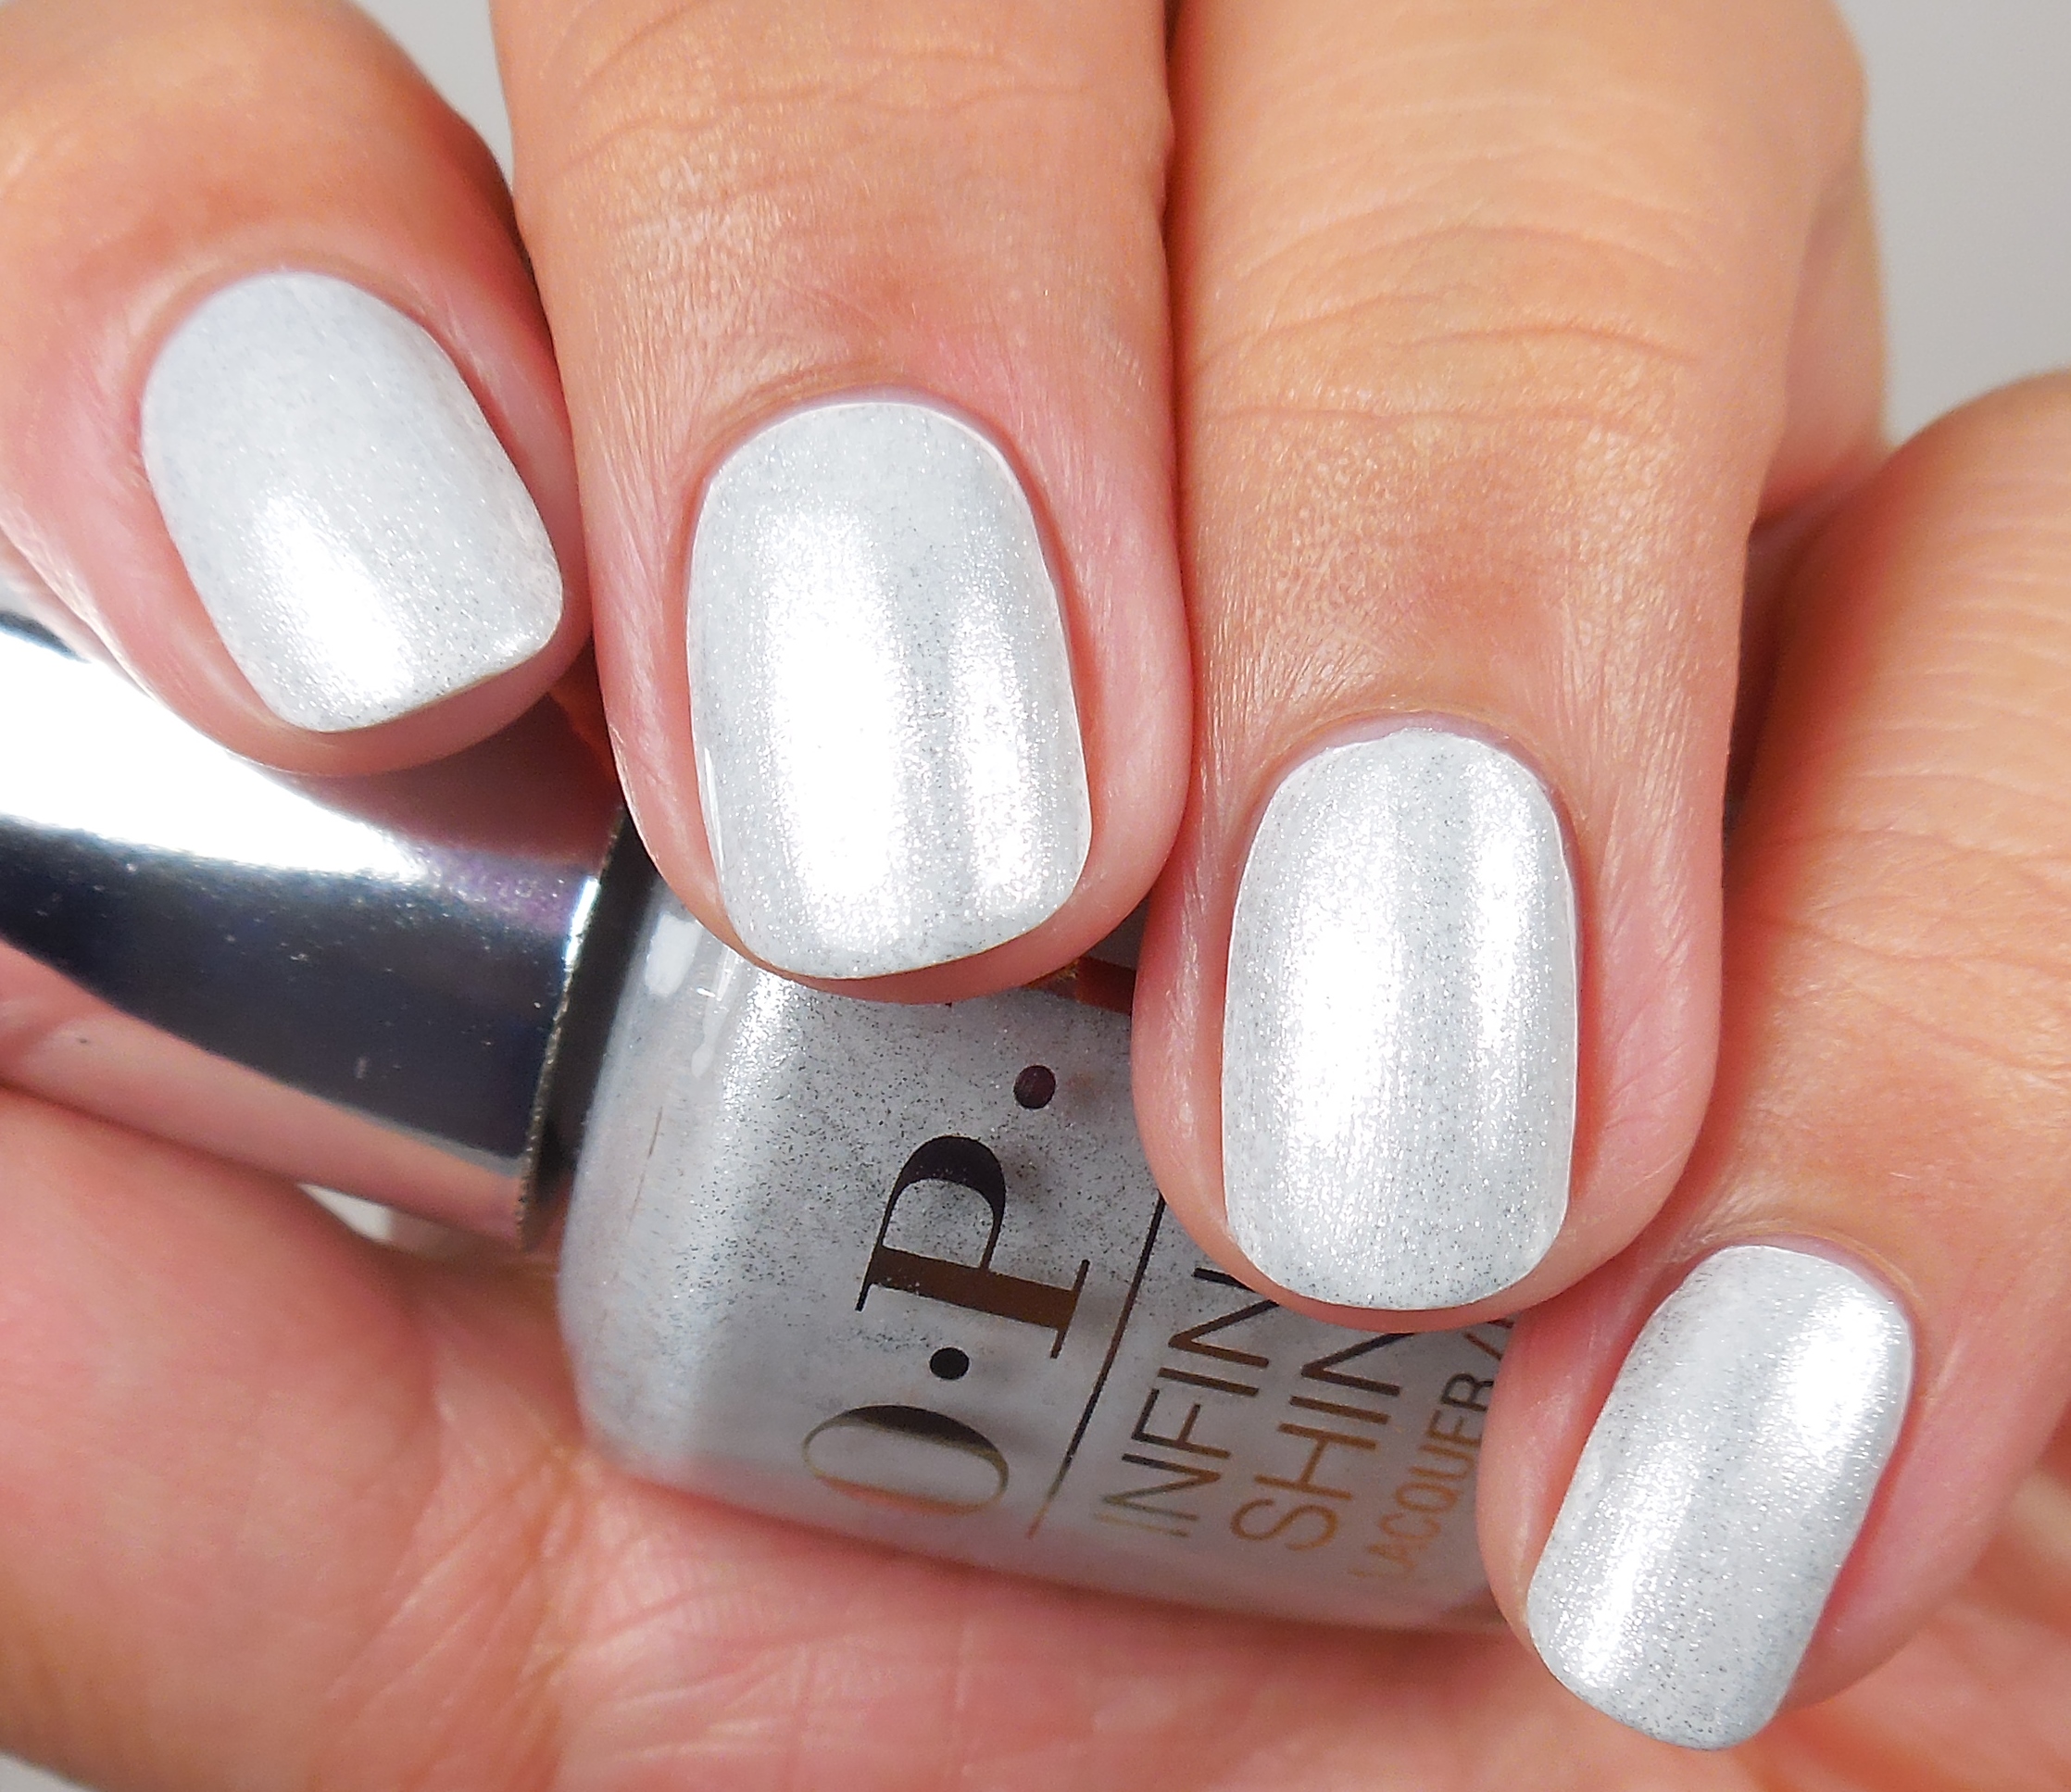
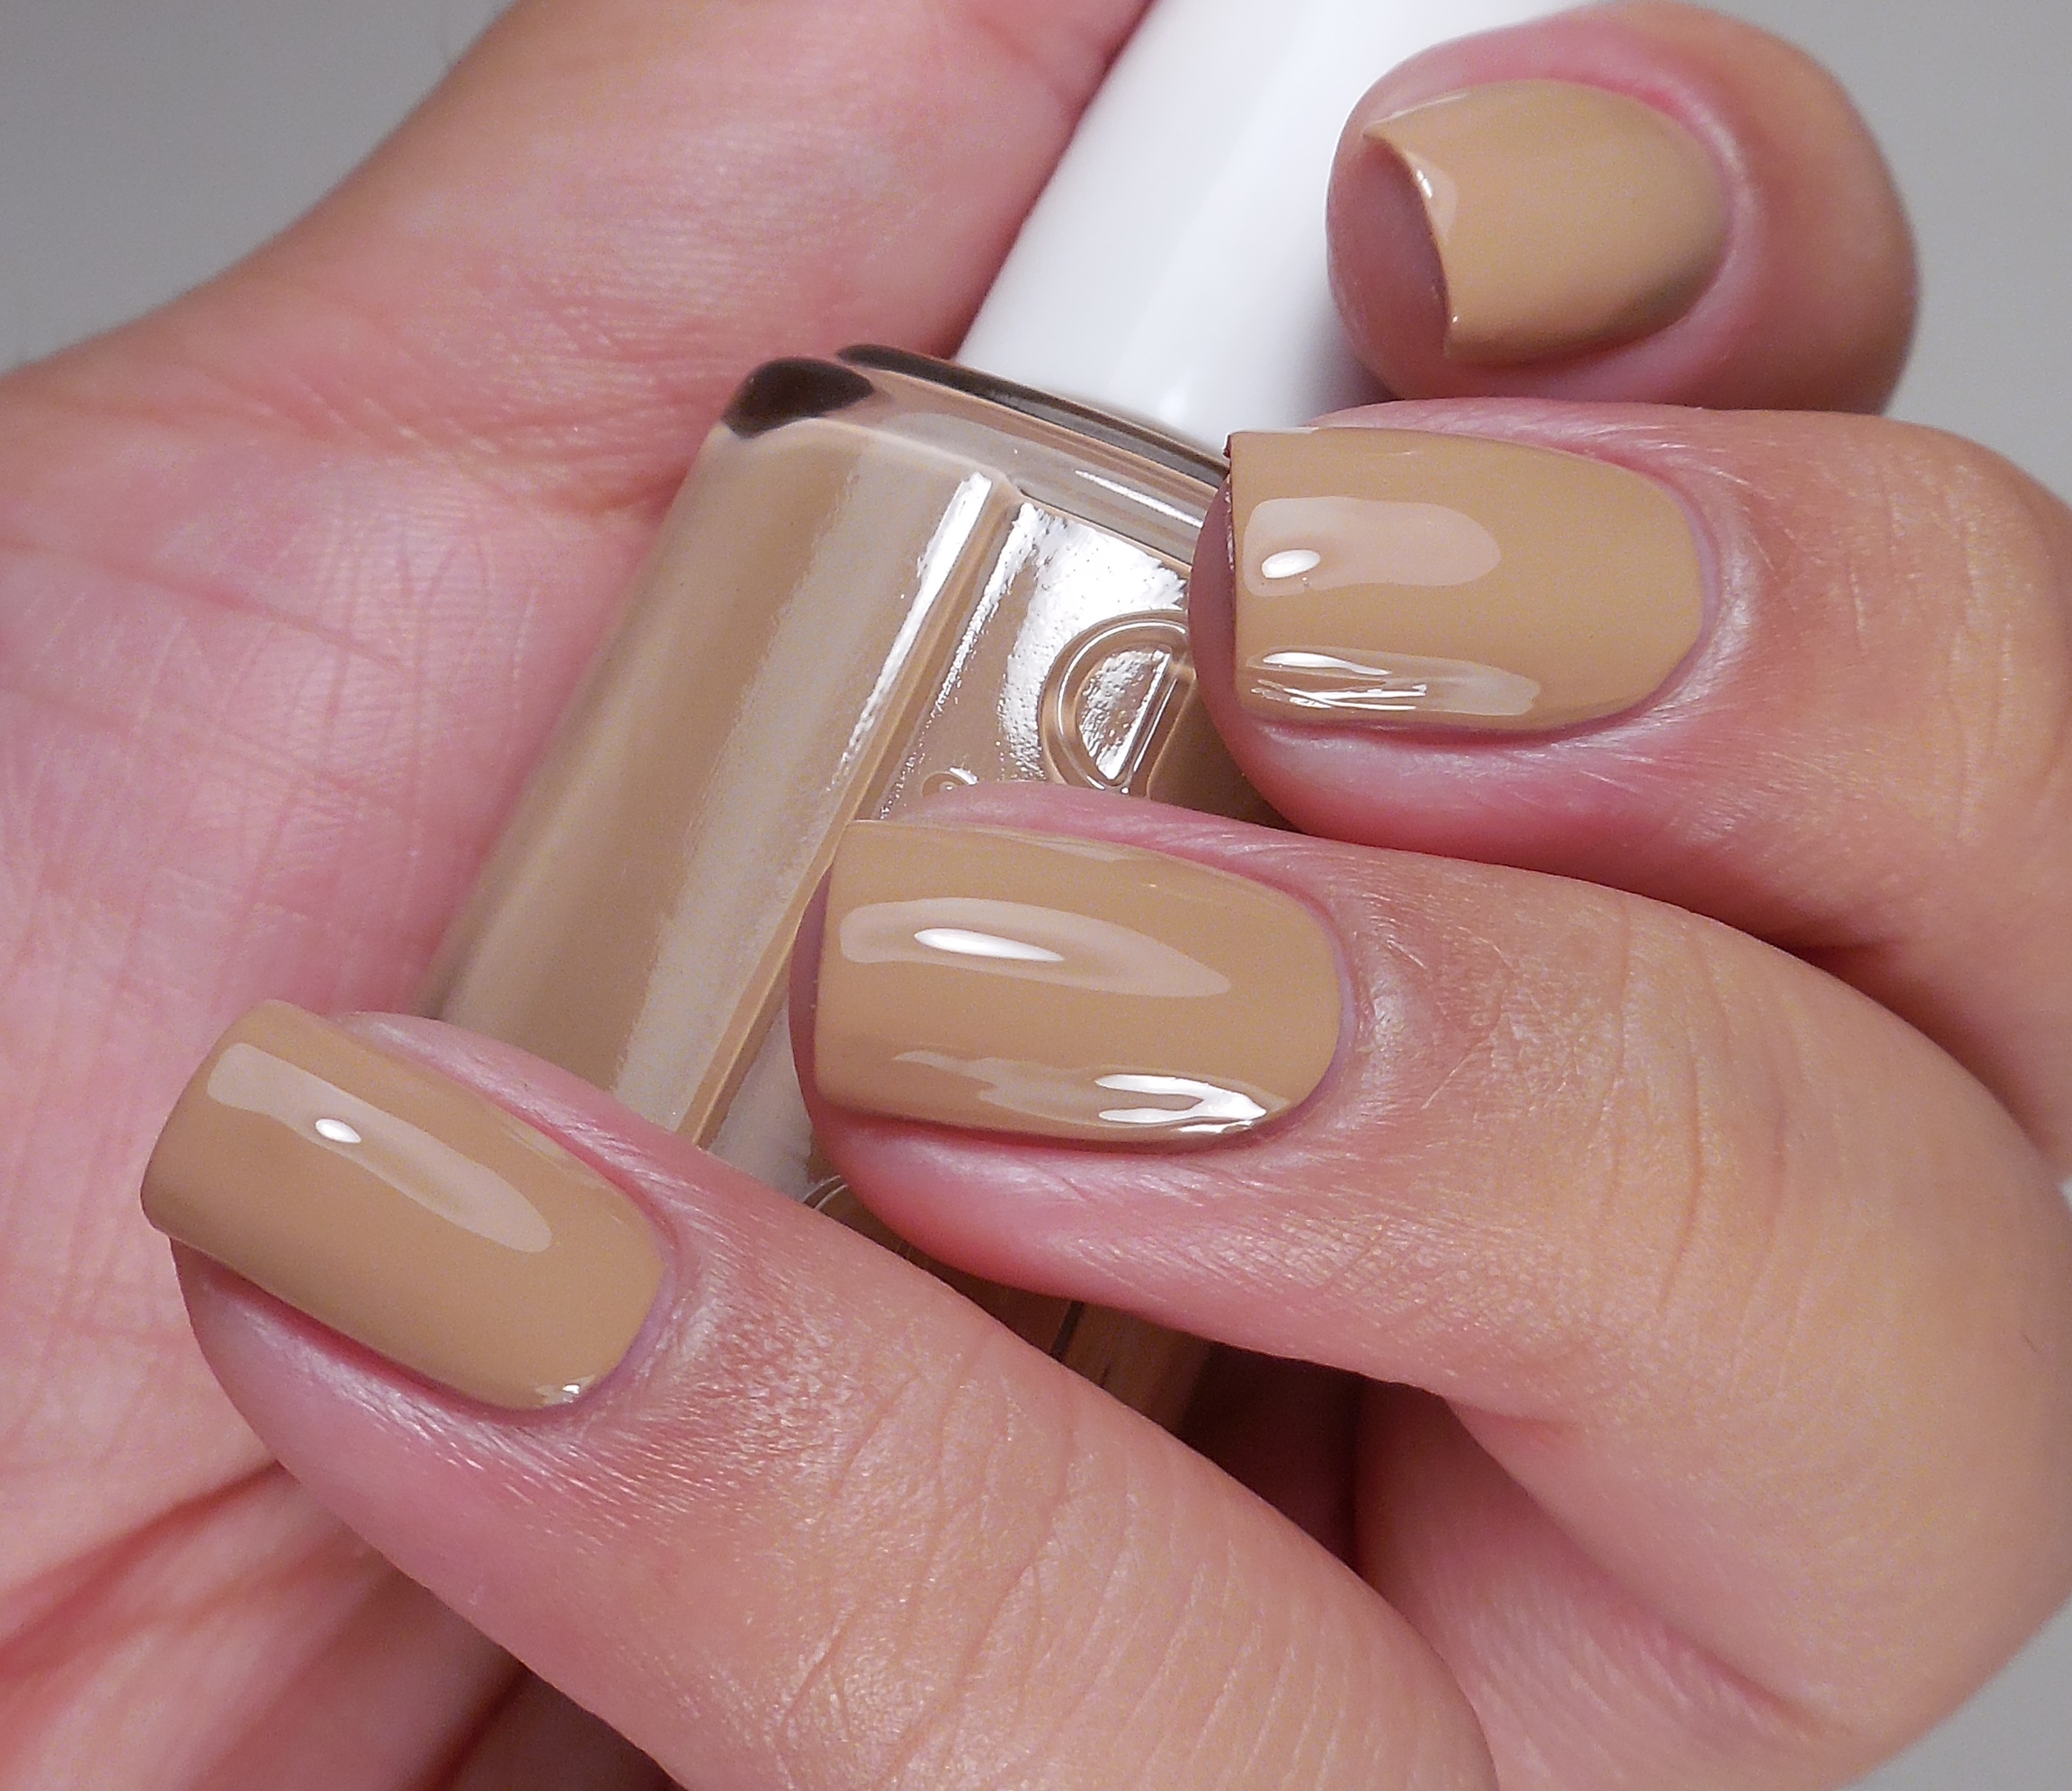
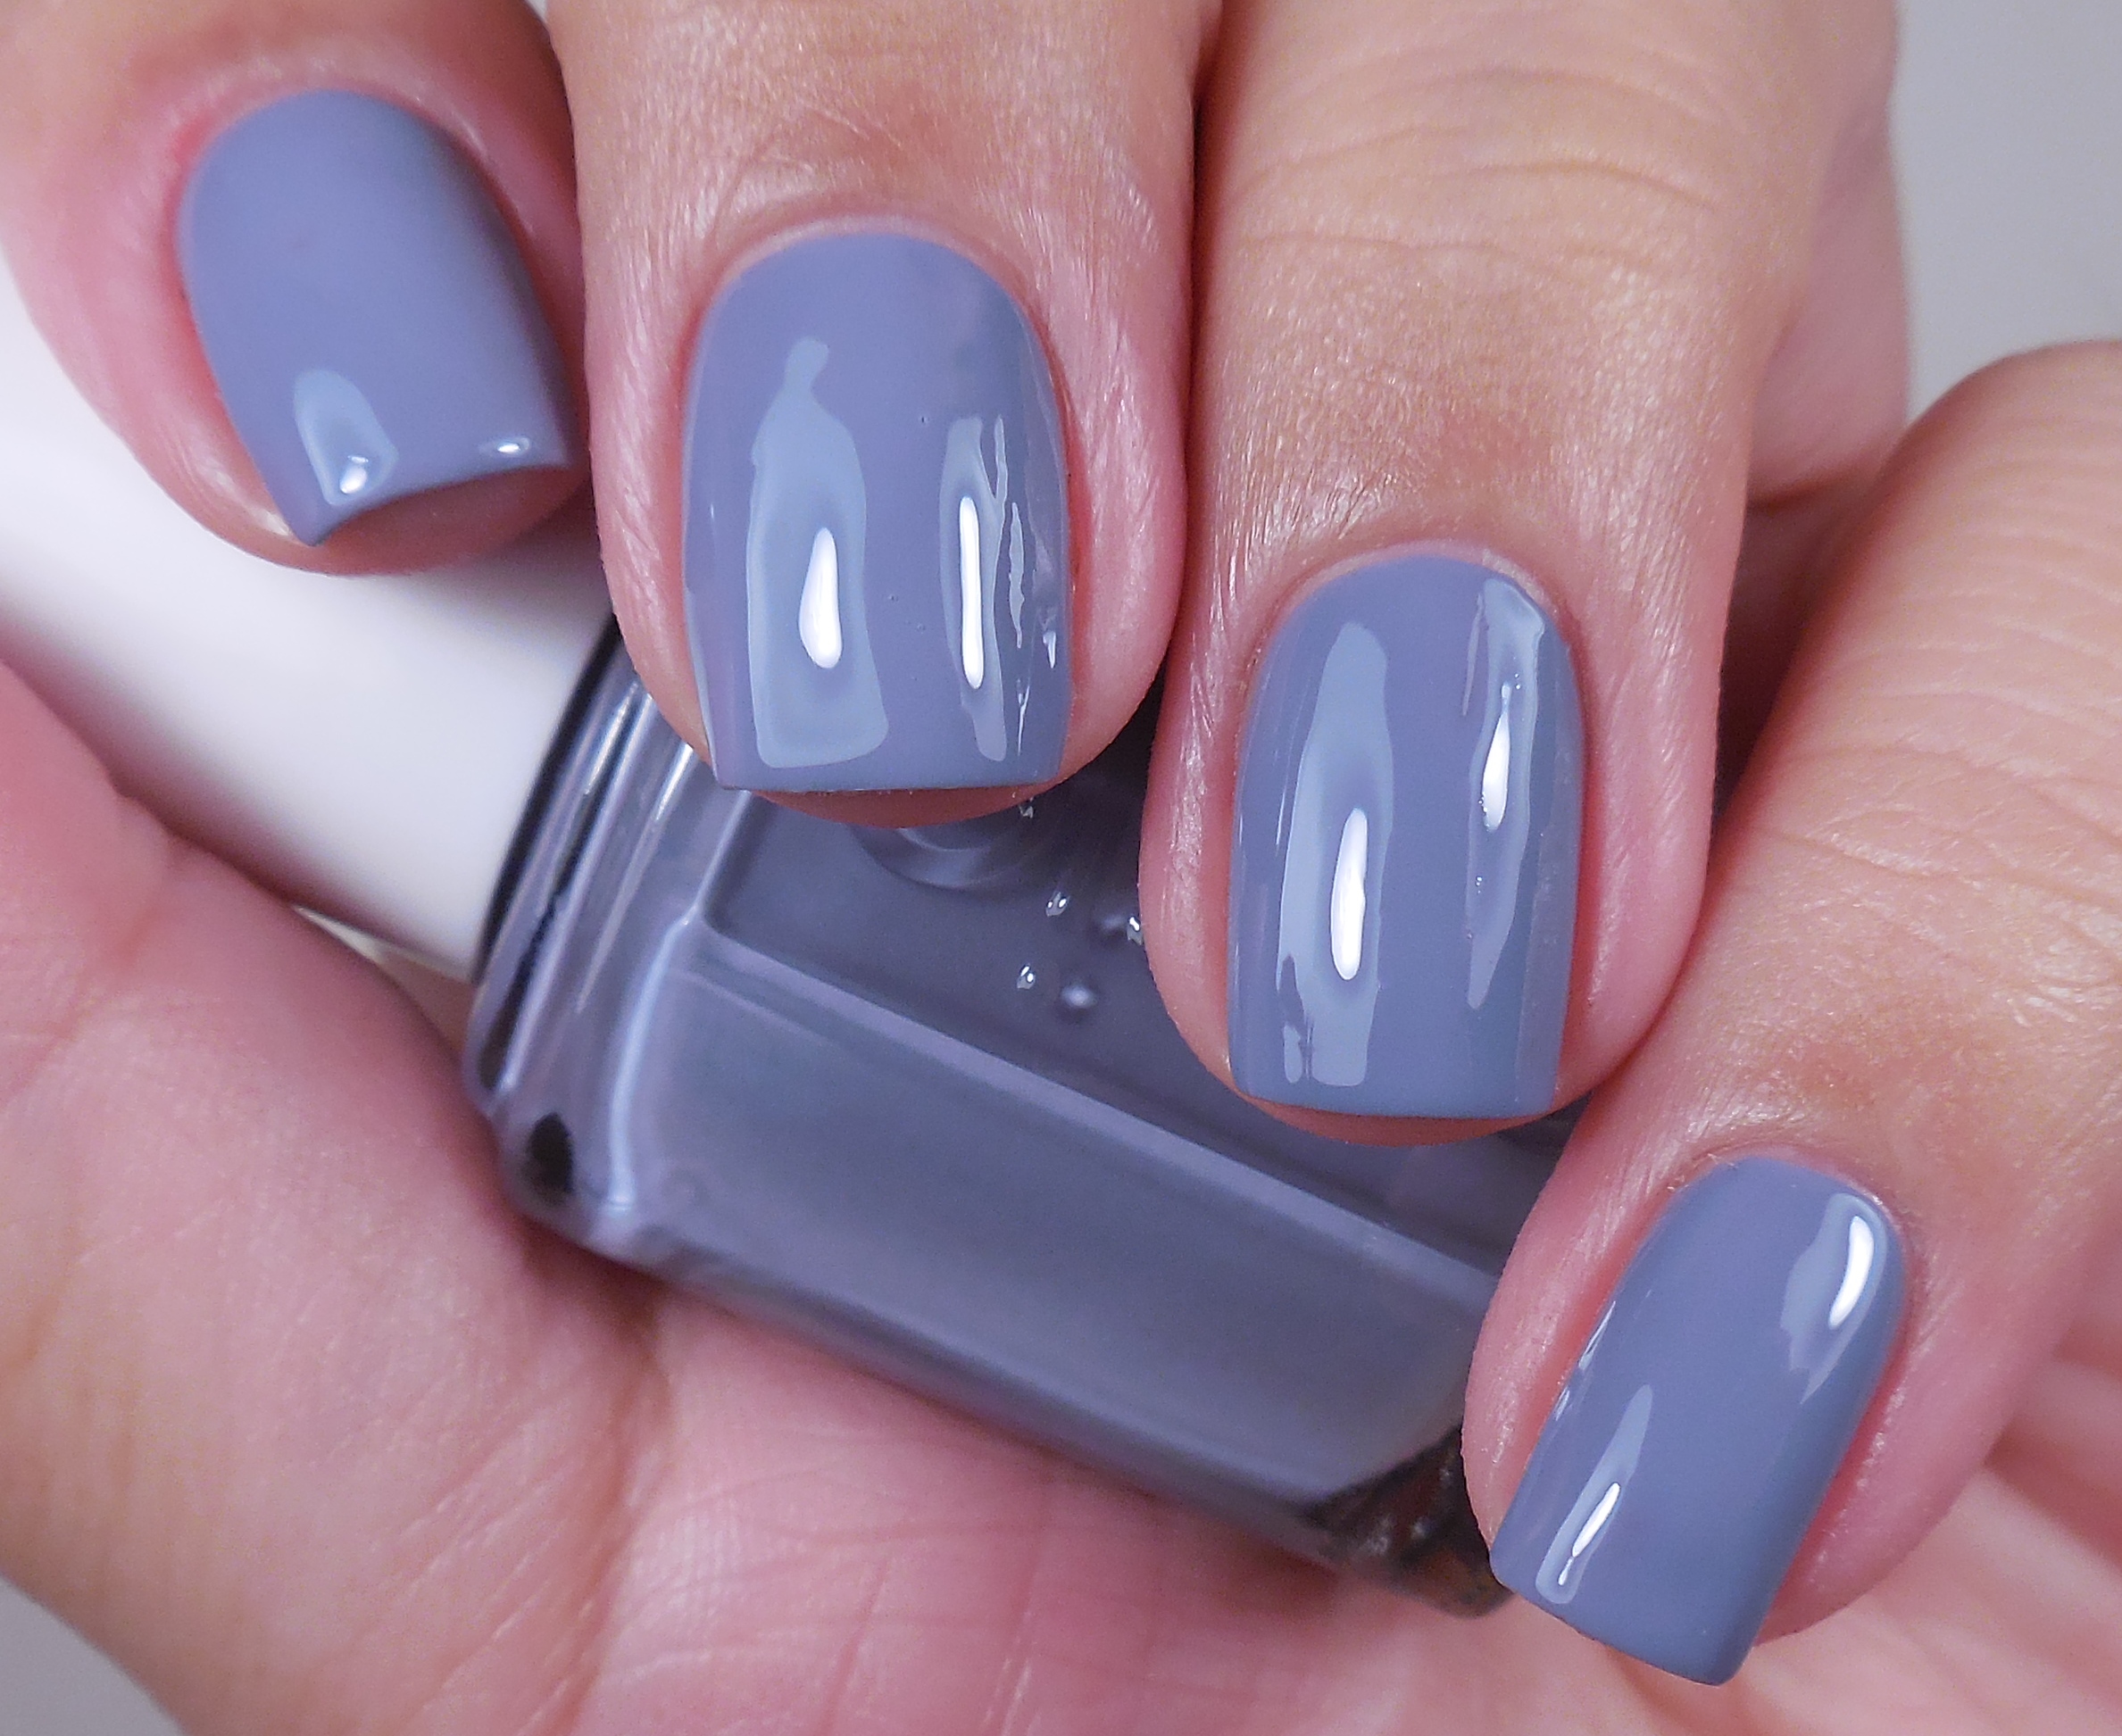
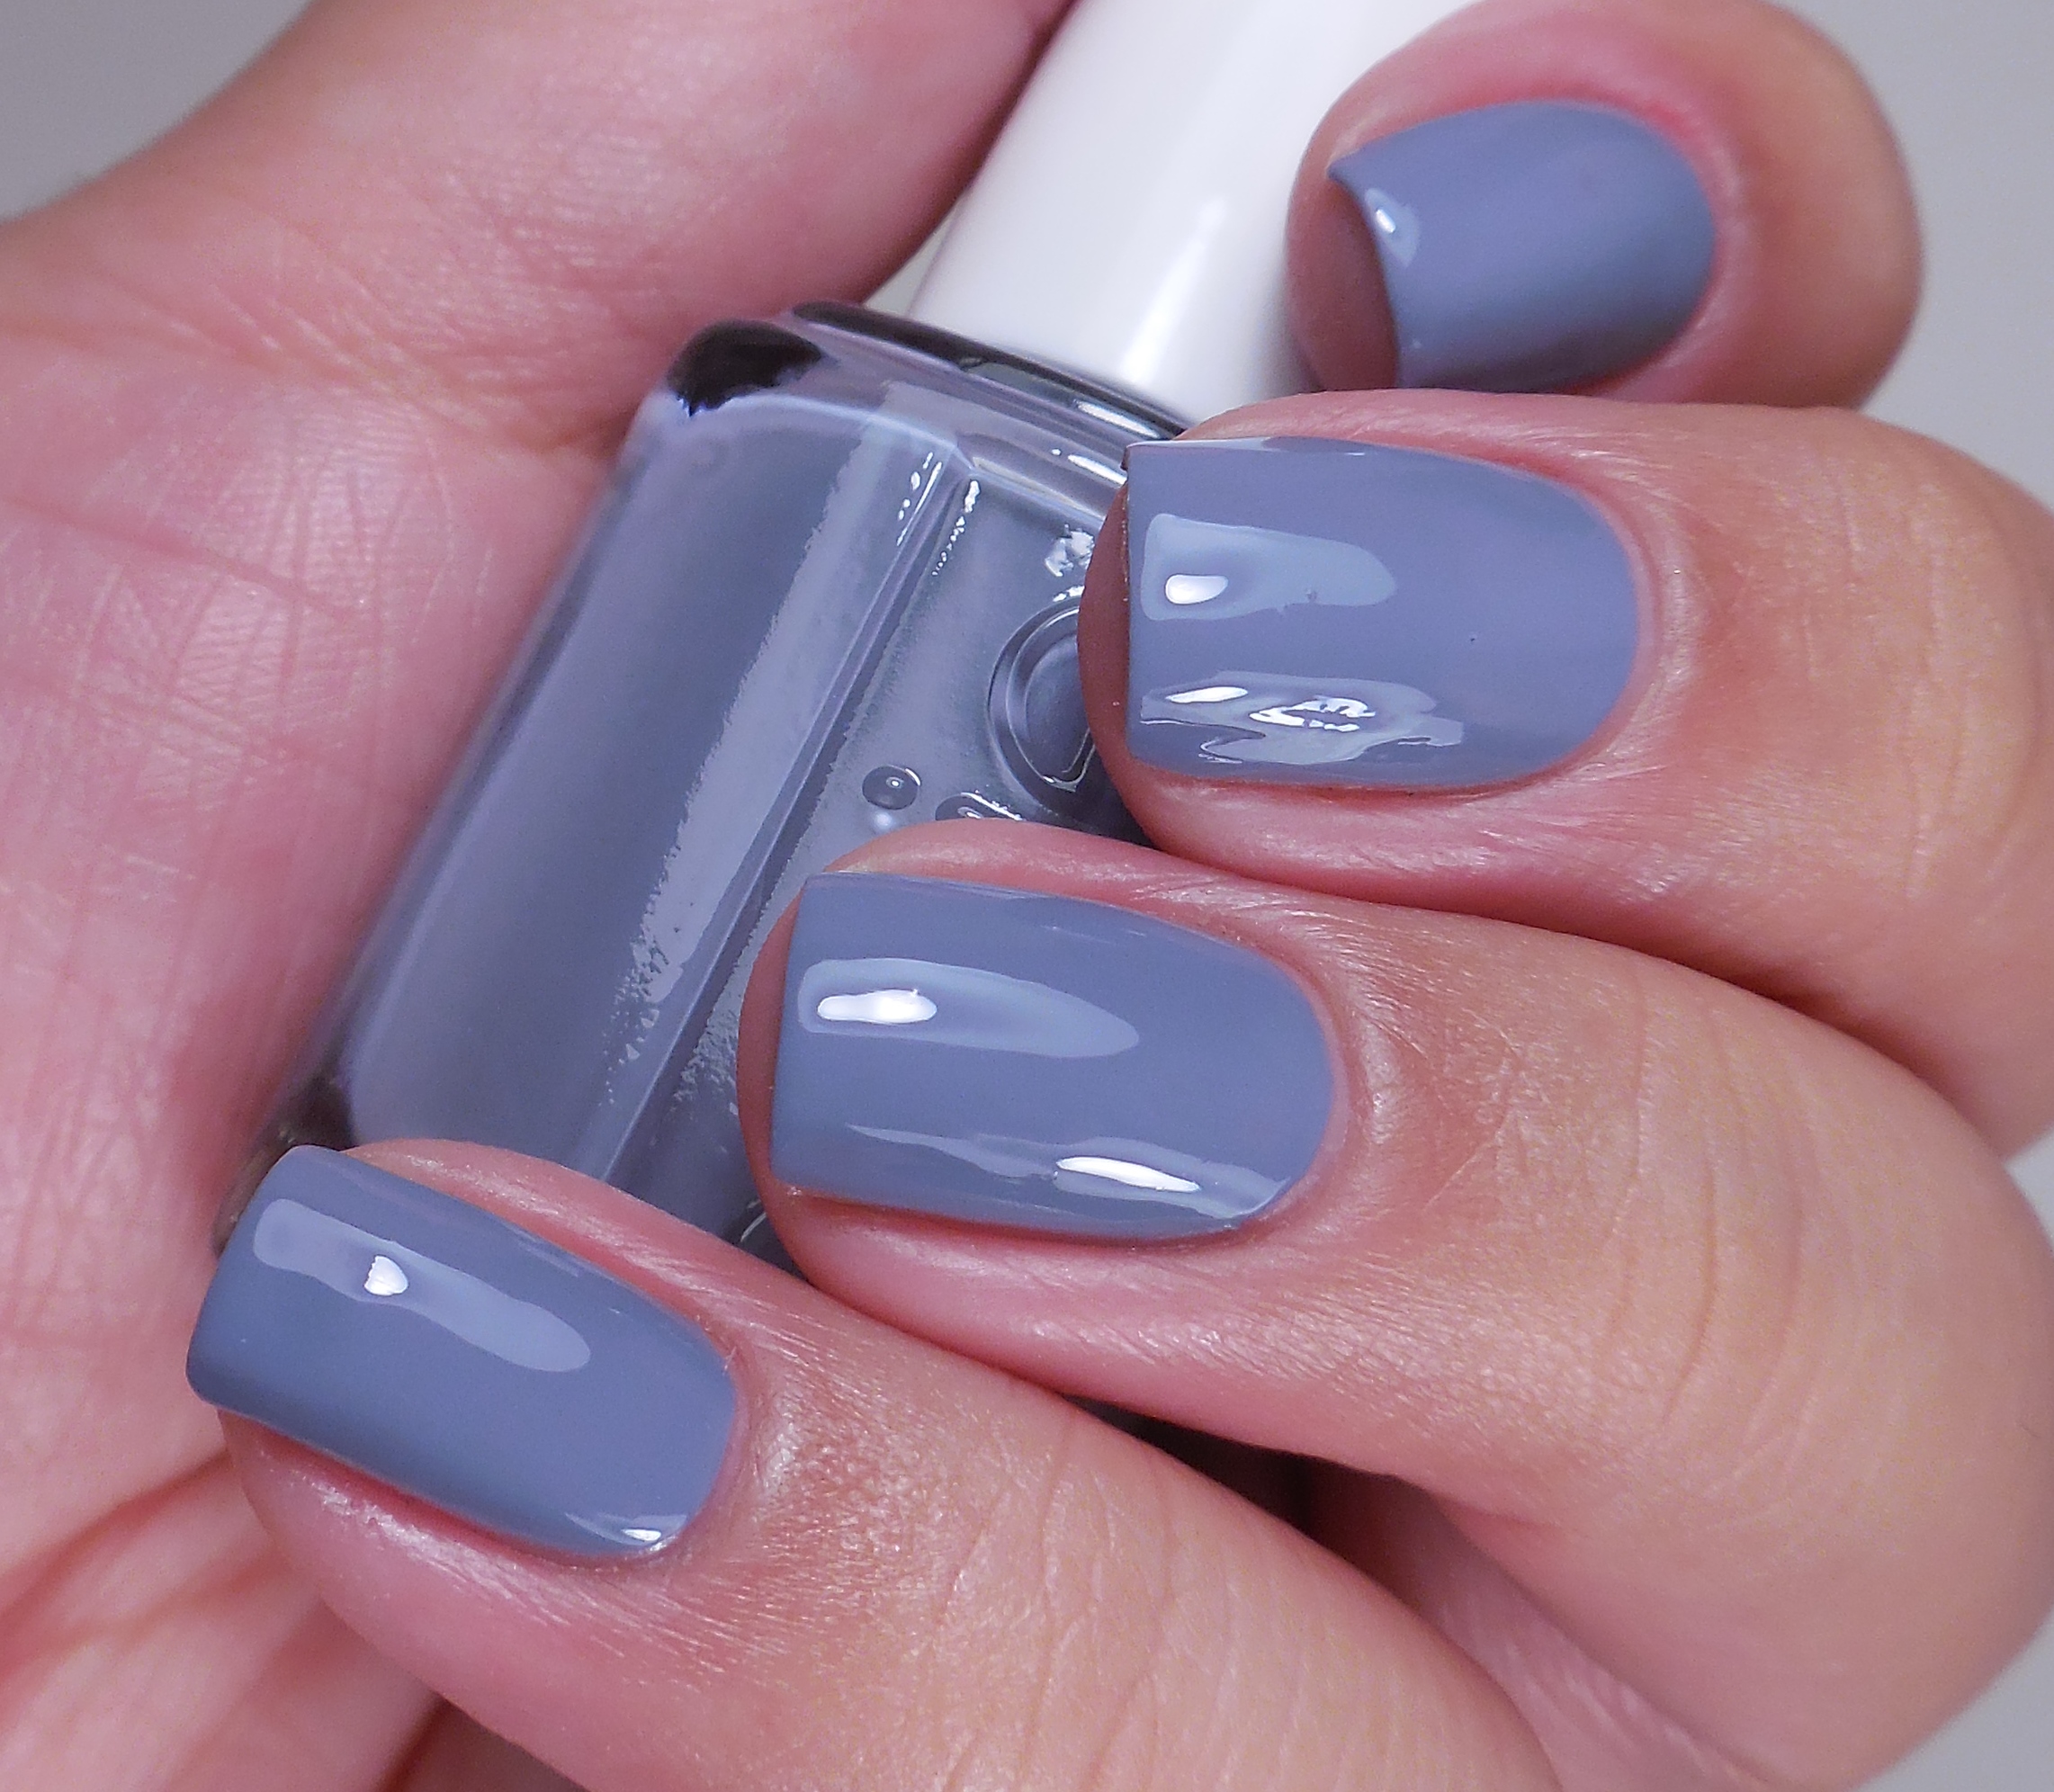
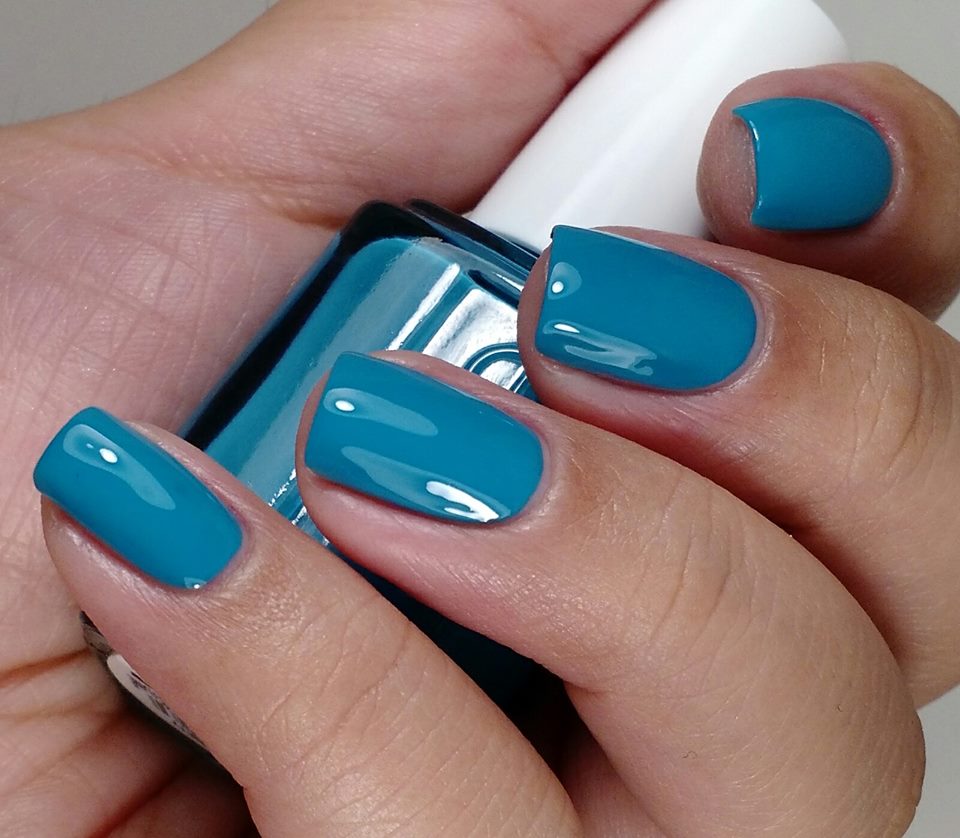
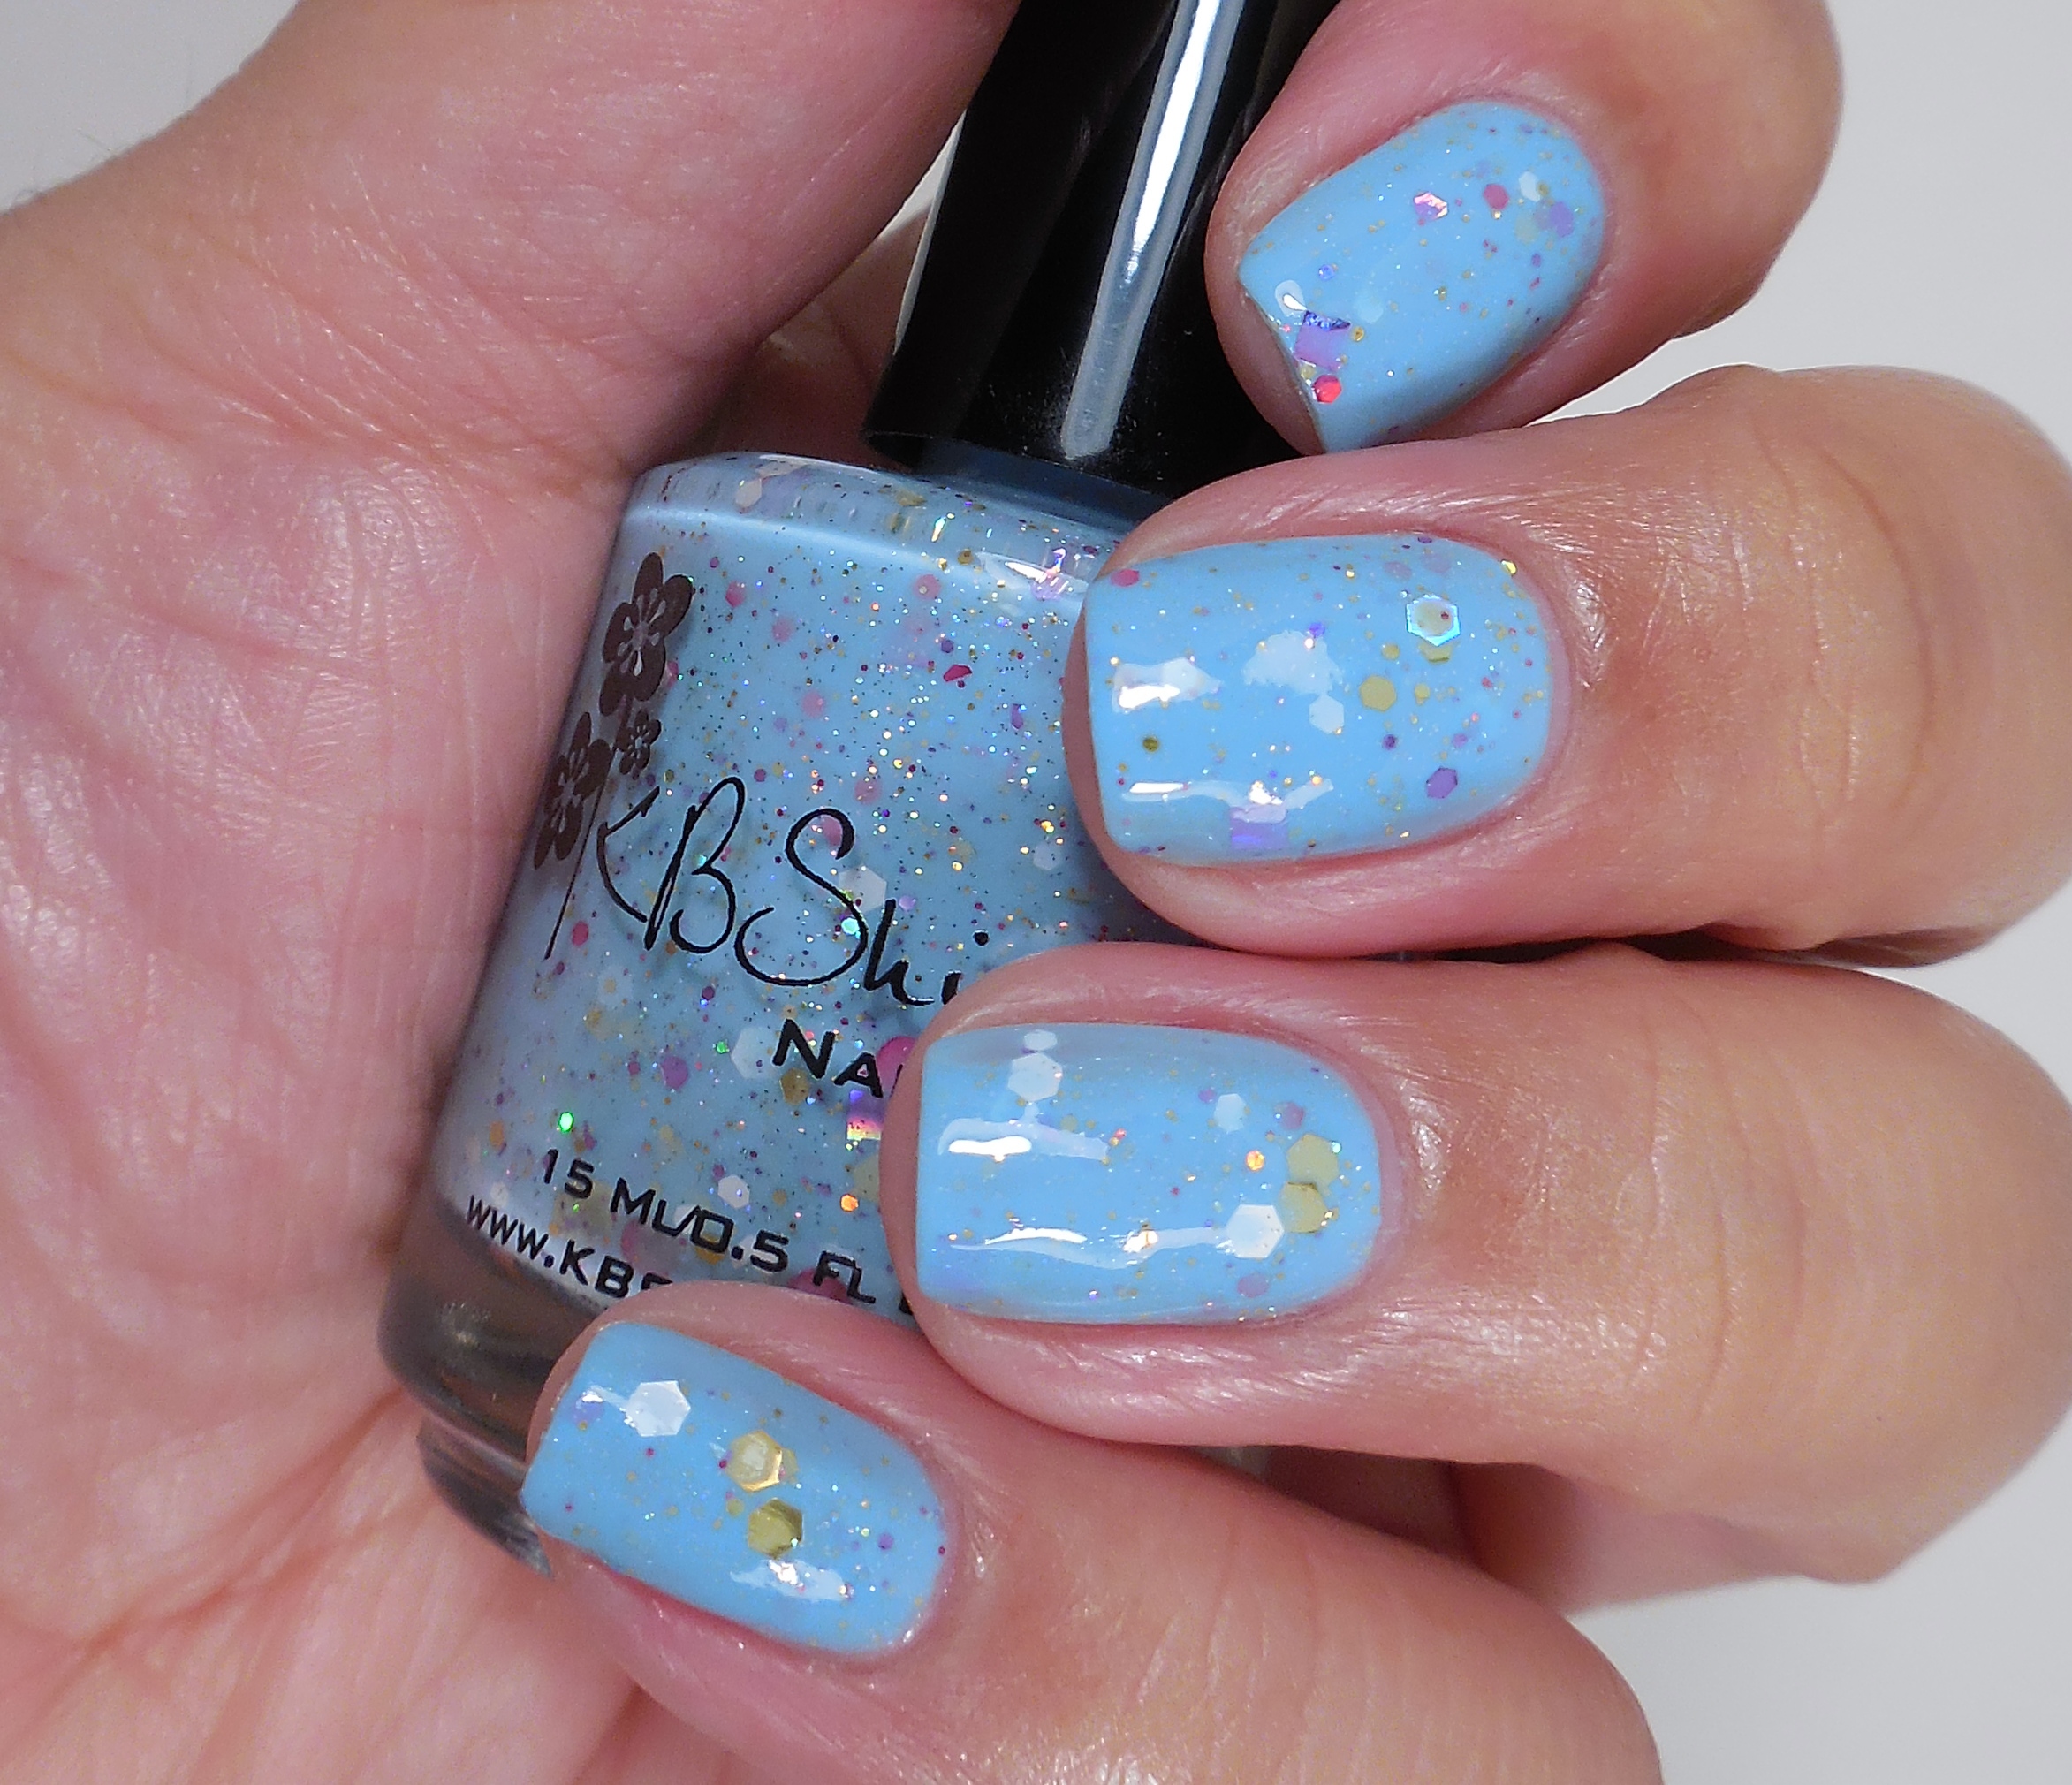
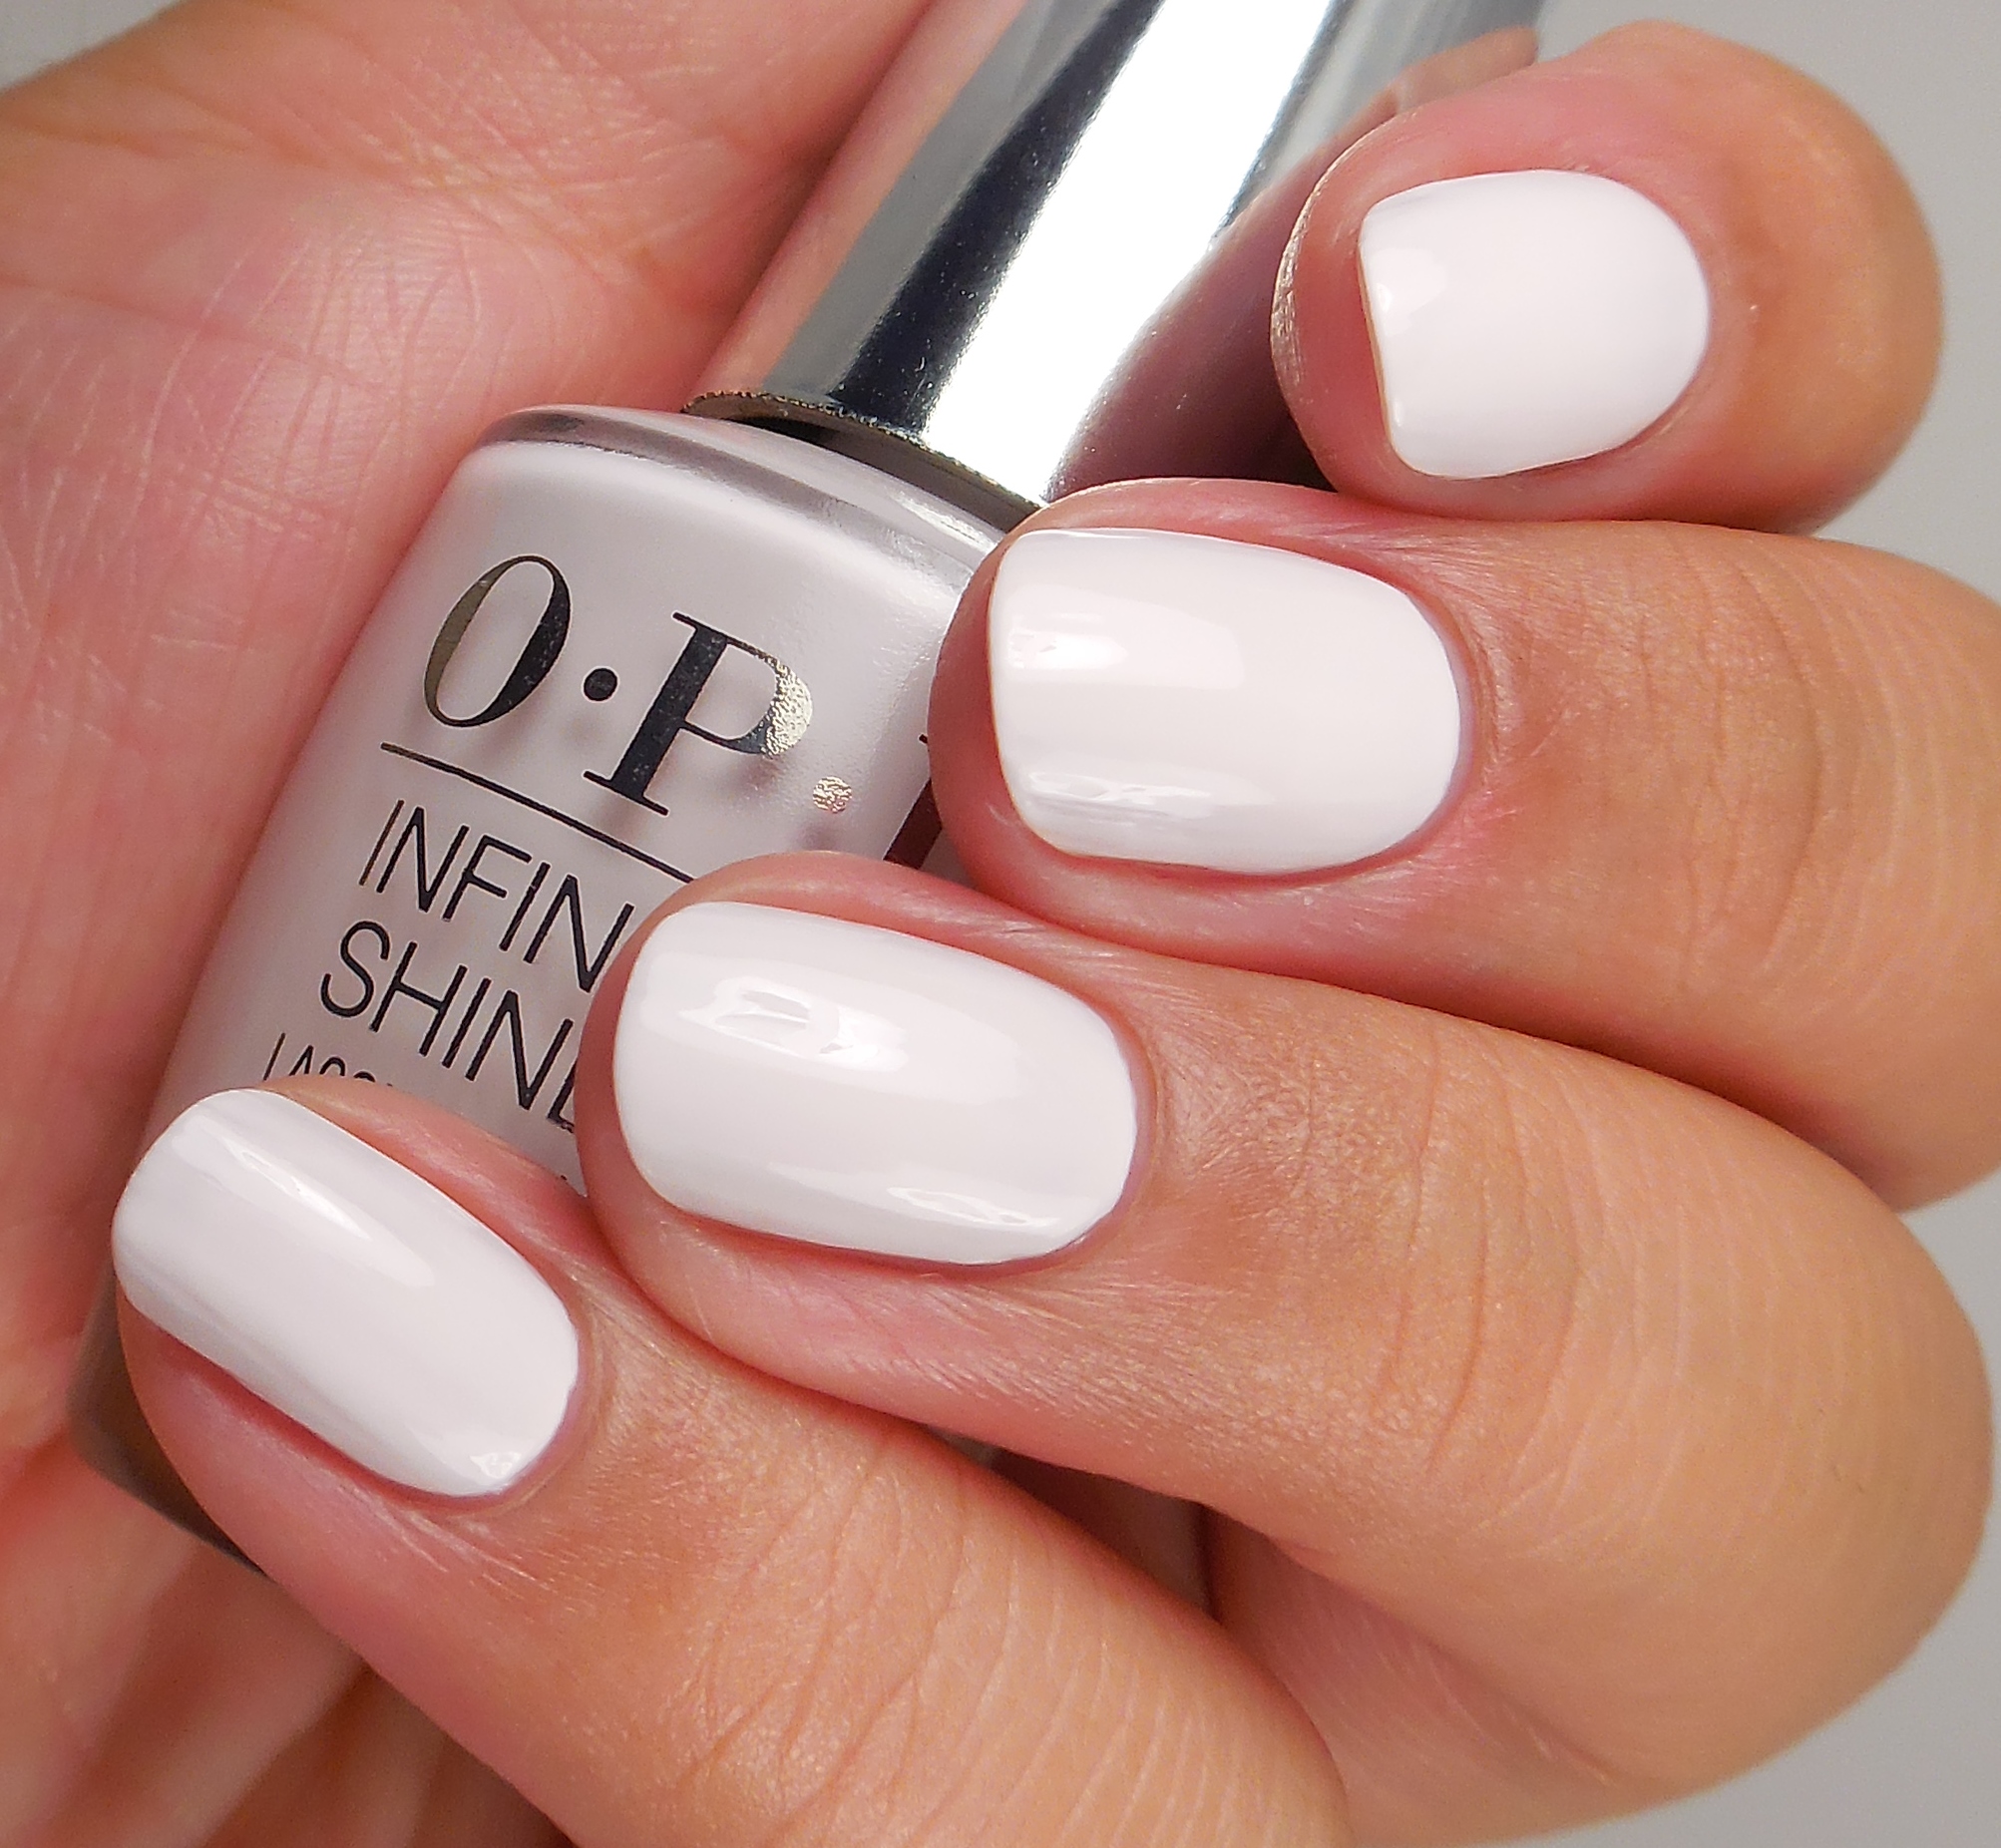
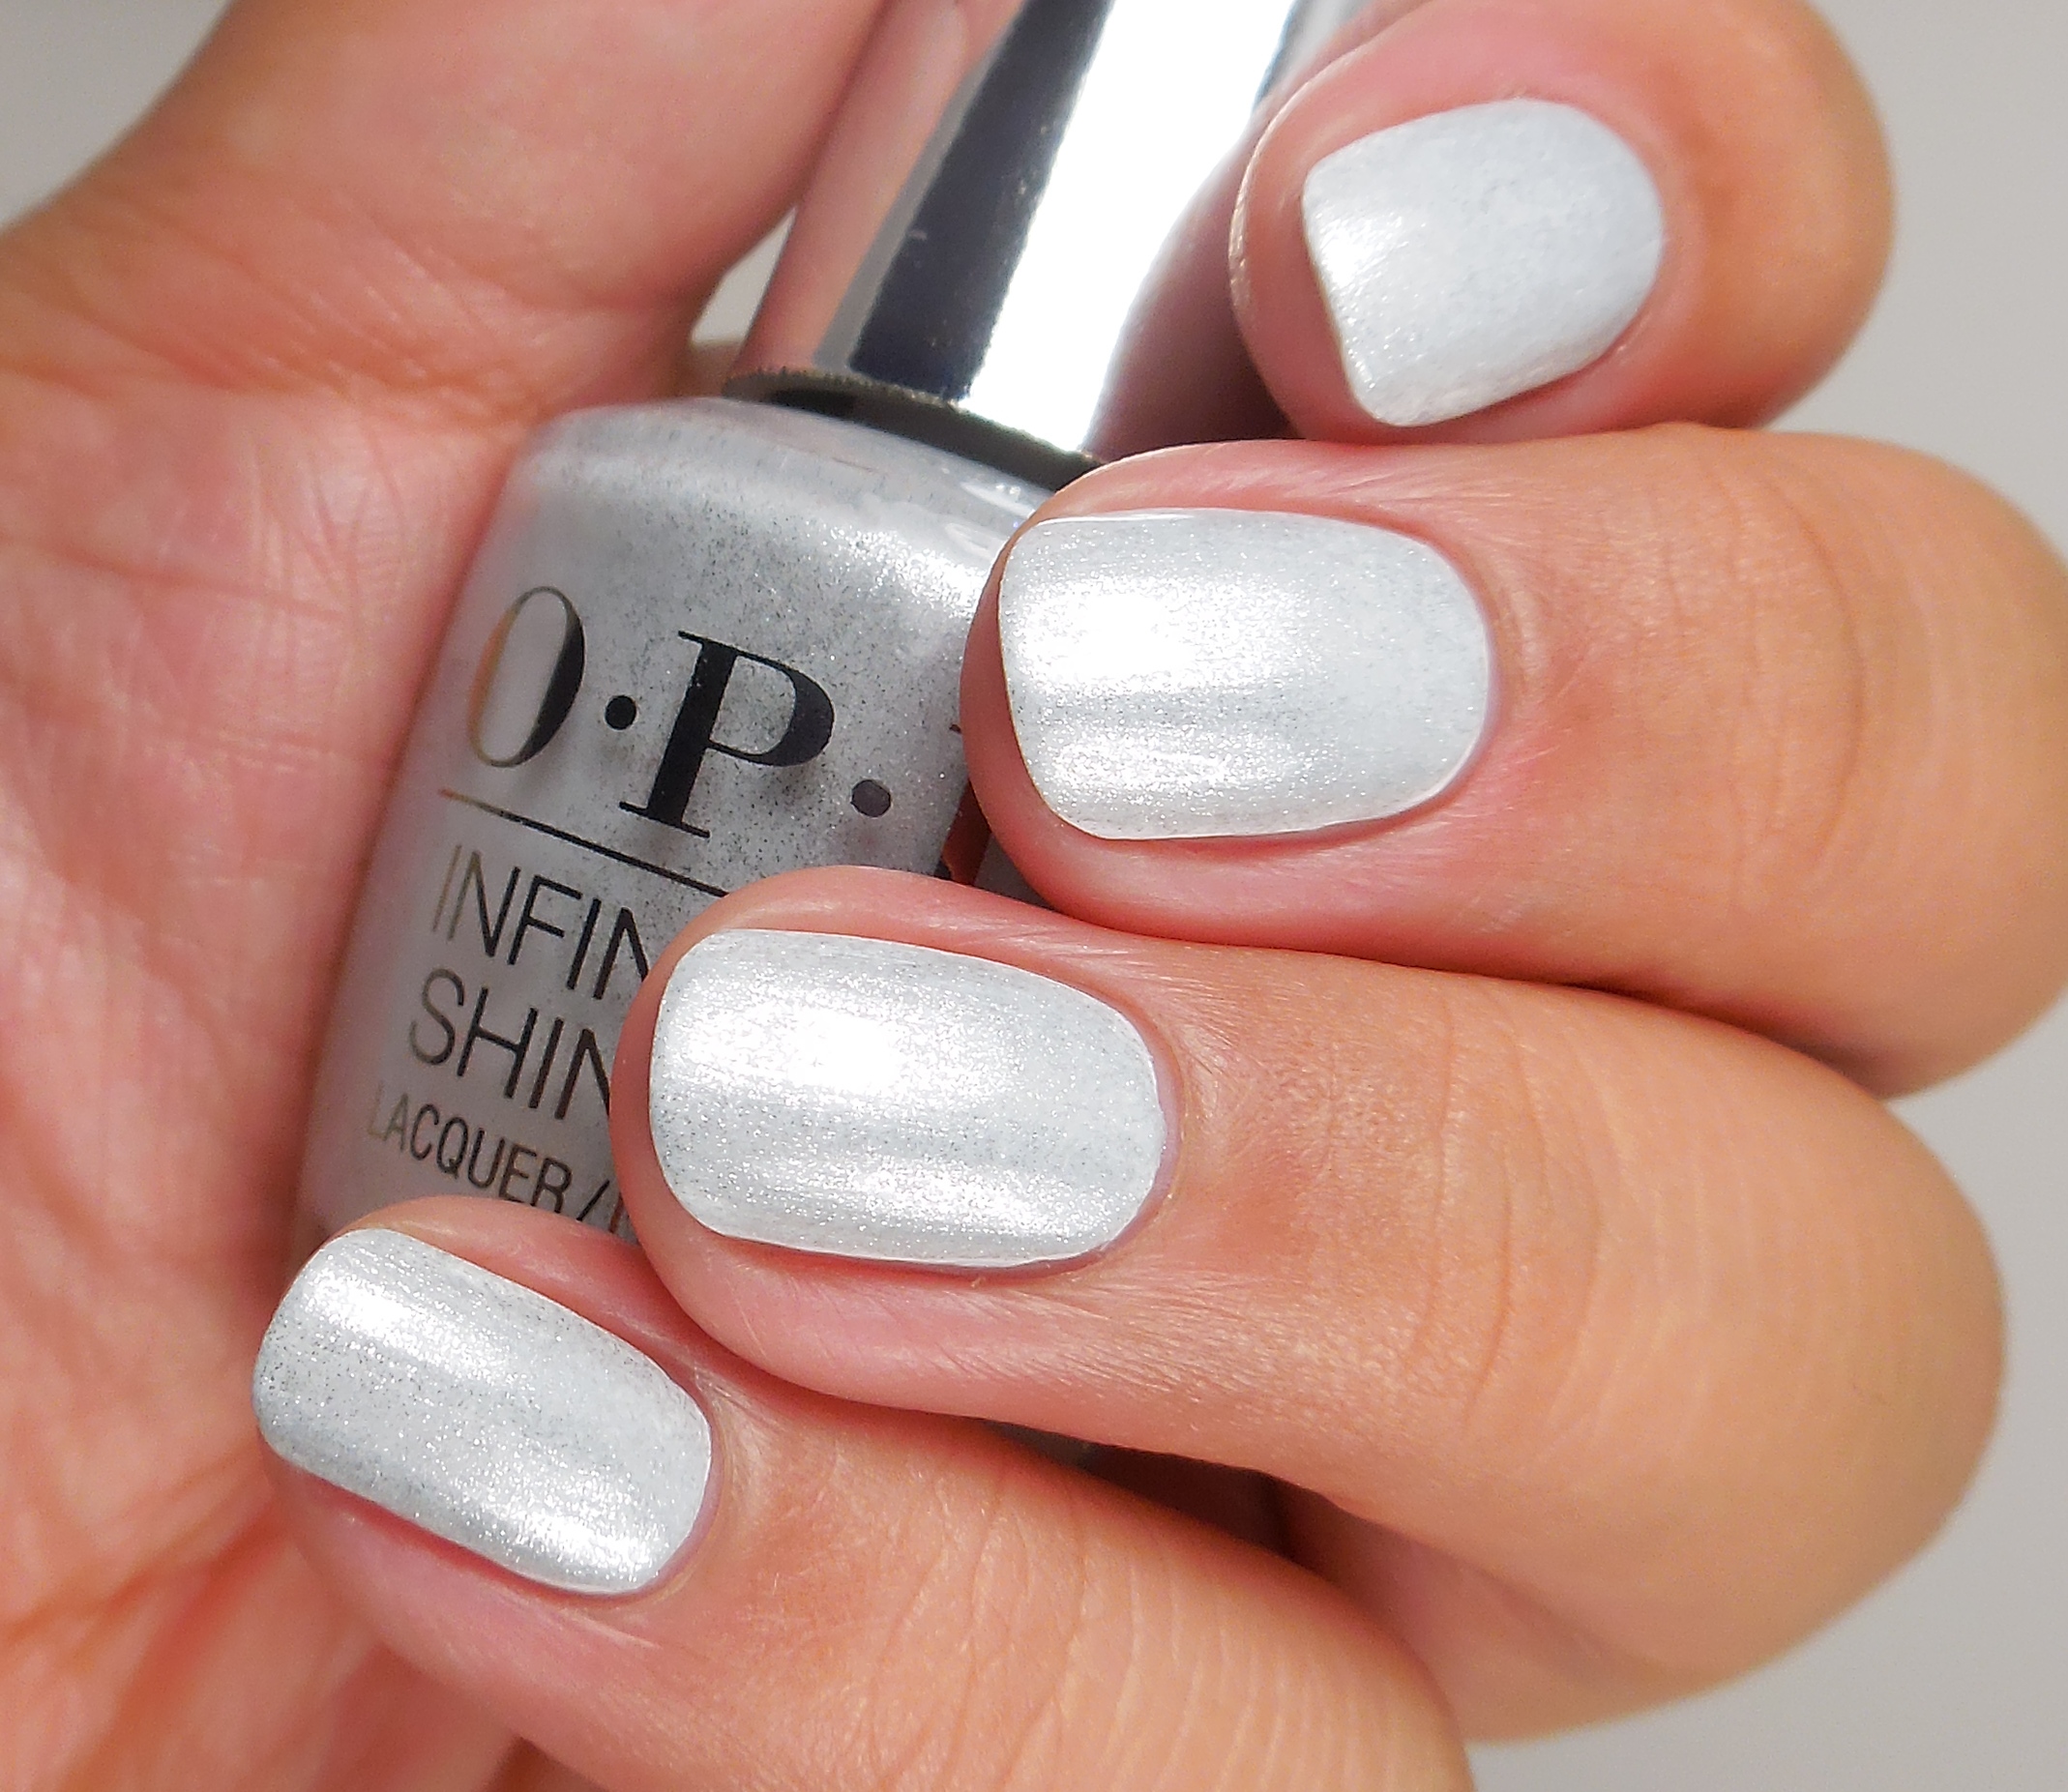
OPI Infinite Shine Go To Grayt Lengths over Non-Stop White

78
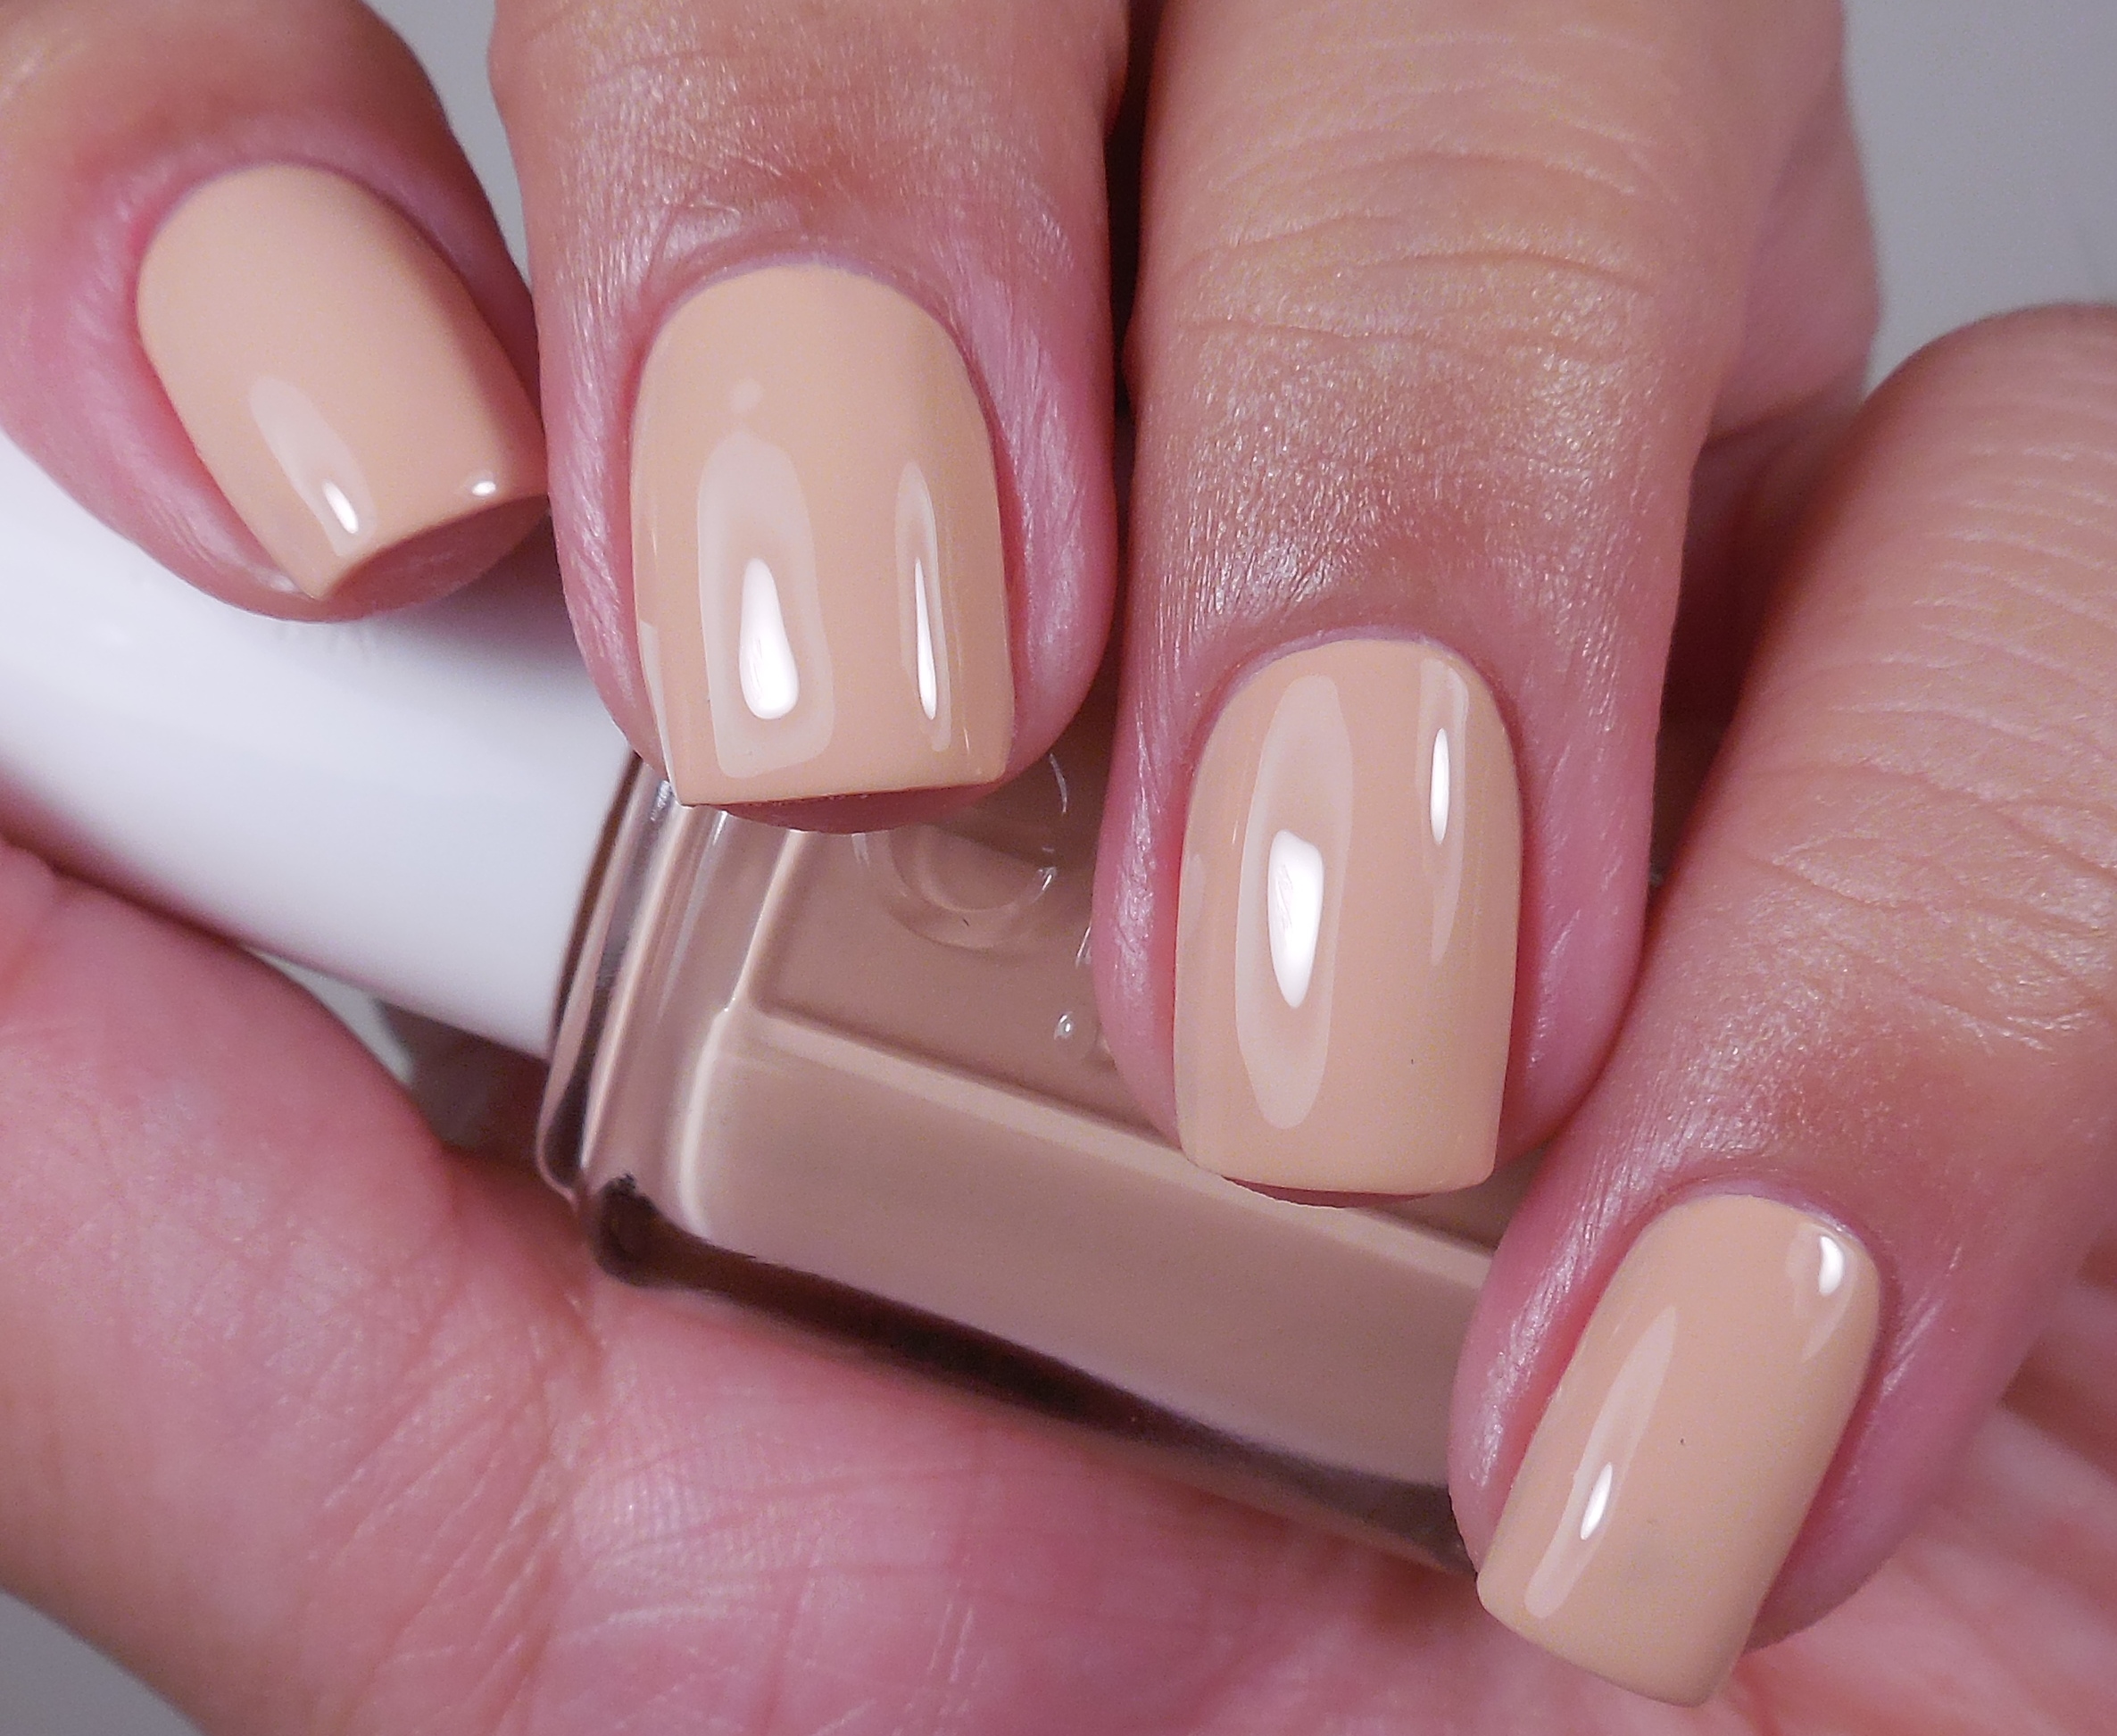
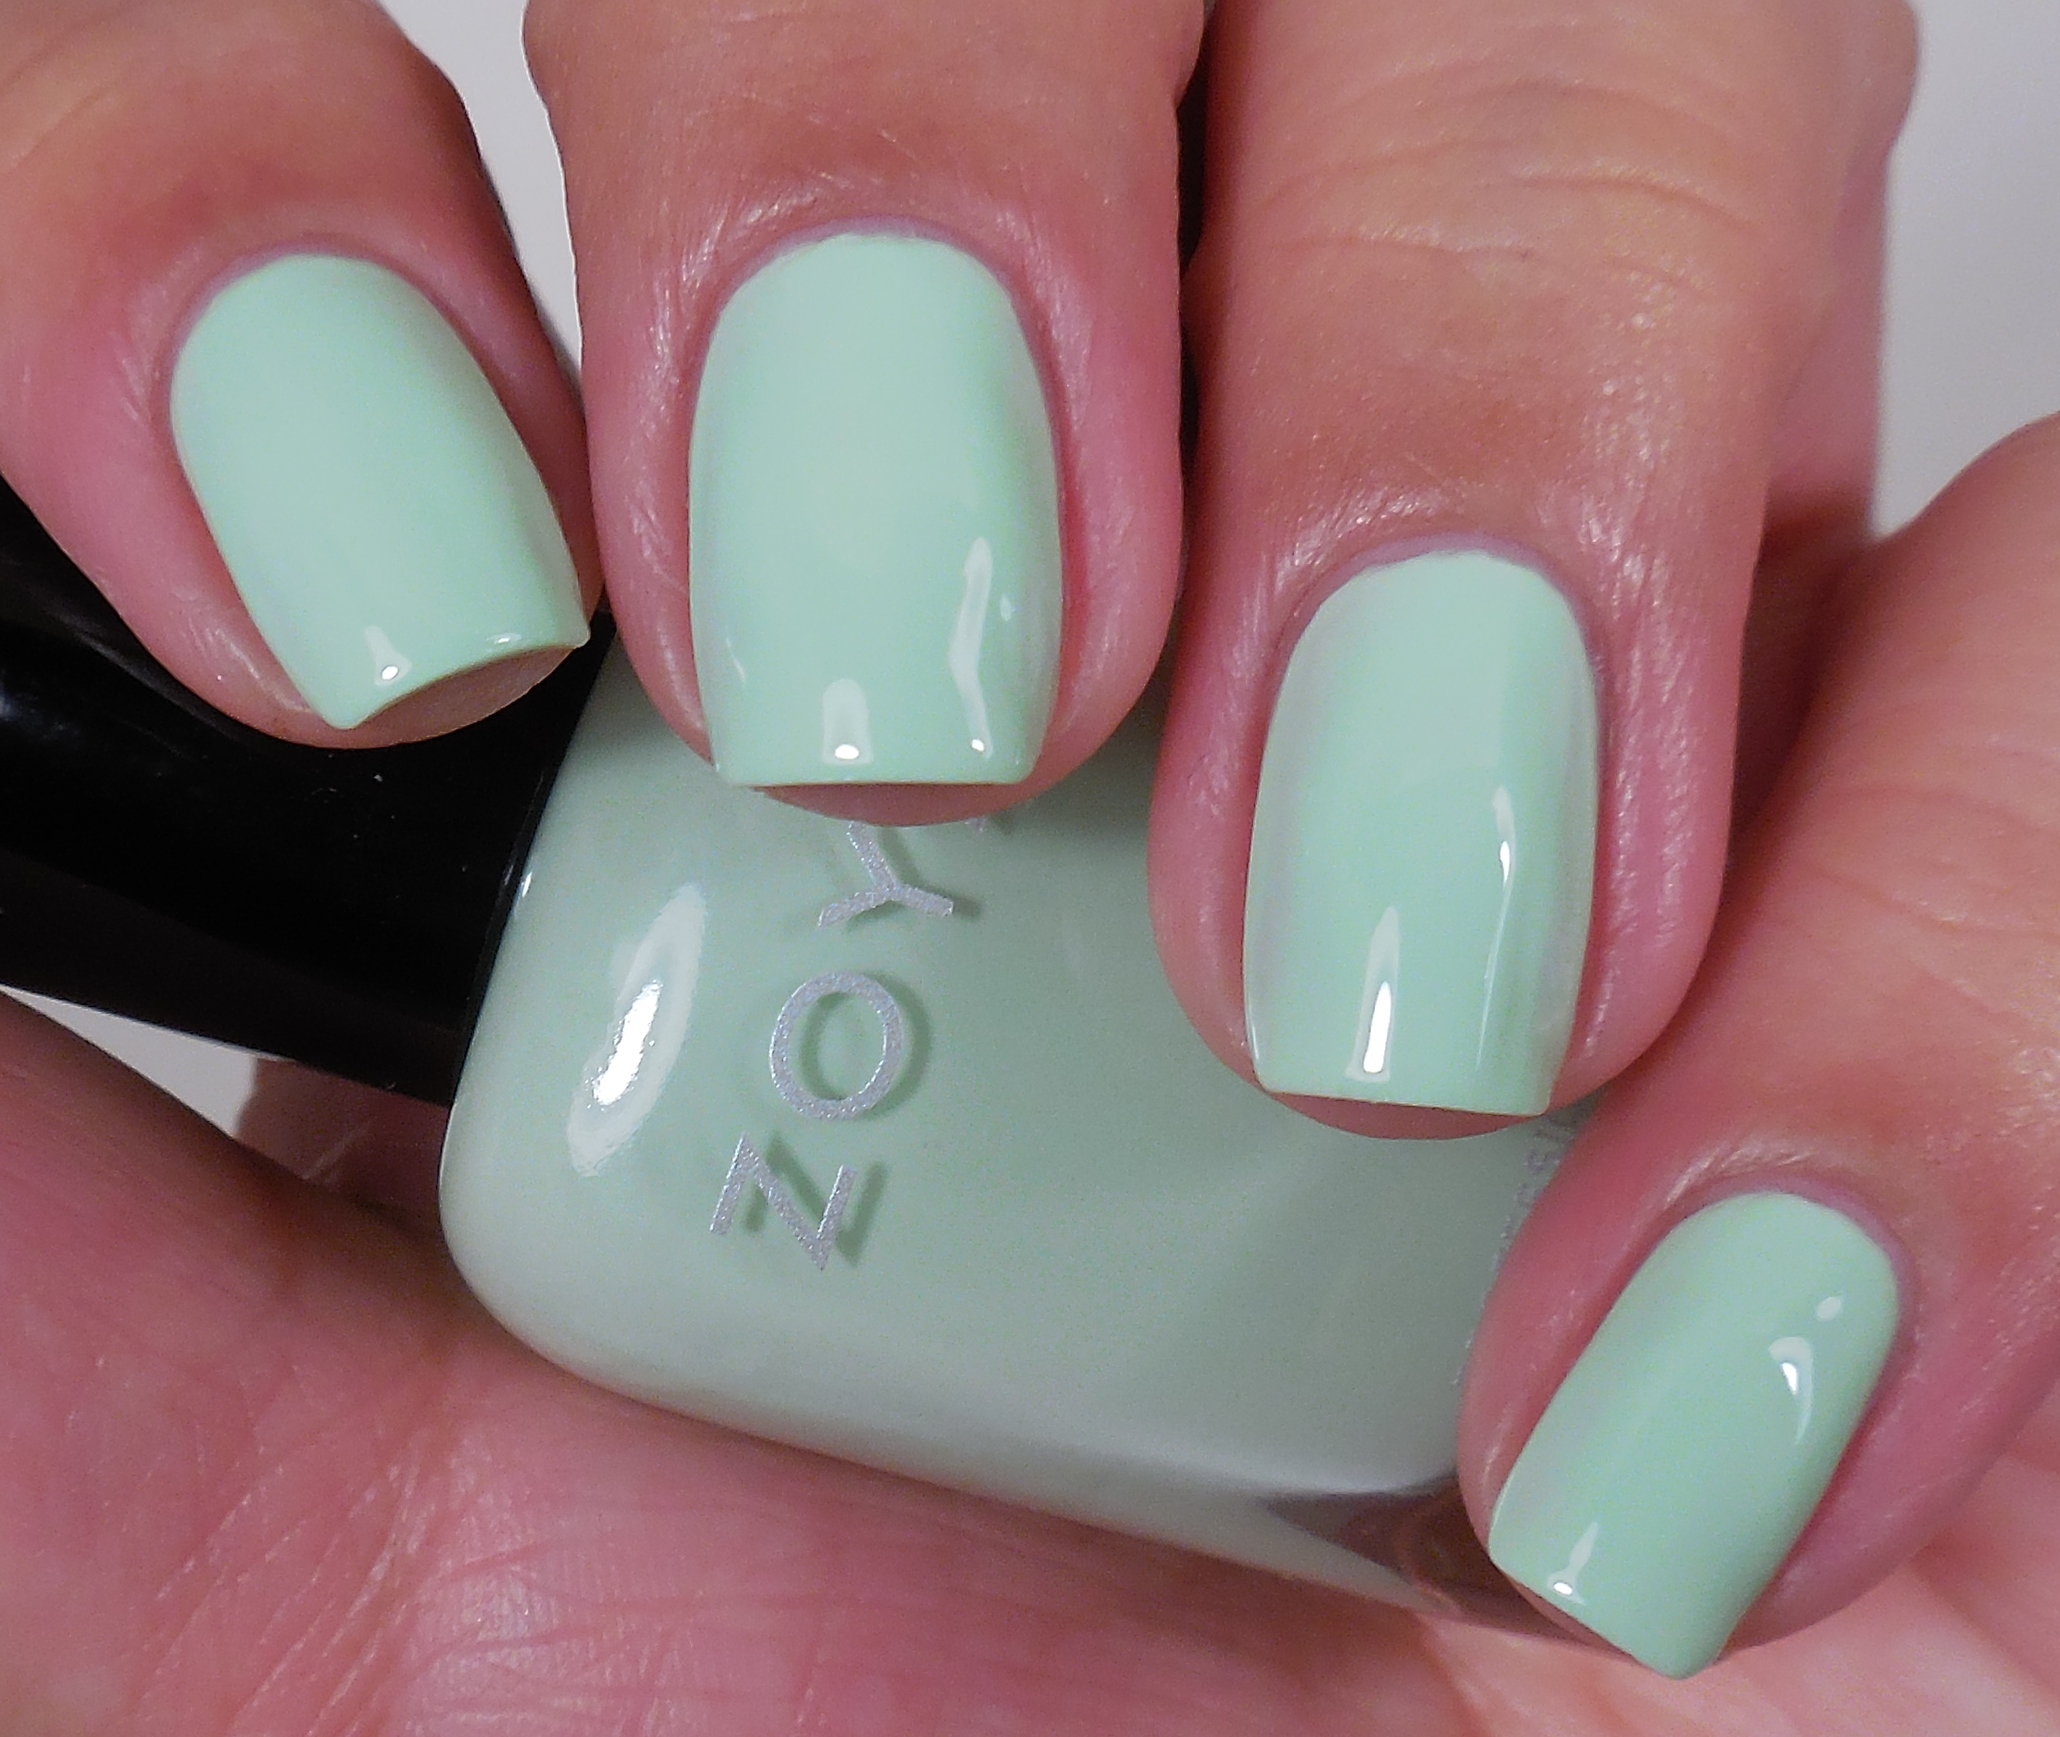
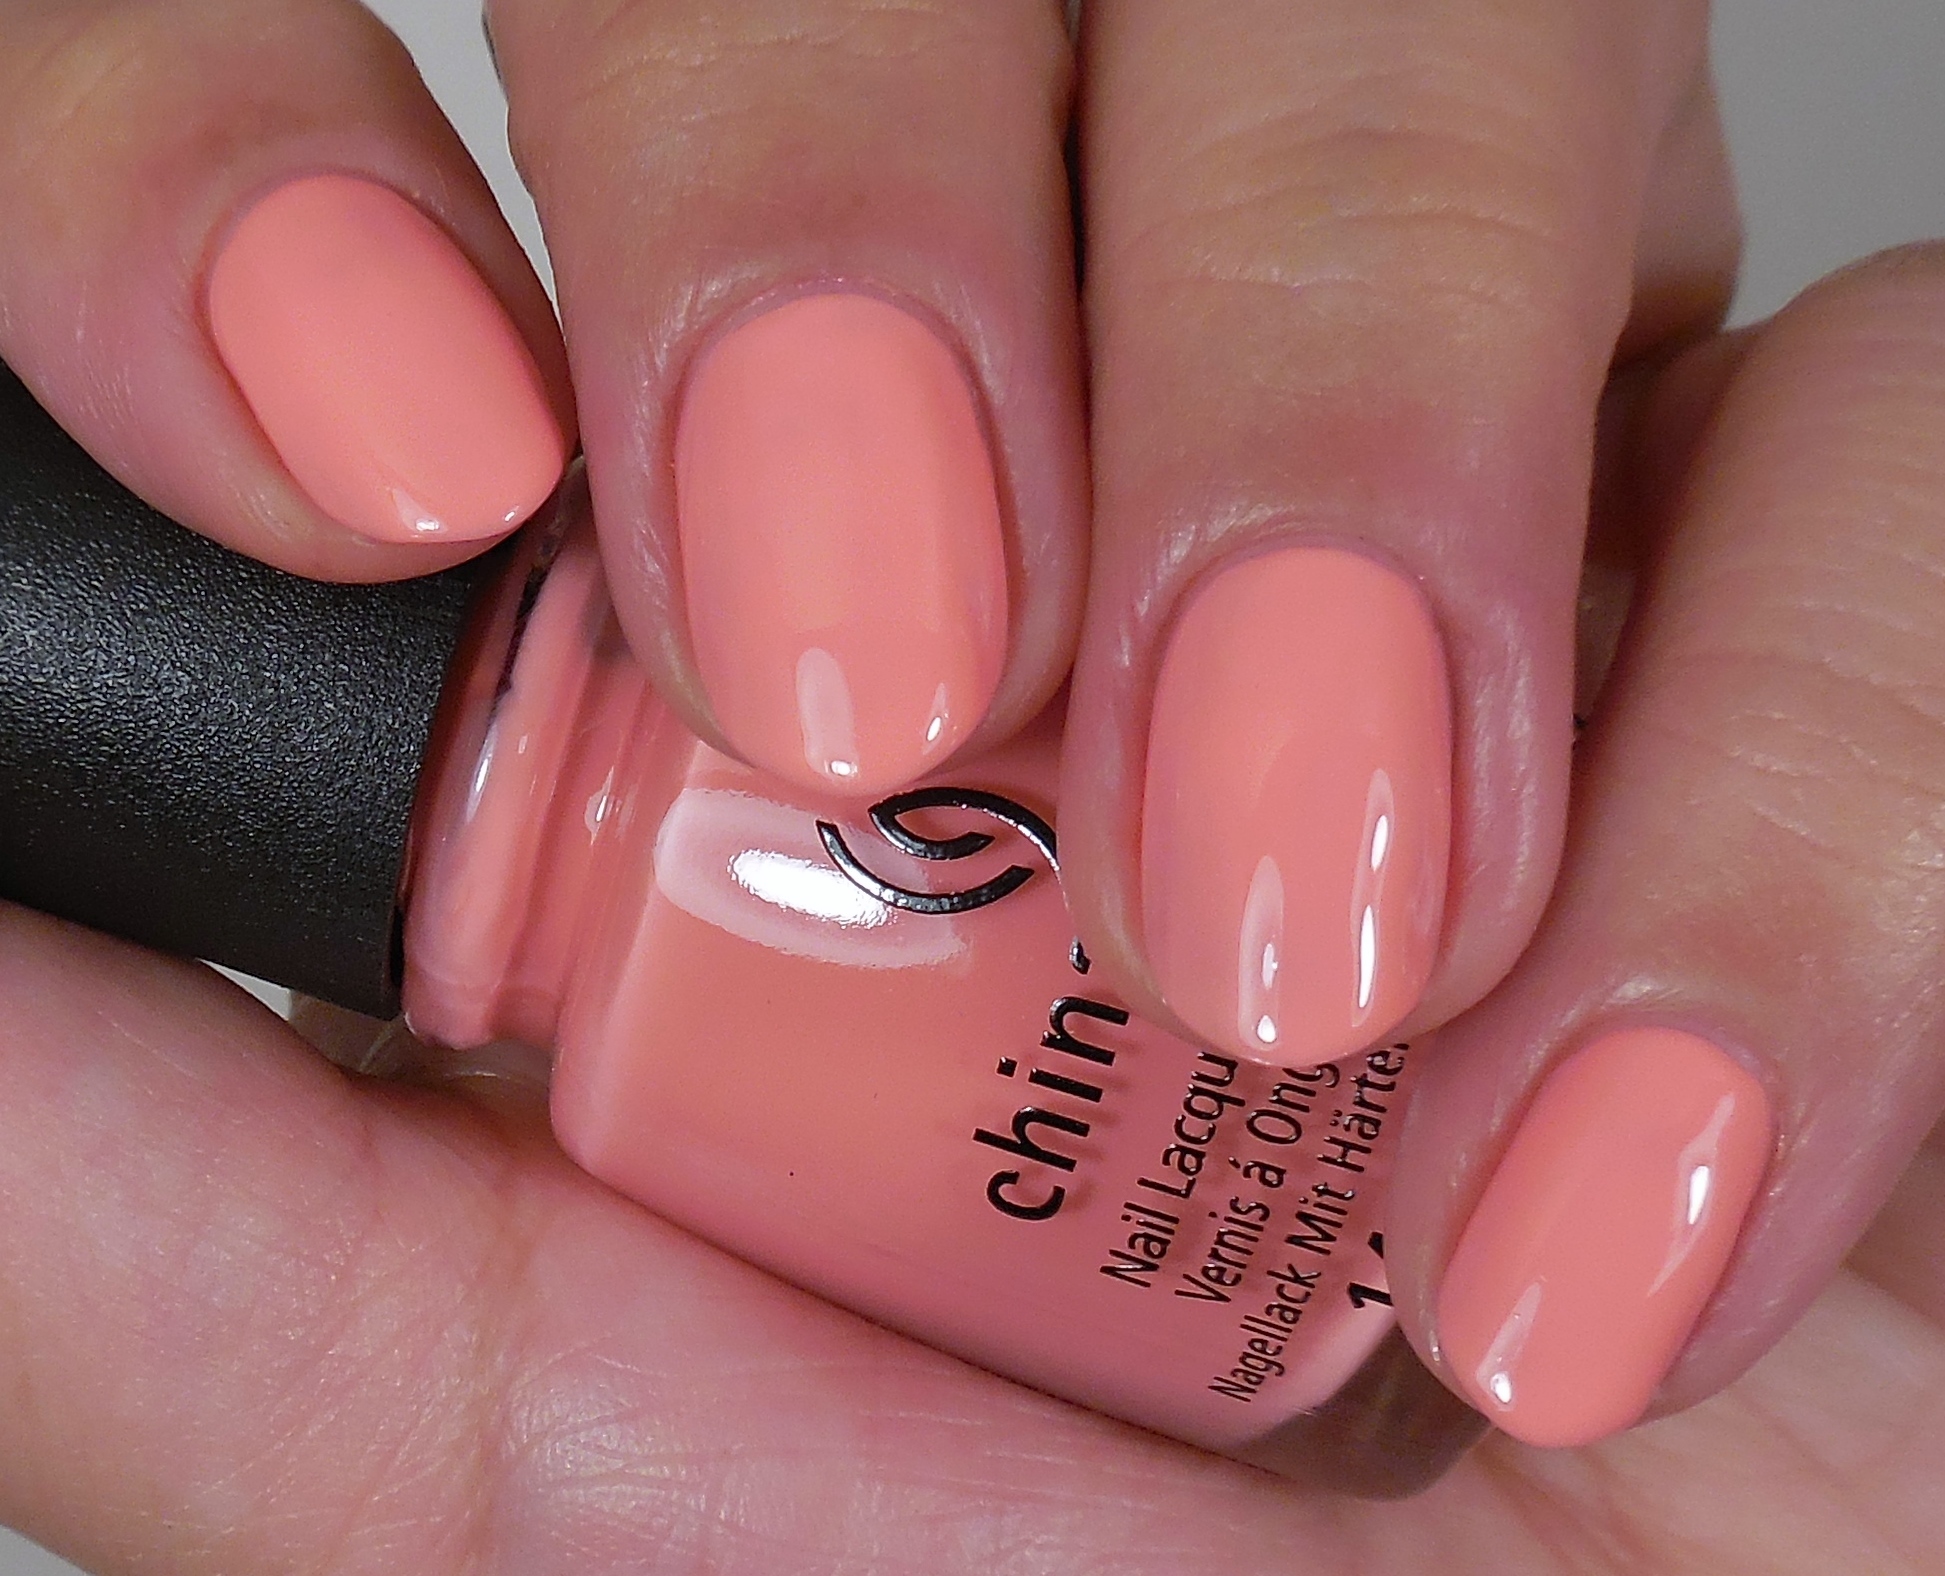
OPI Infinite Shine The Beige of Reason

910
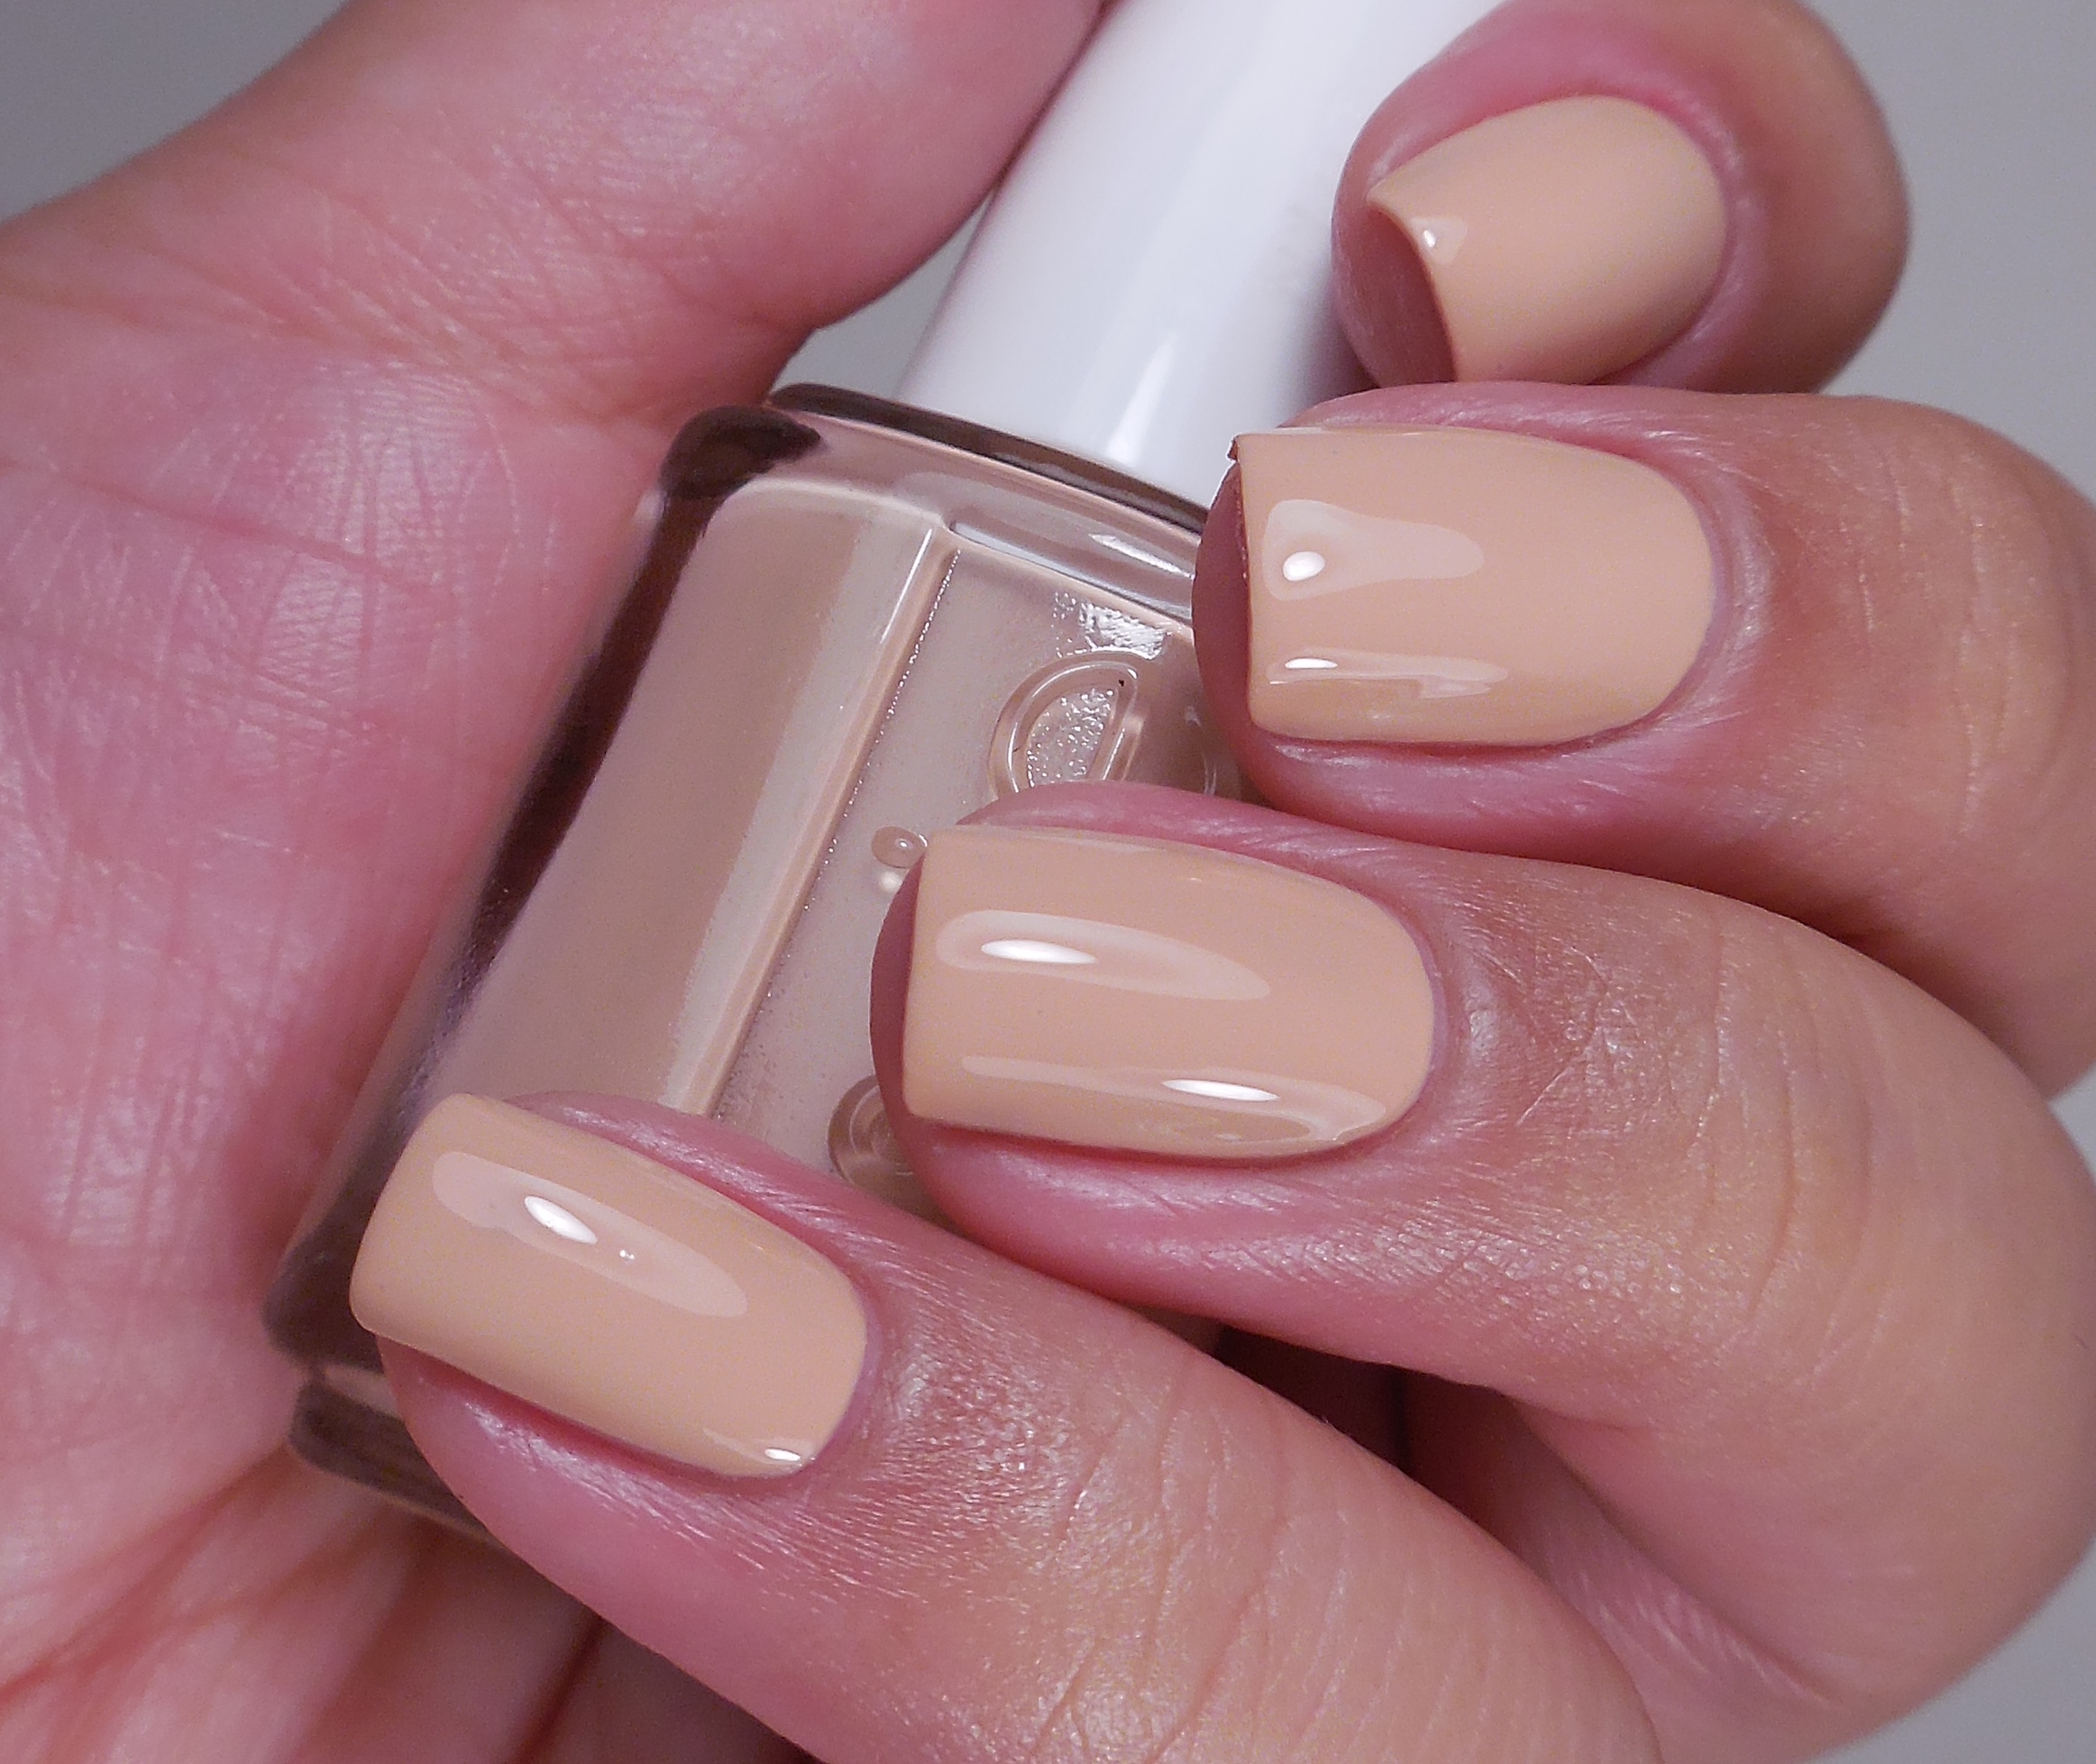
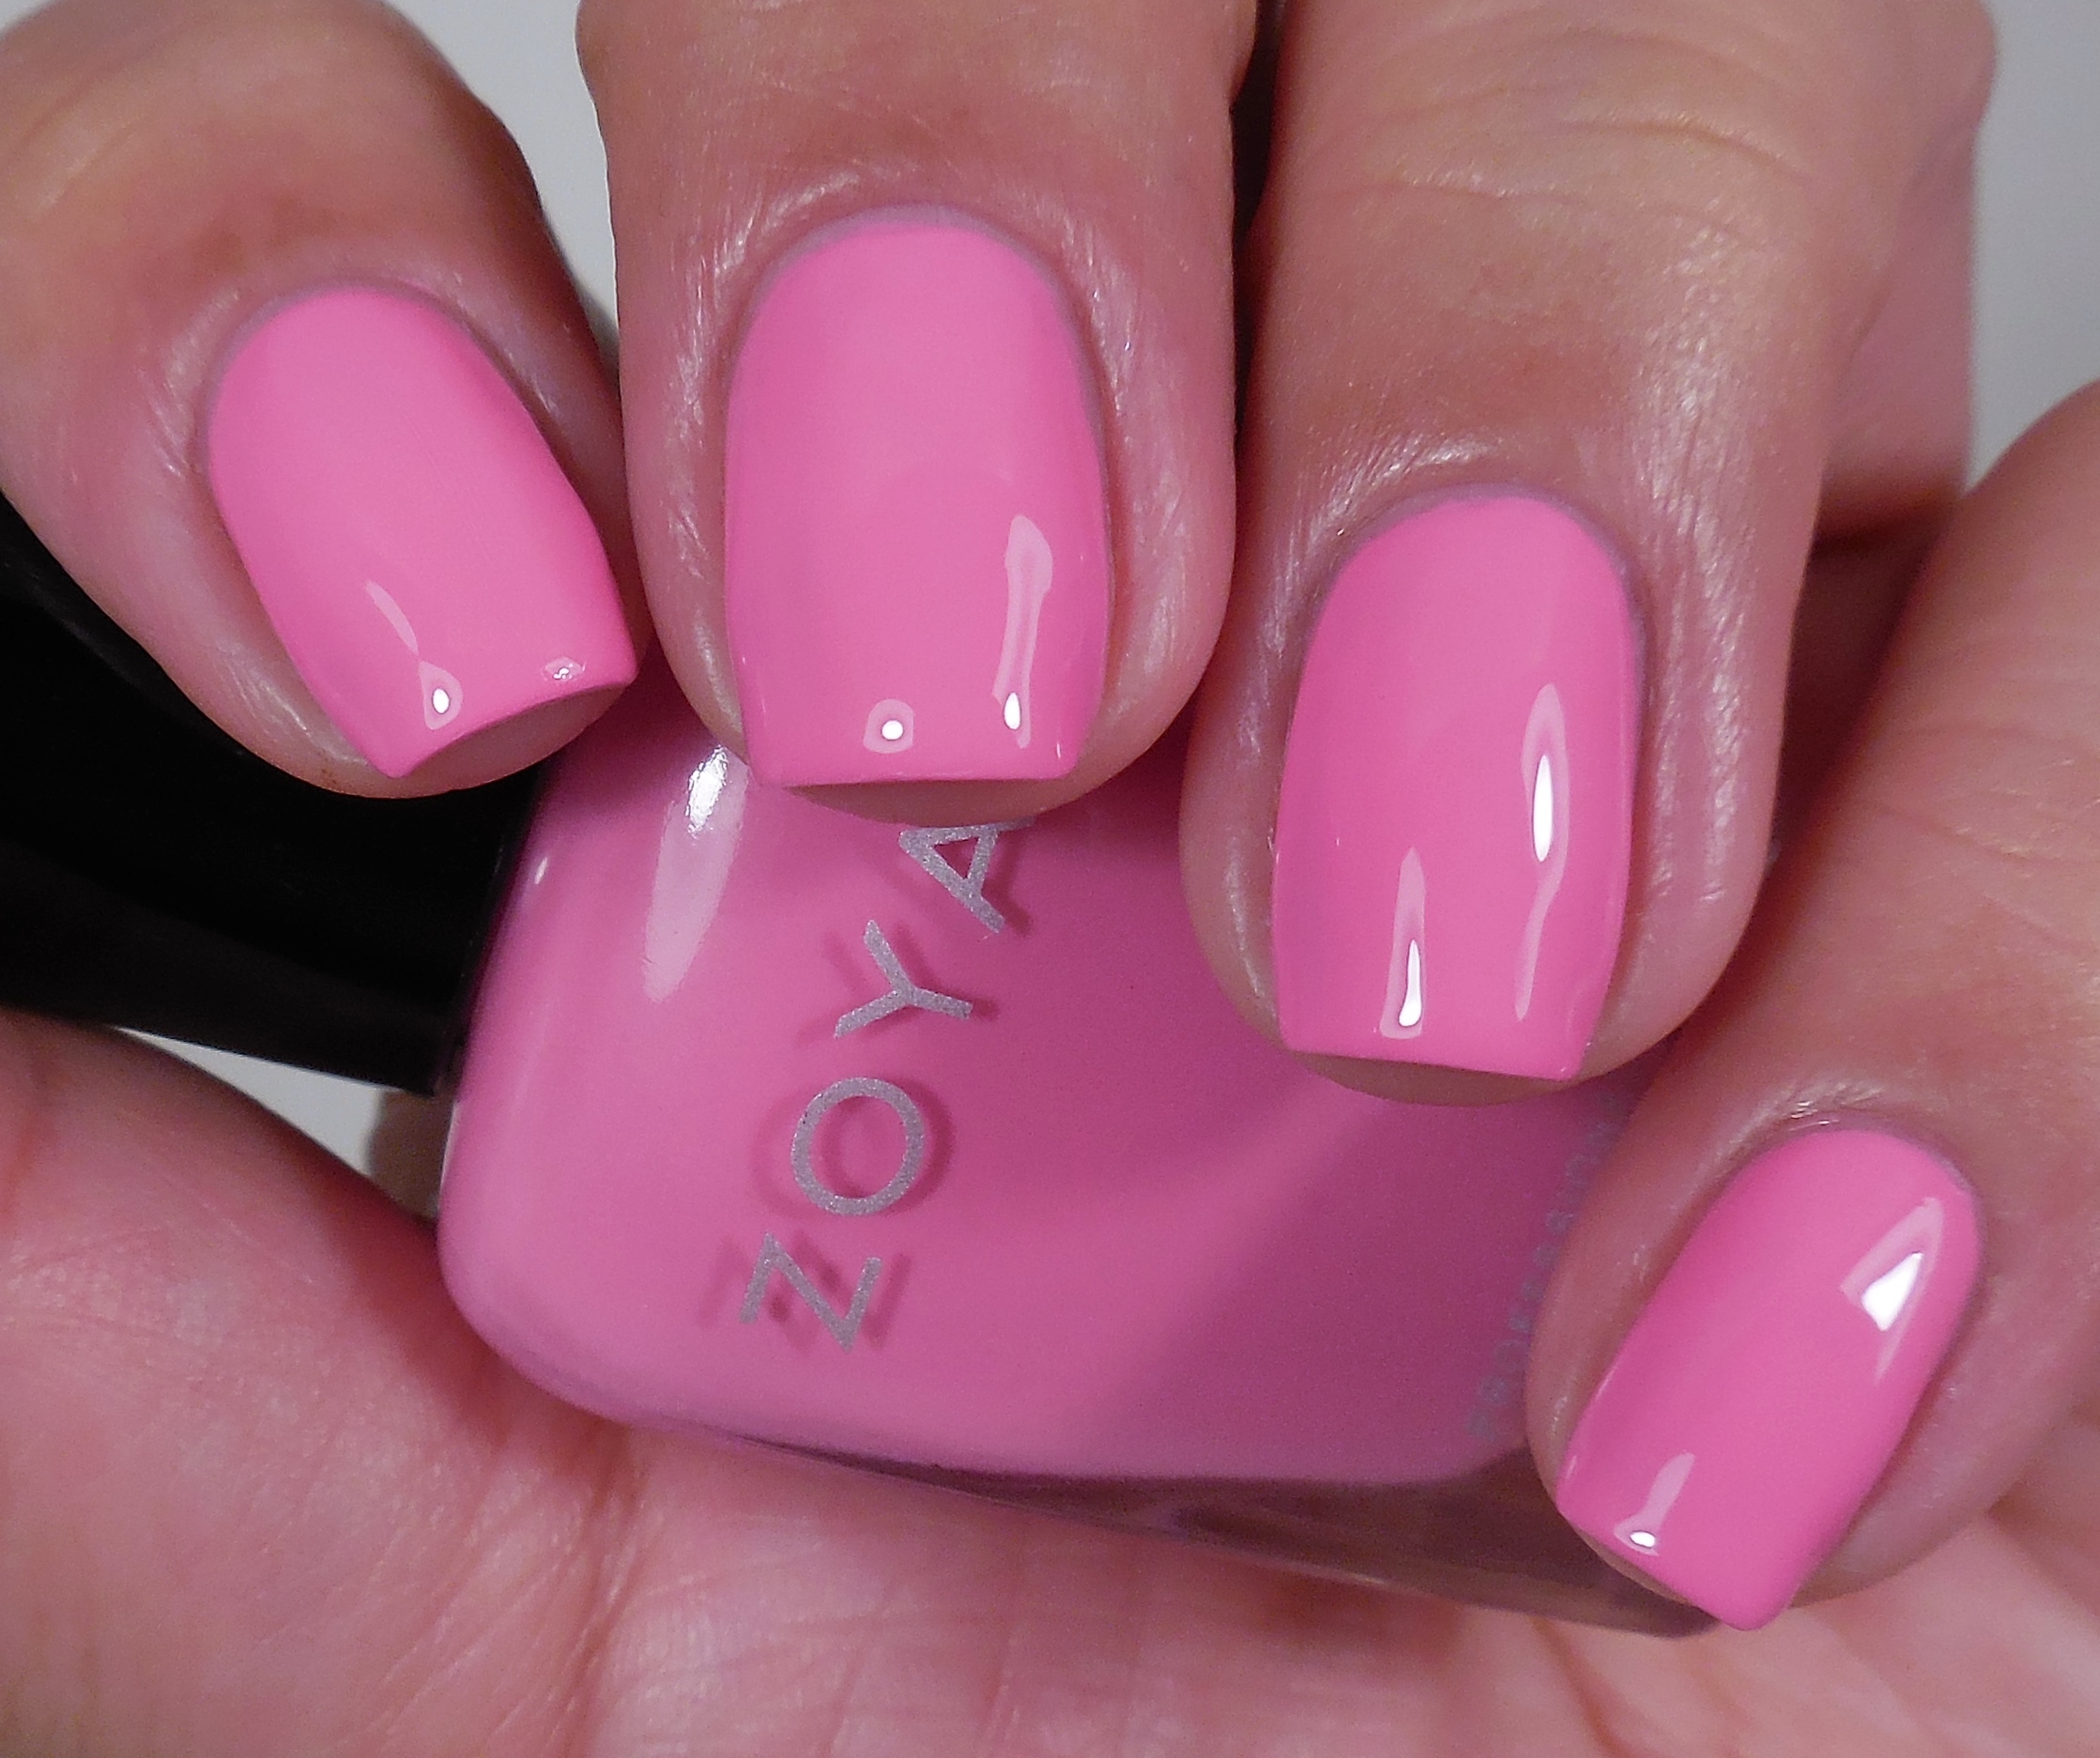
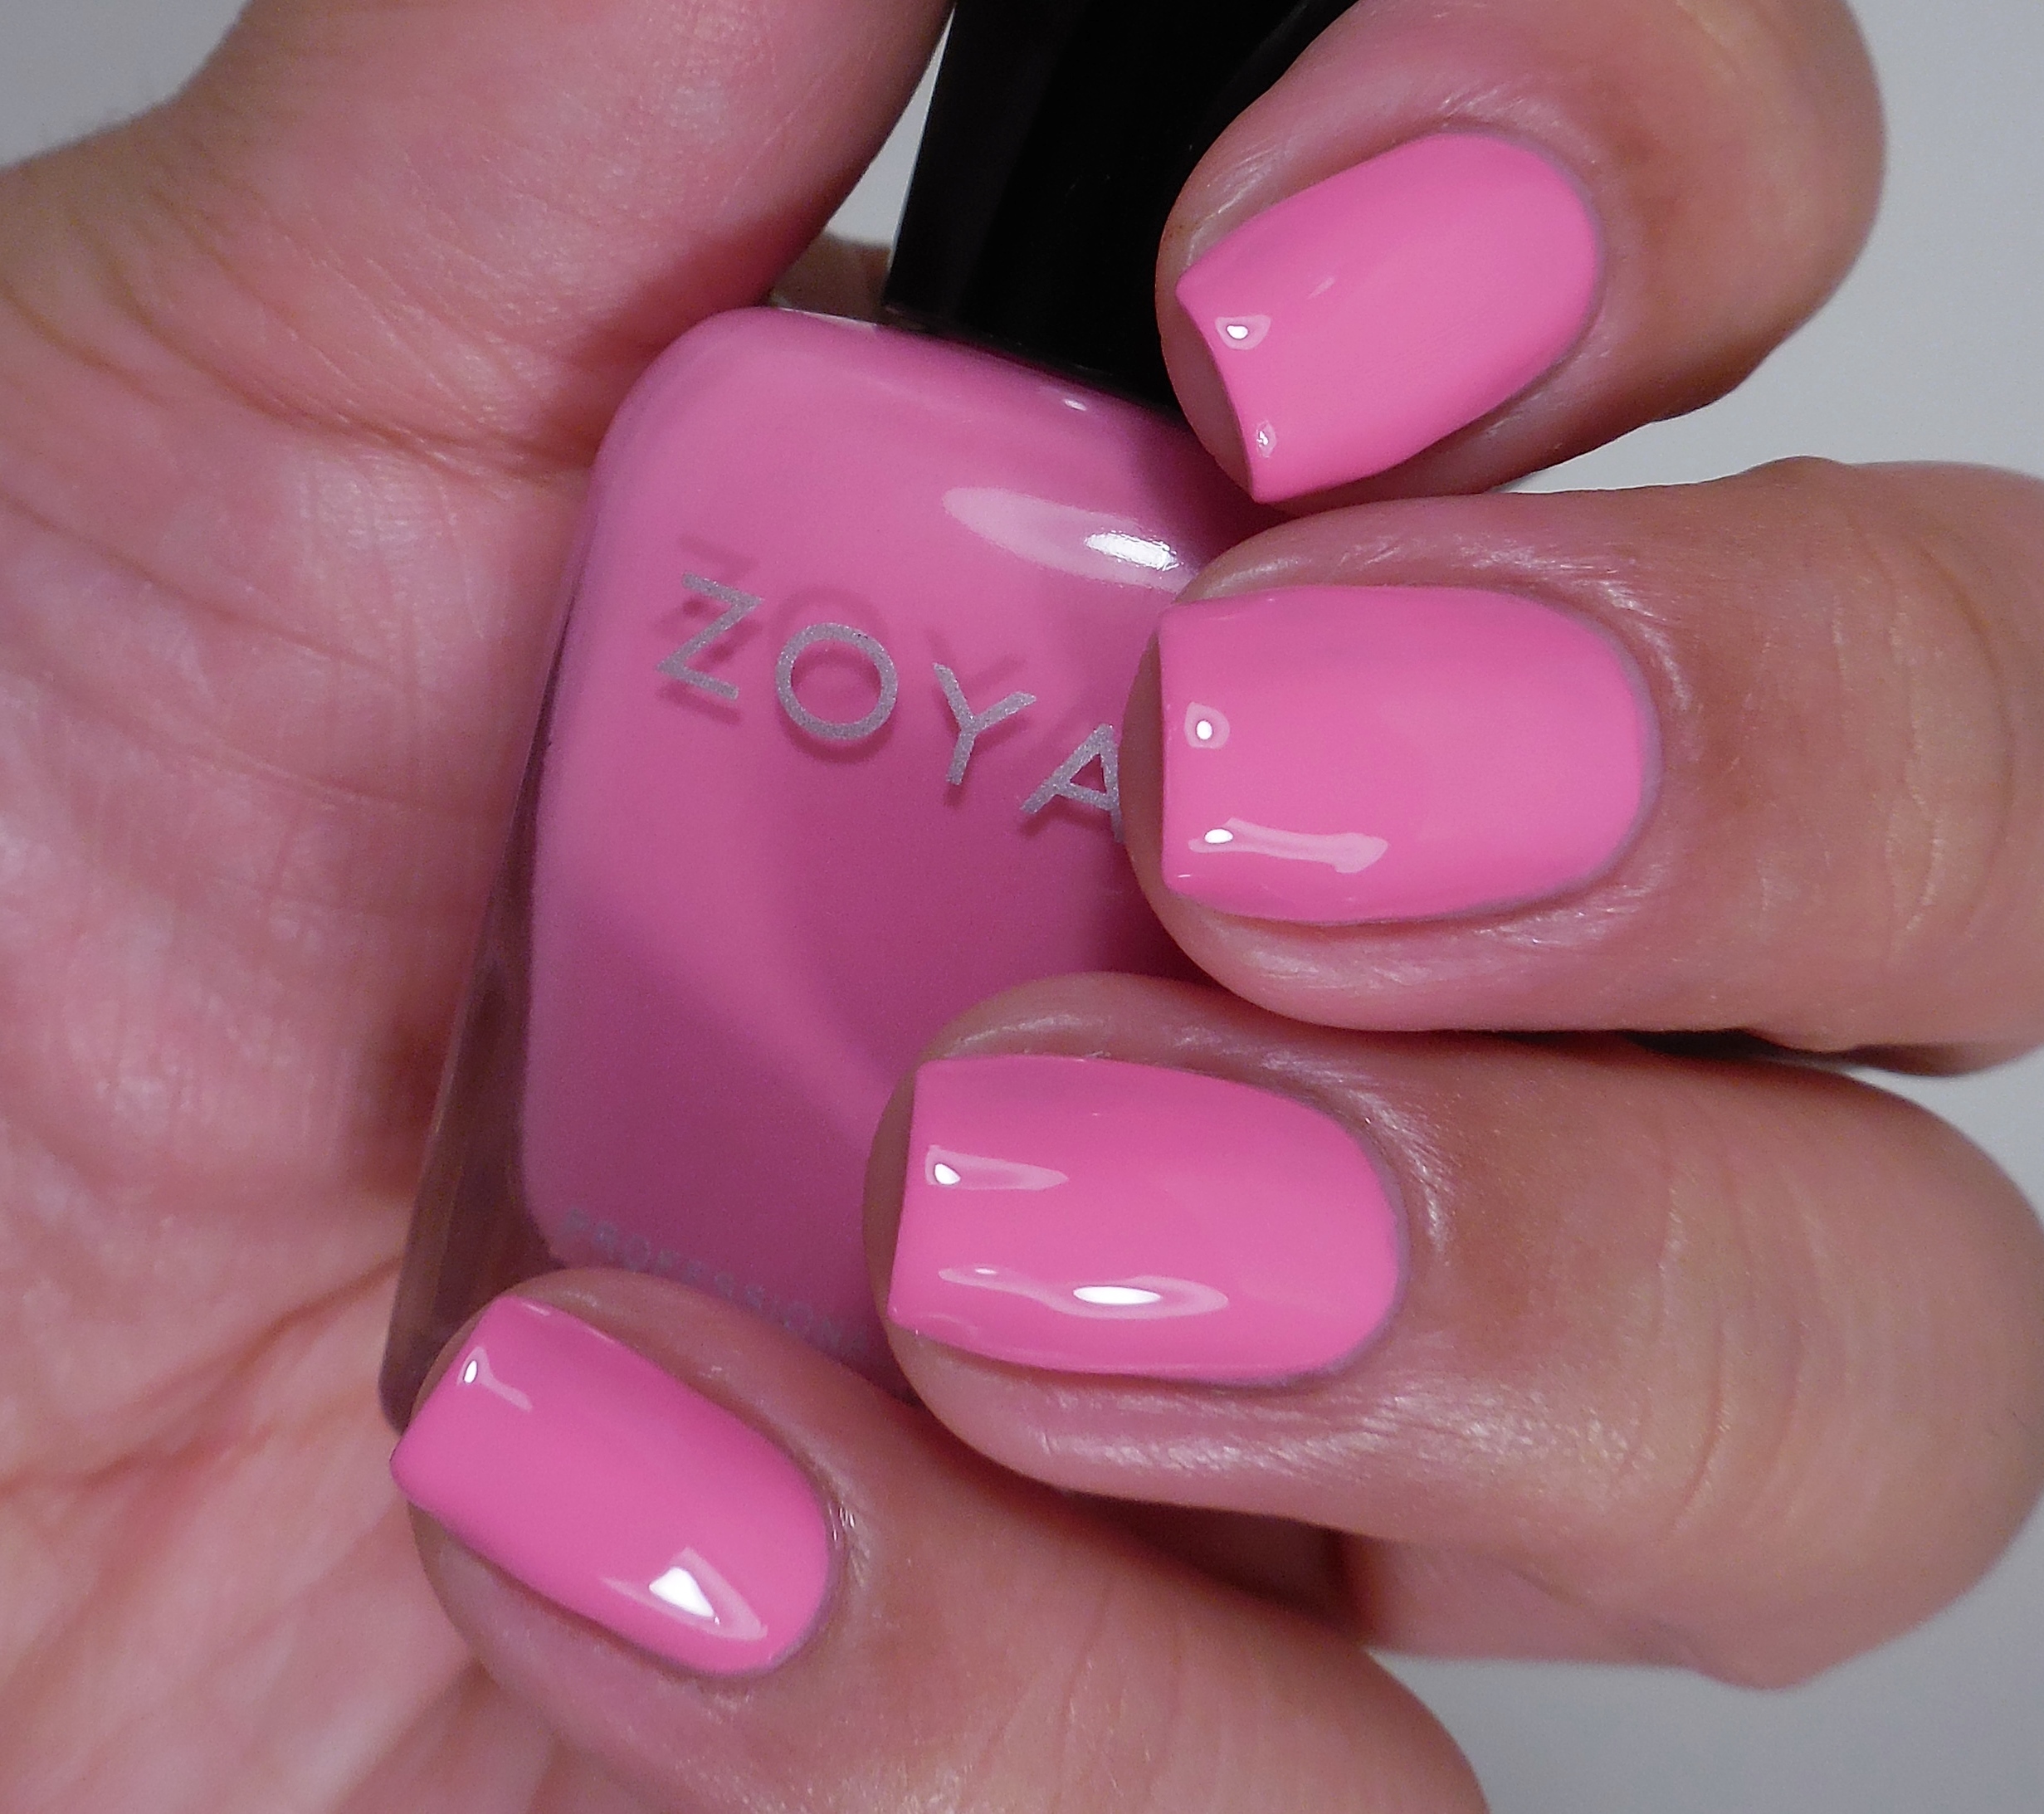
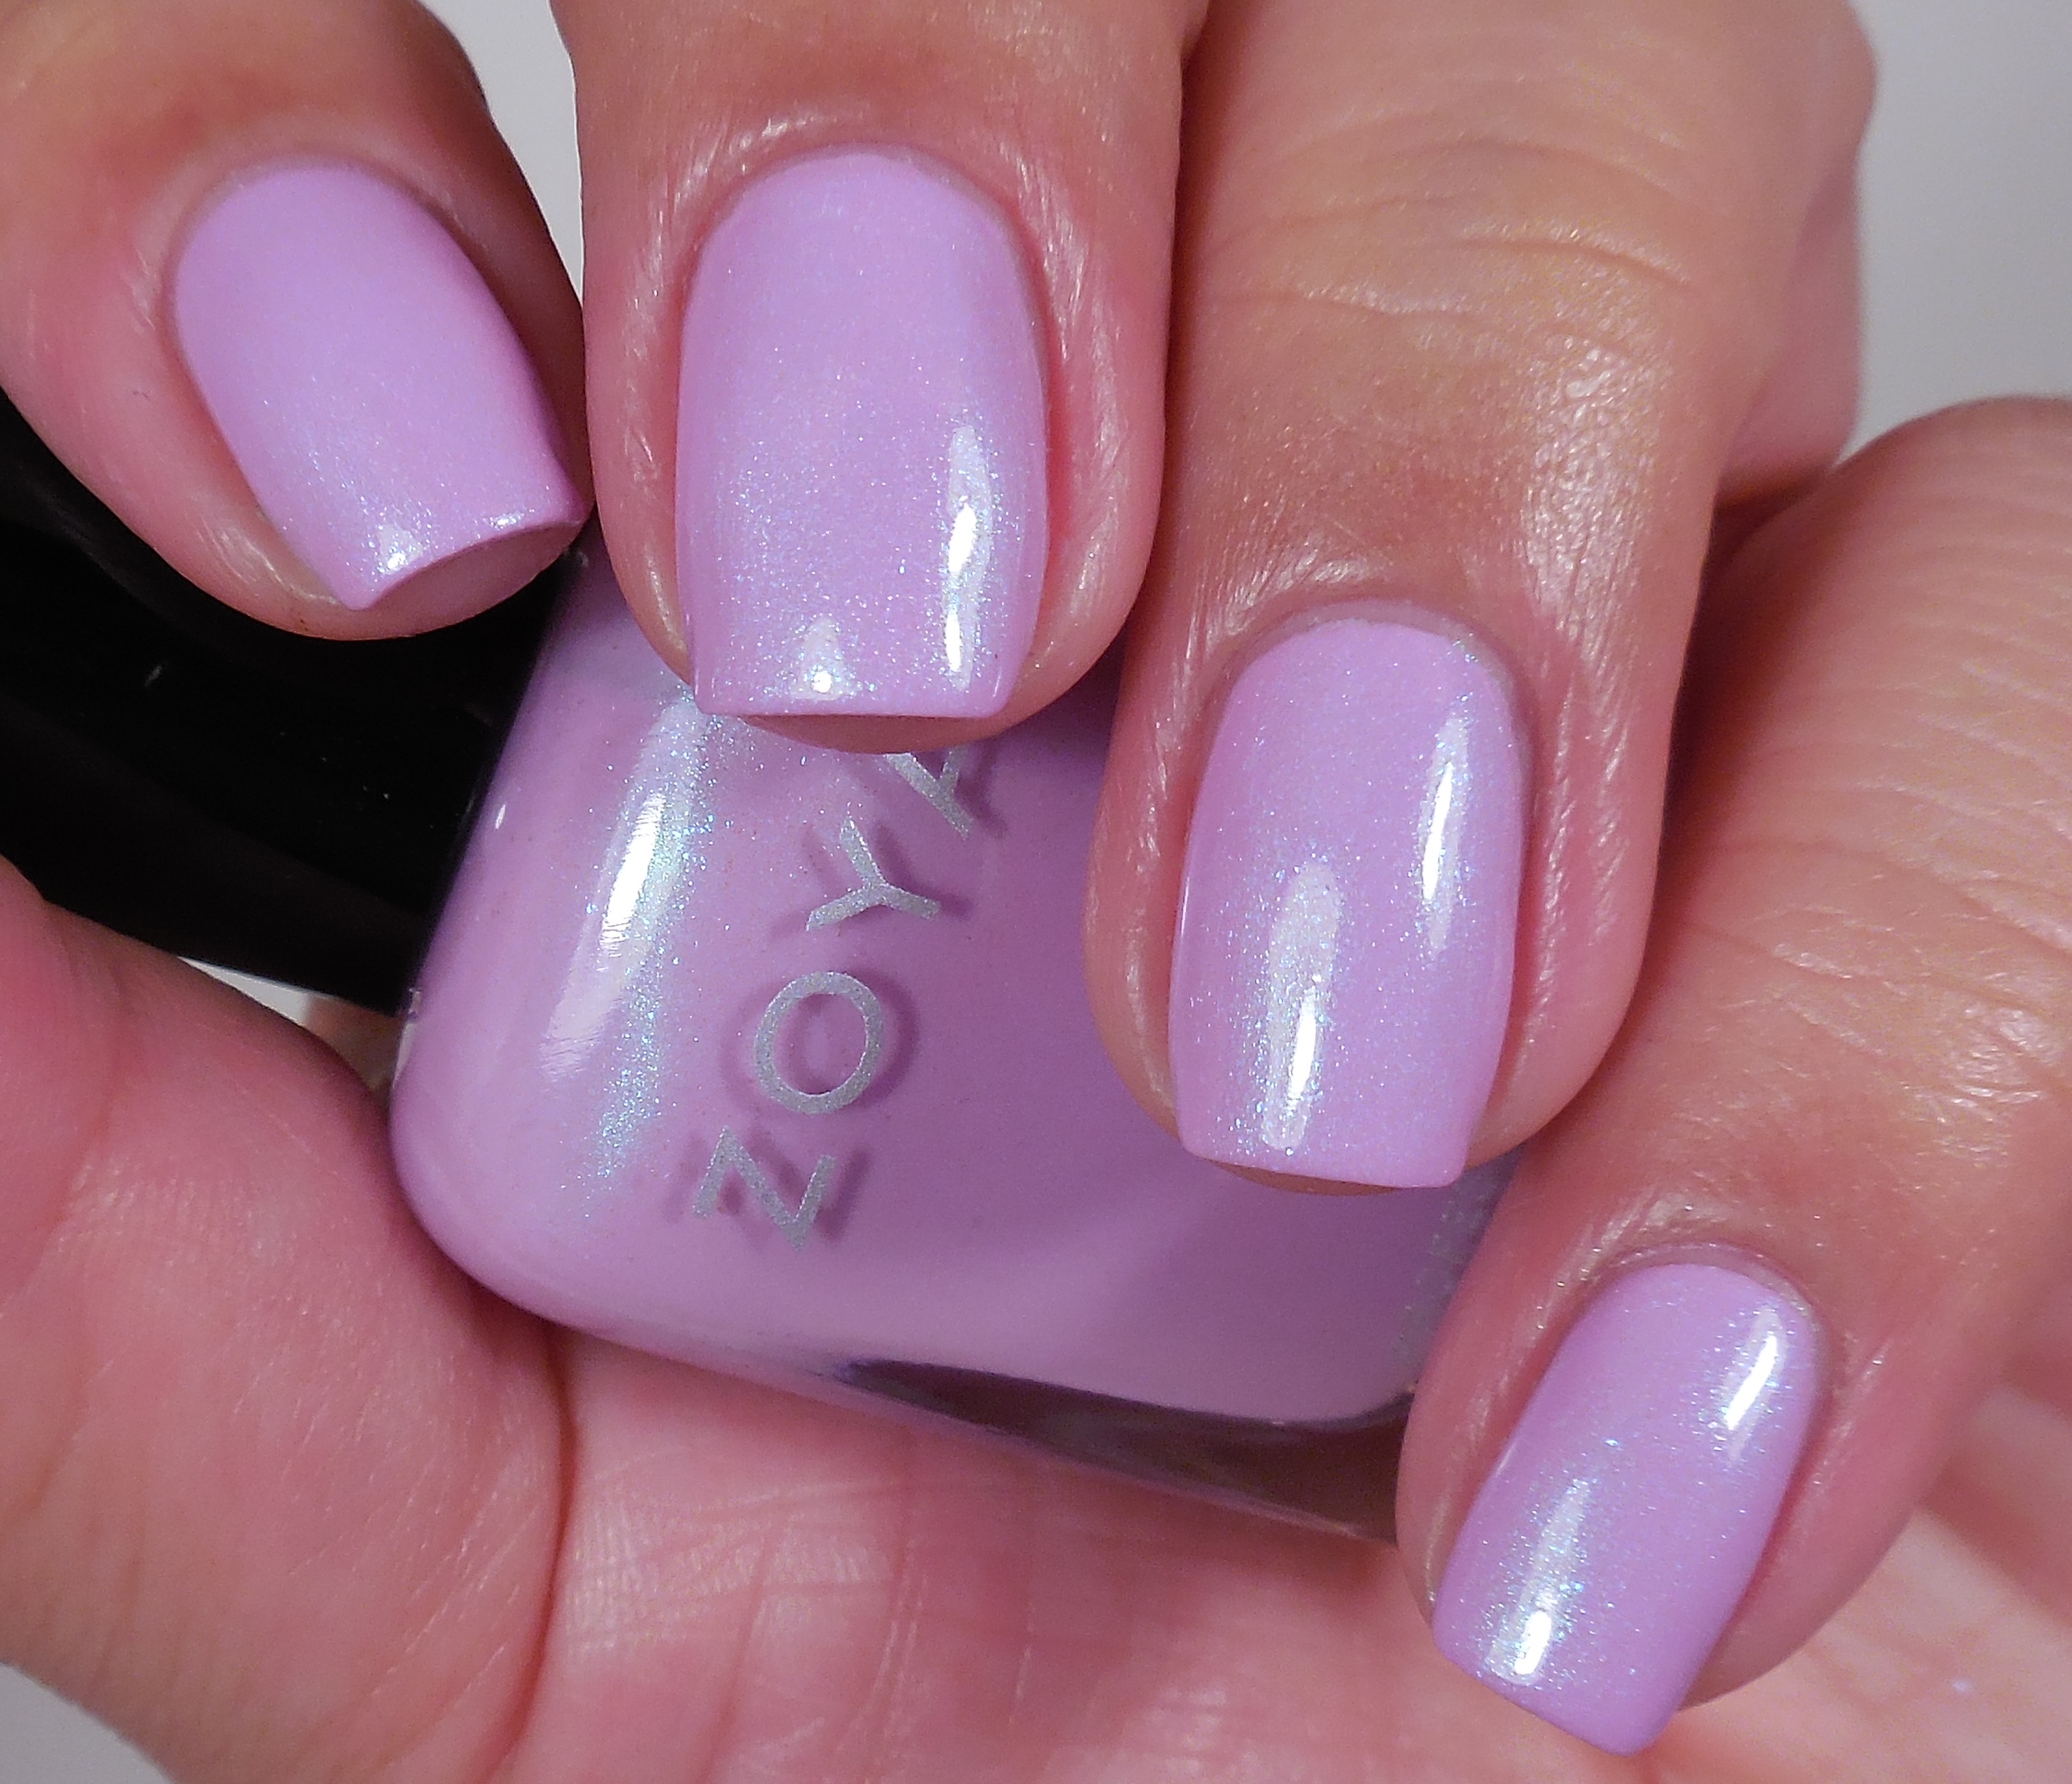
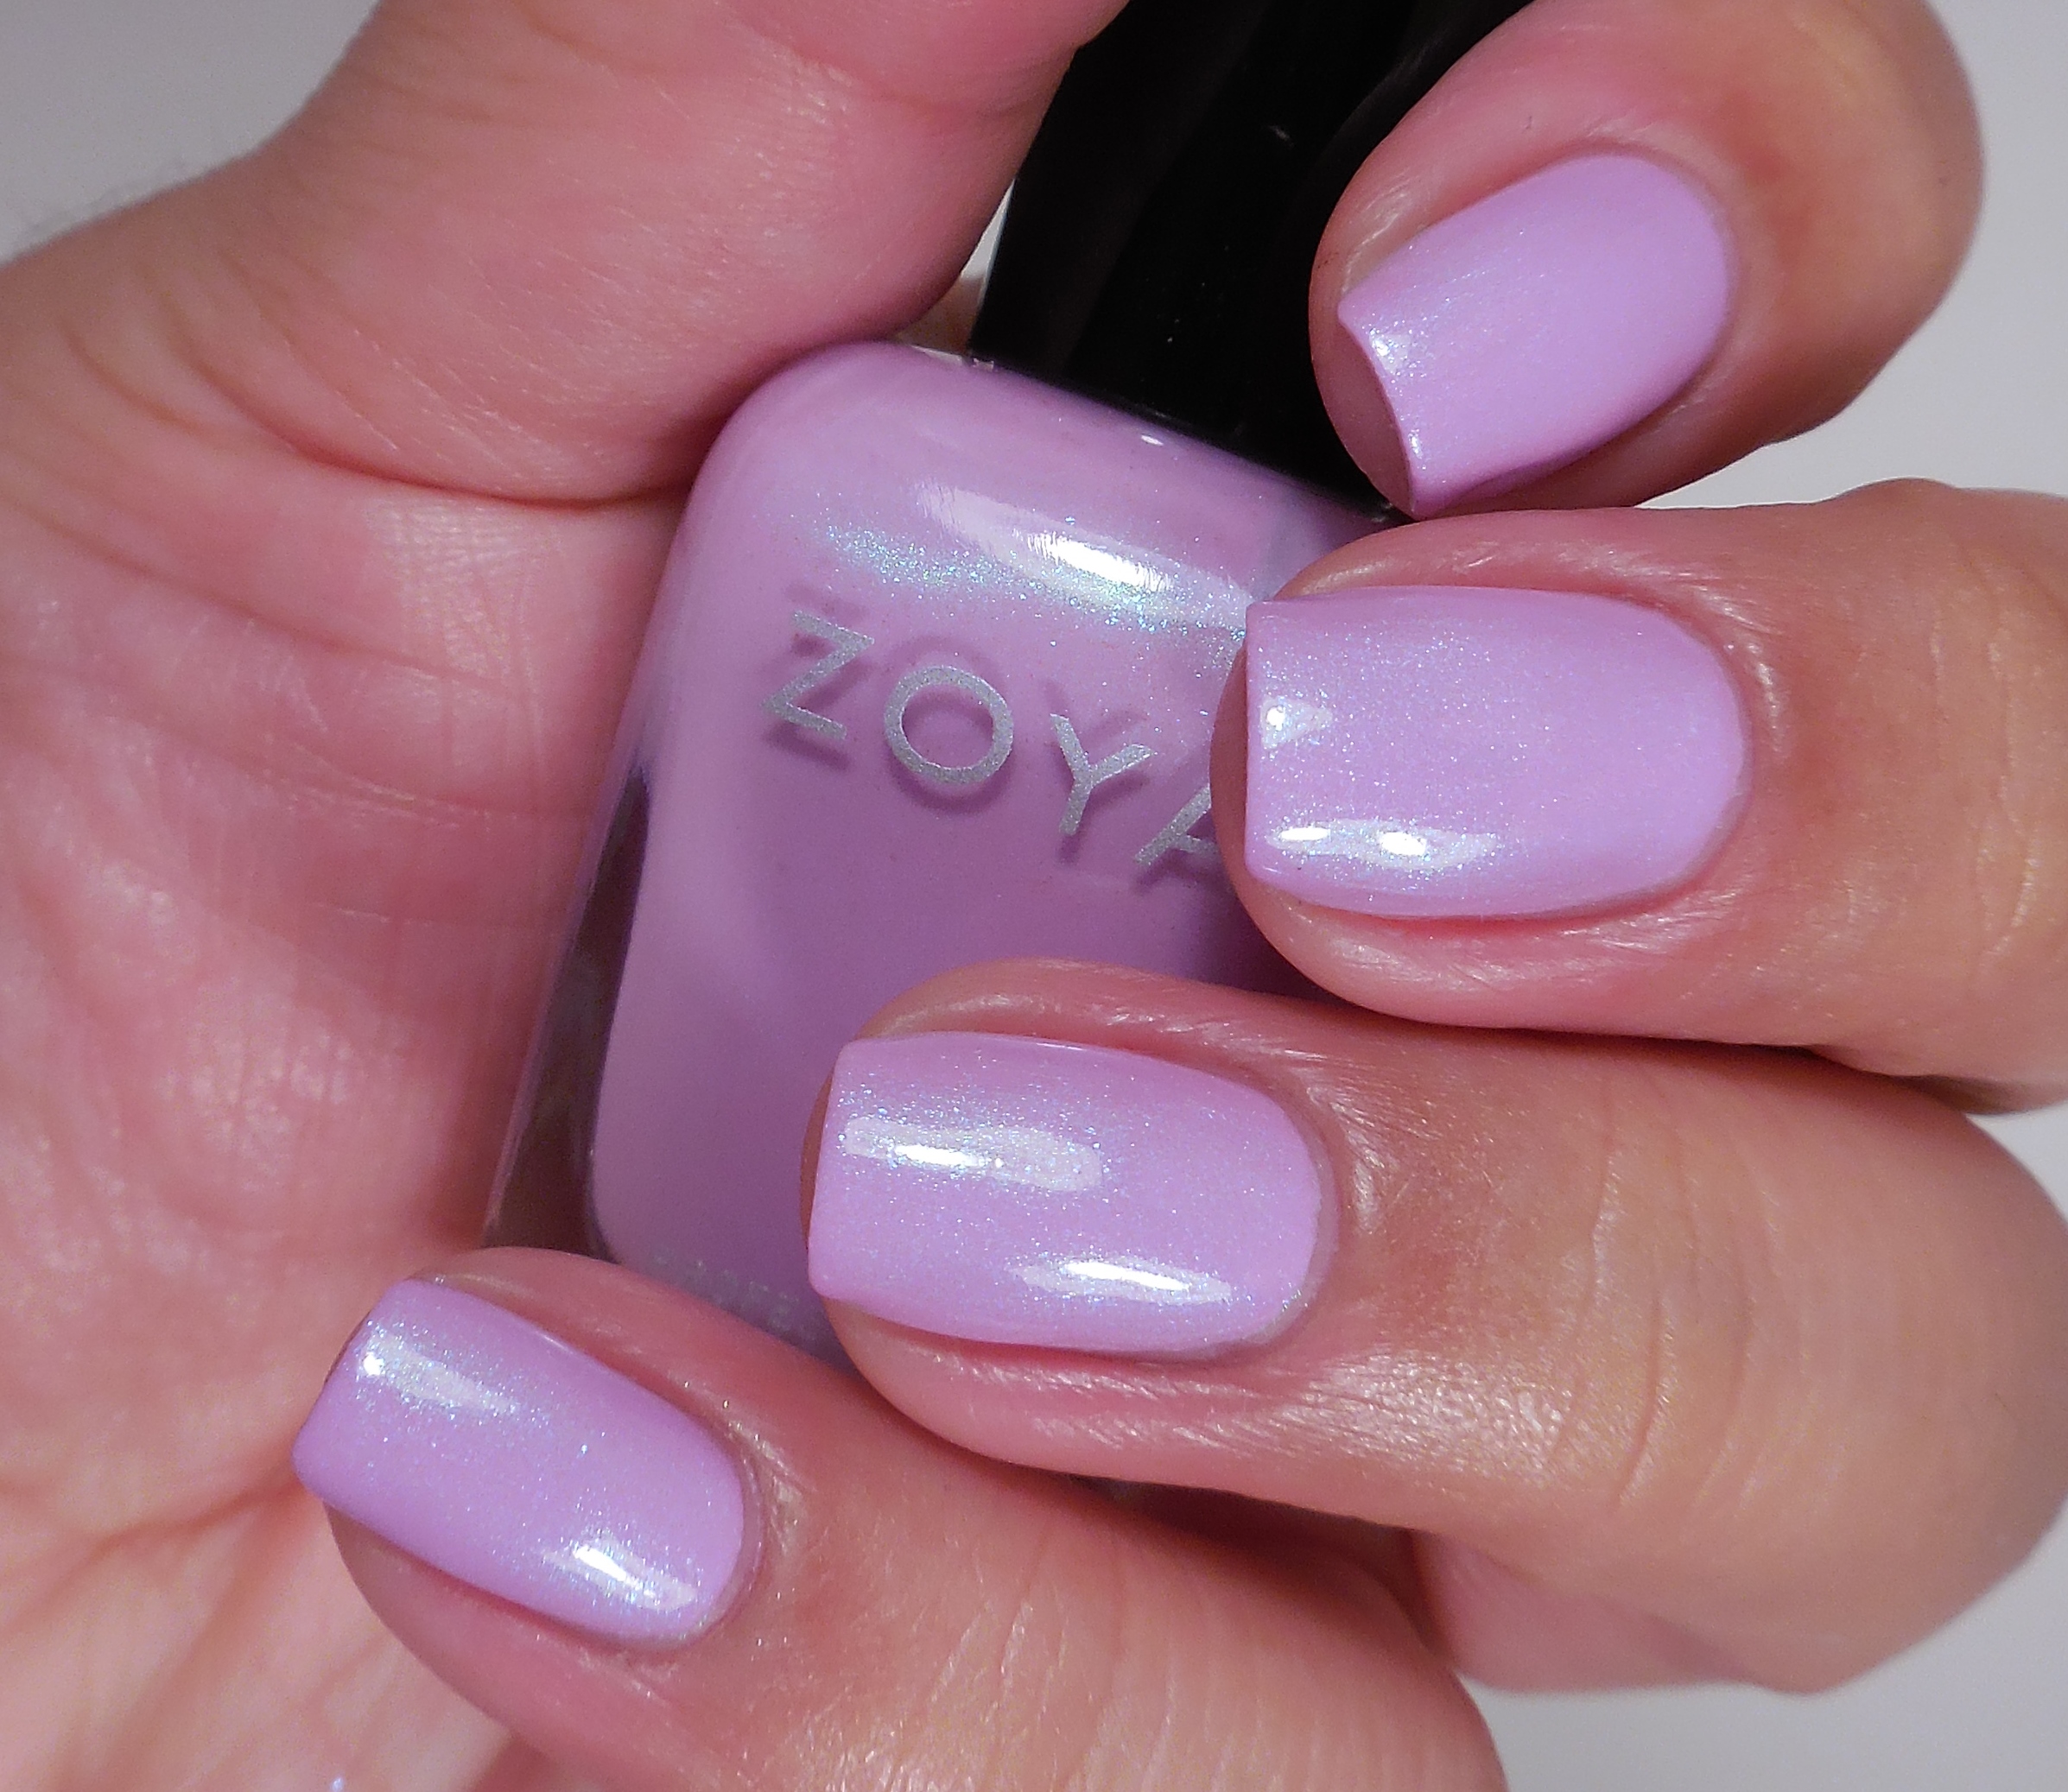
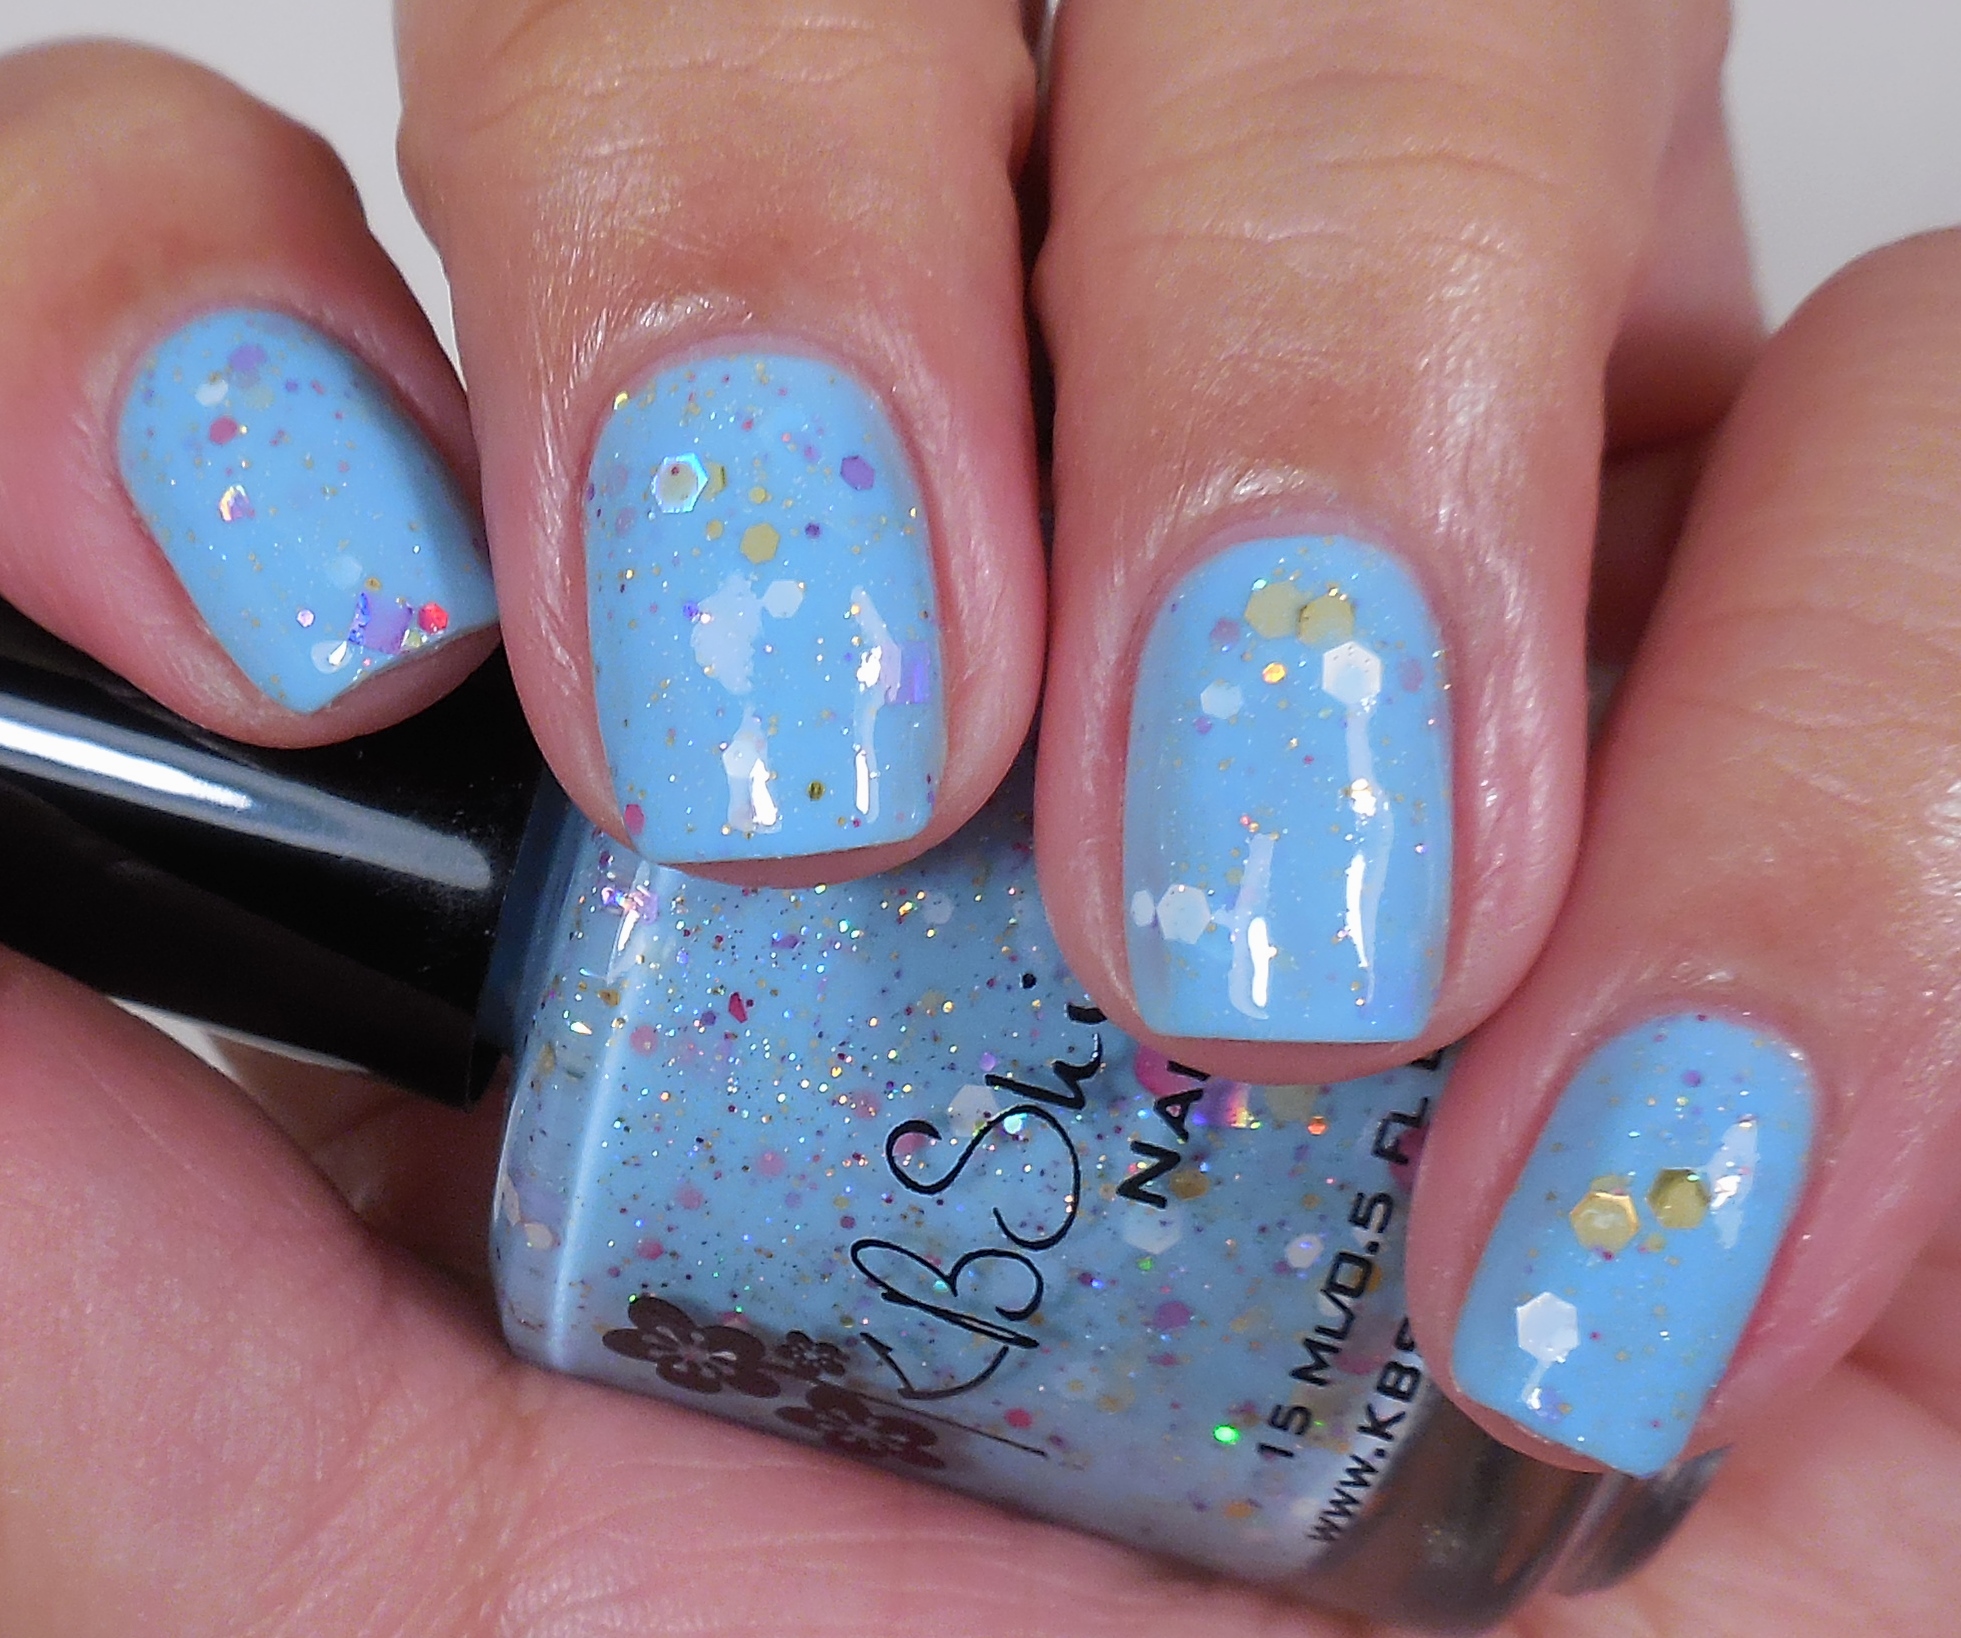
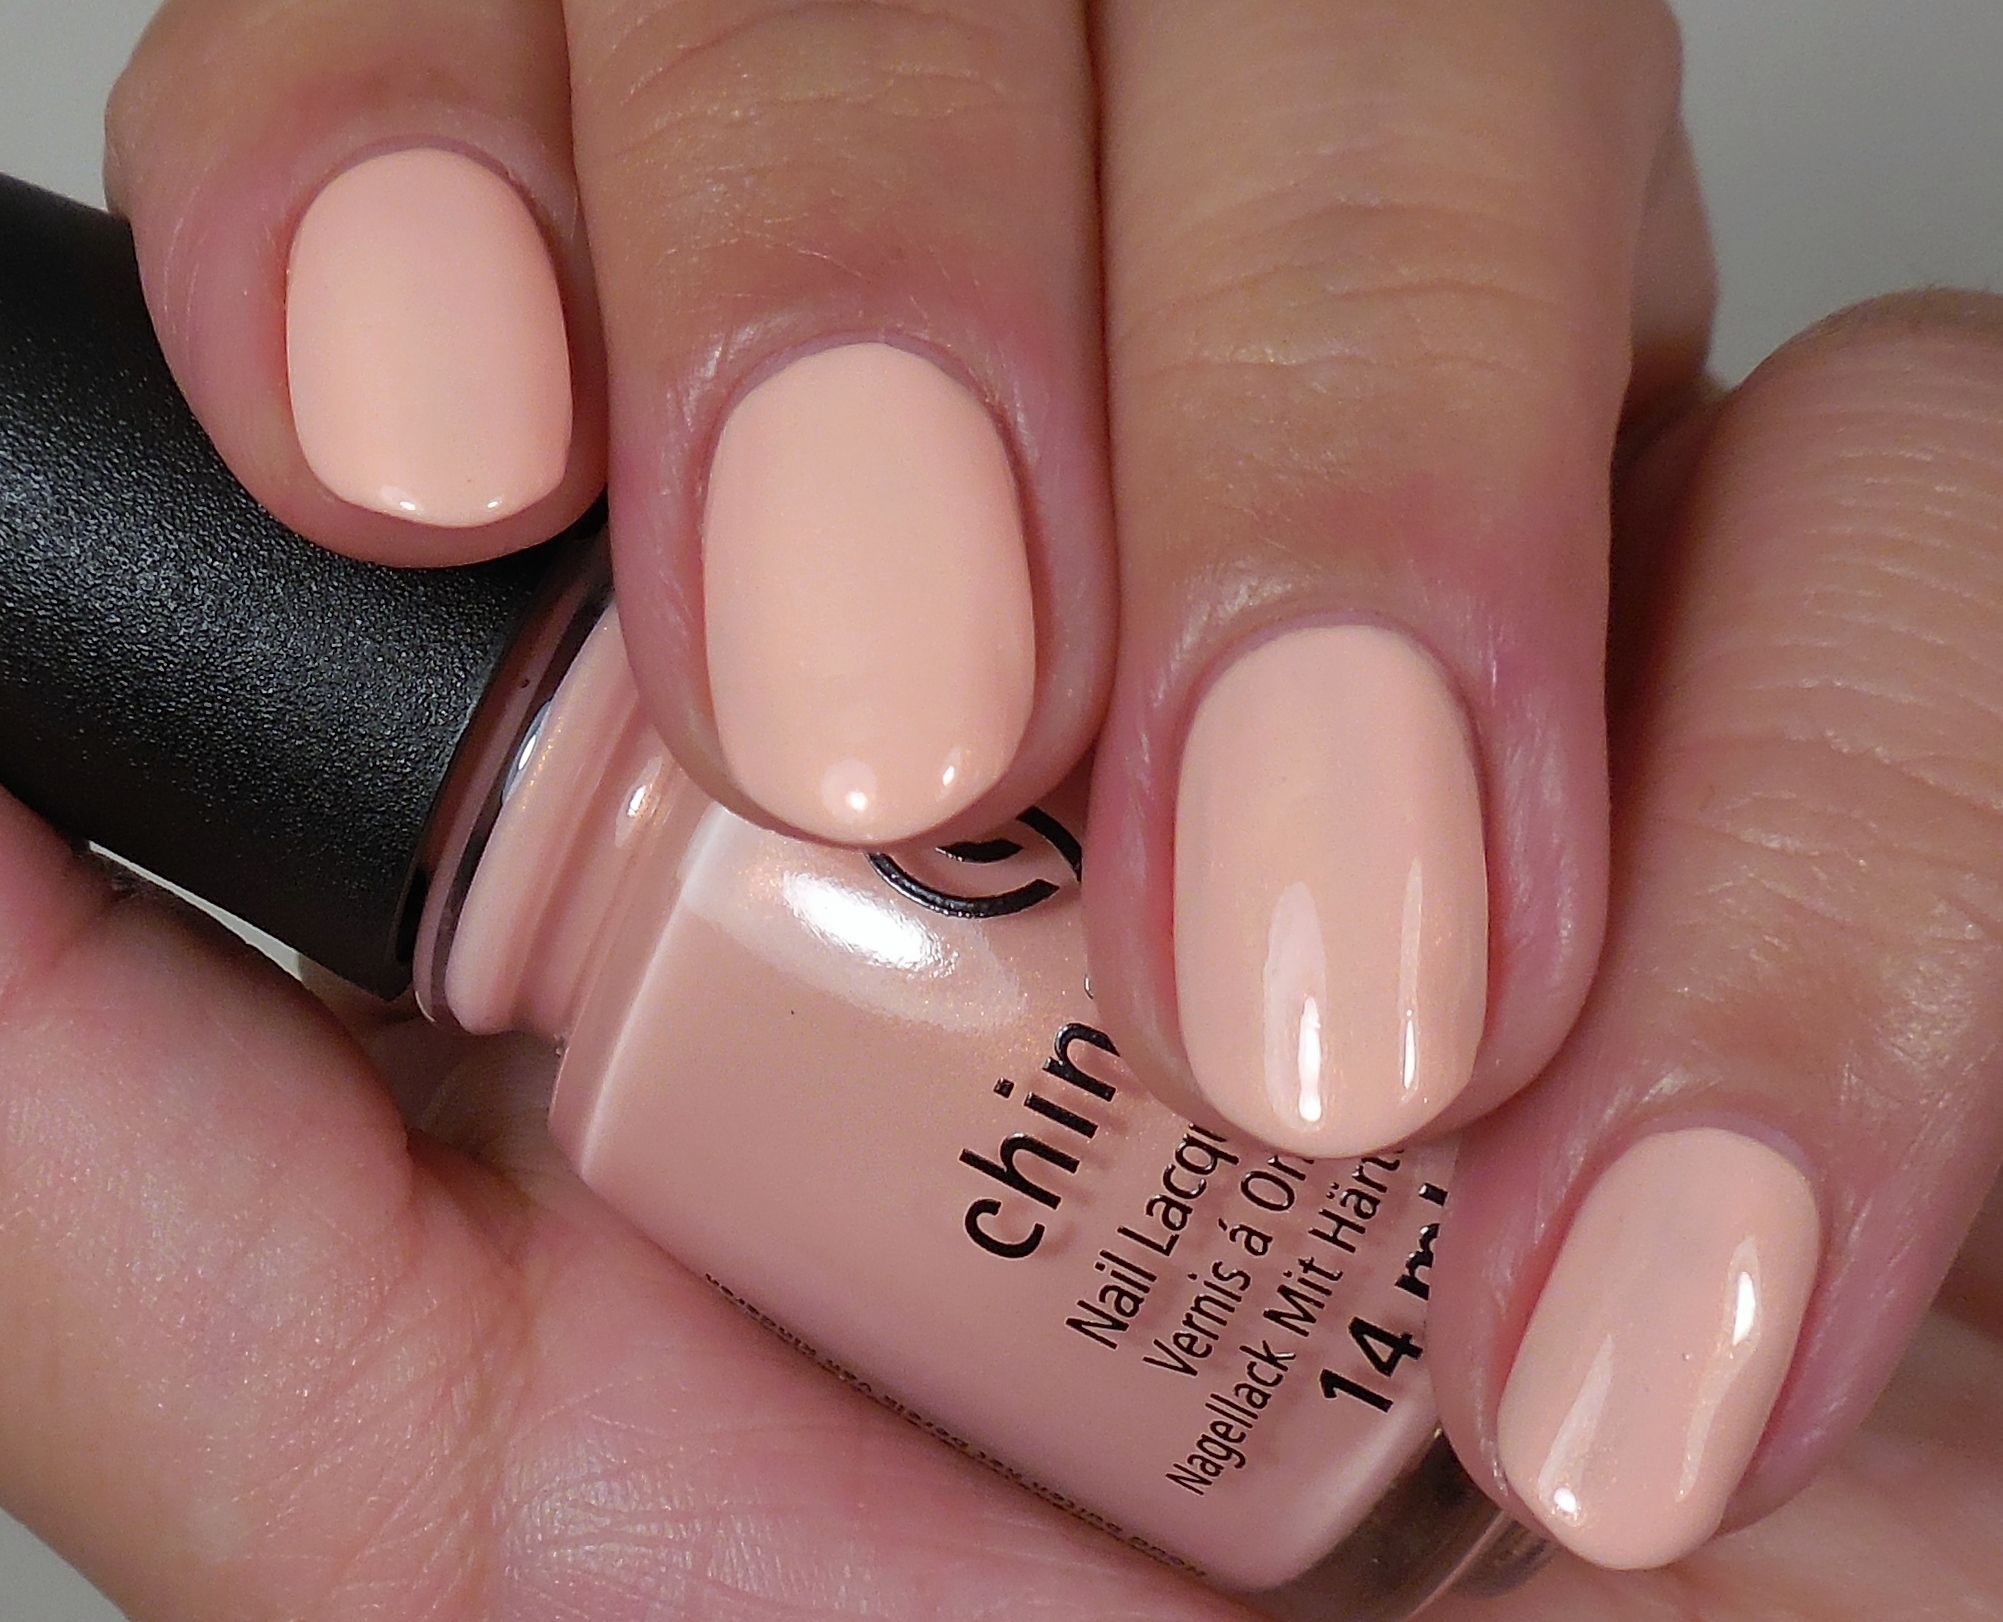
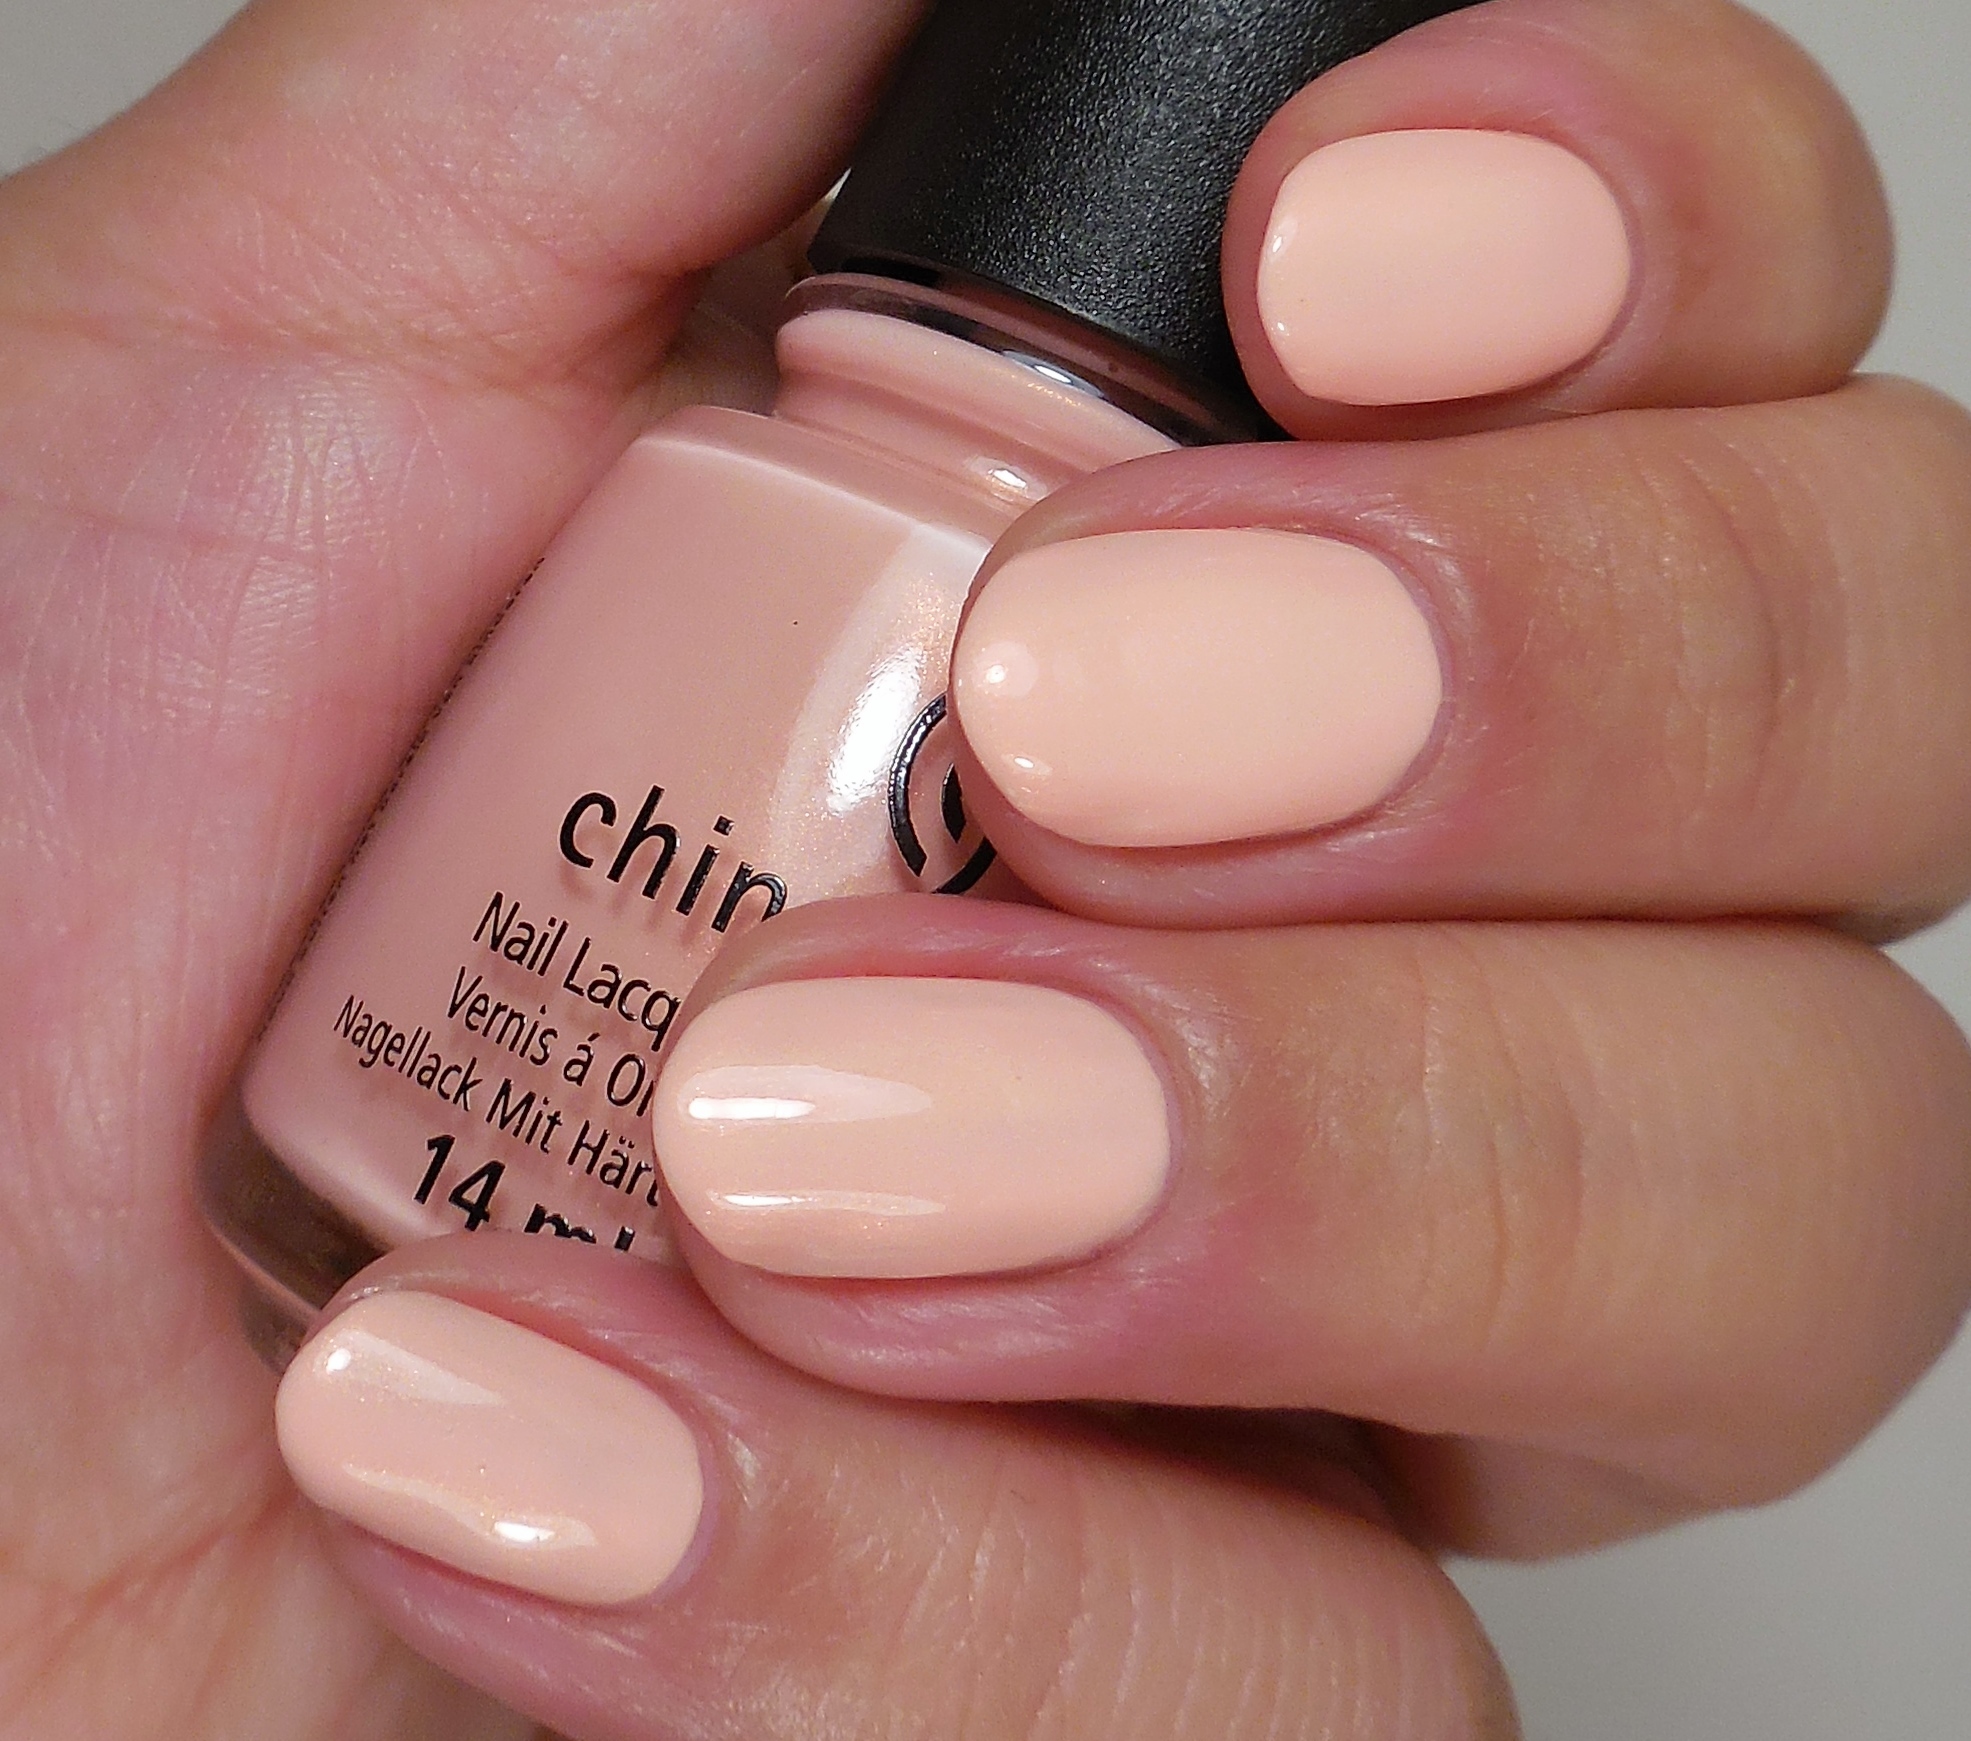
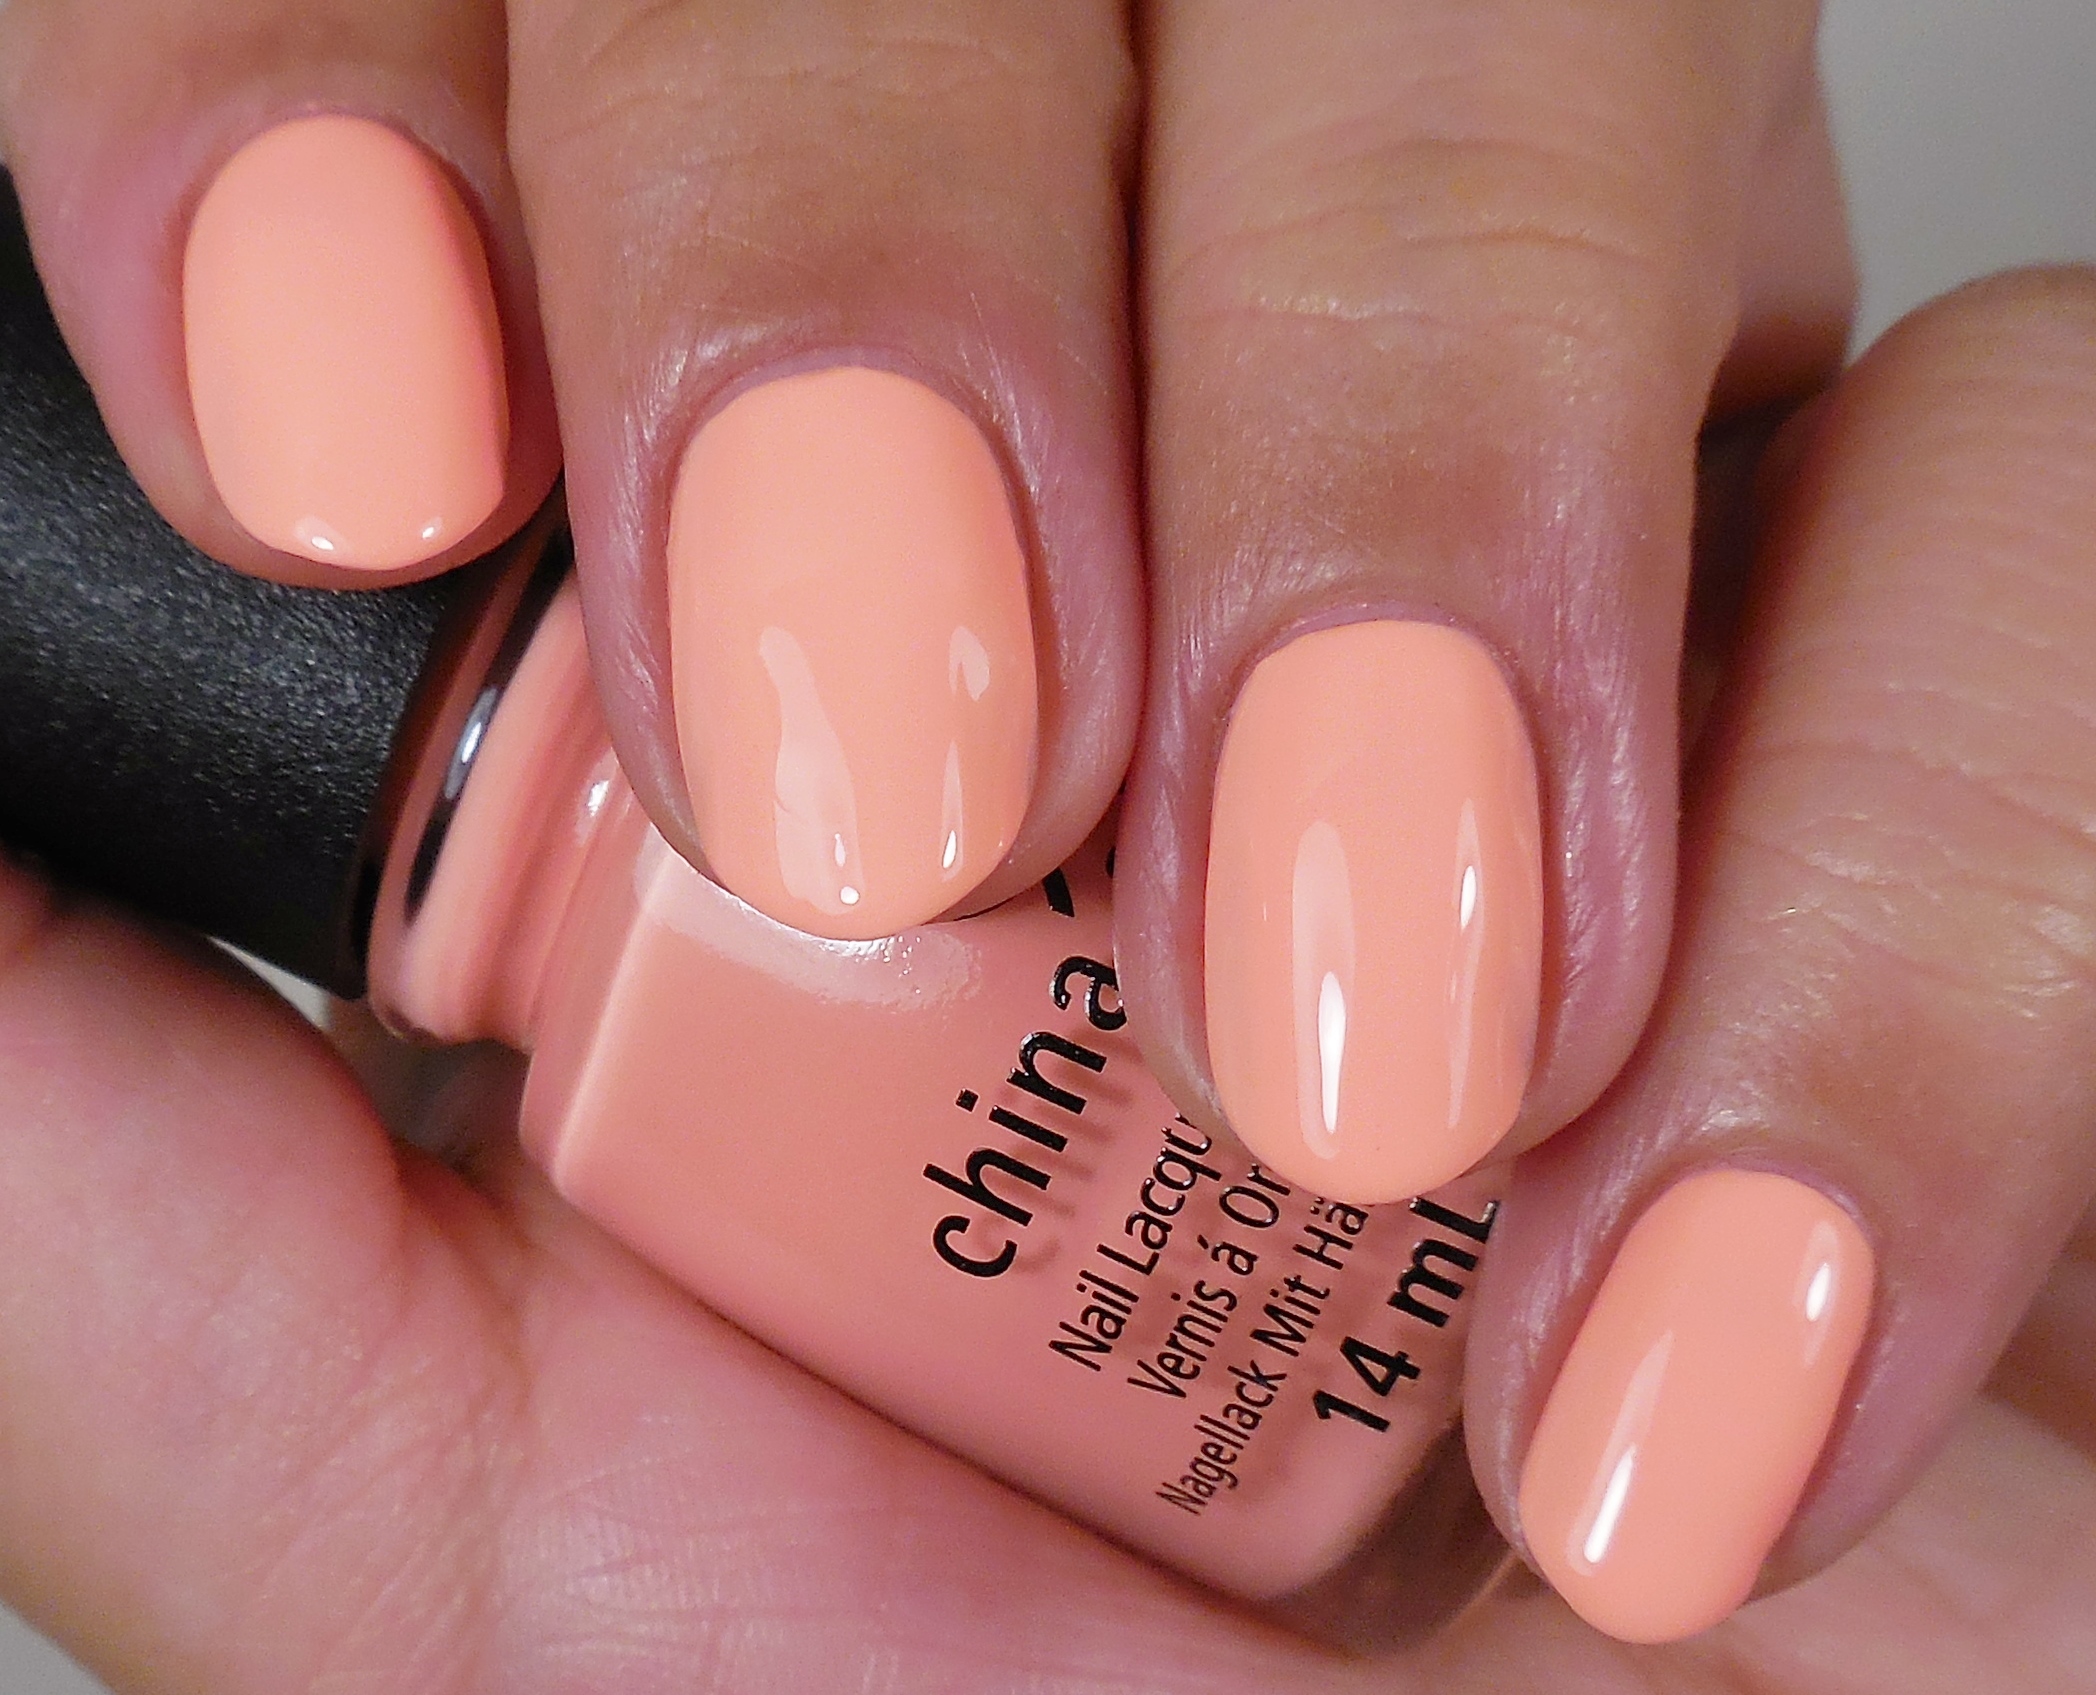
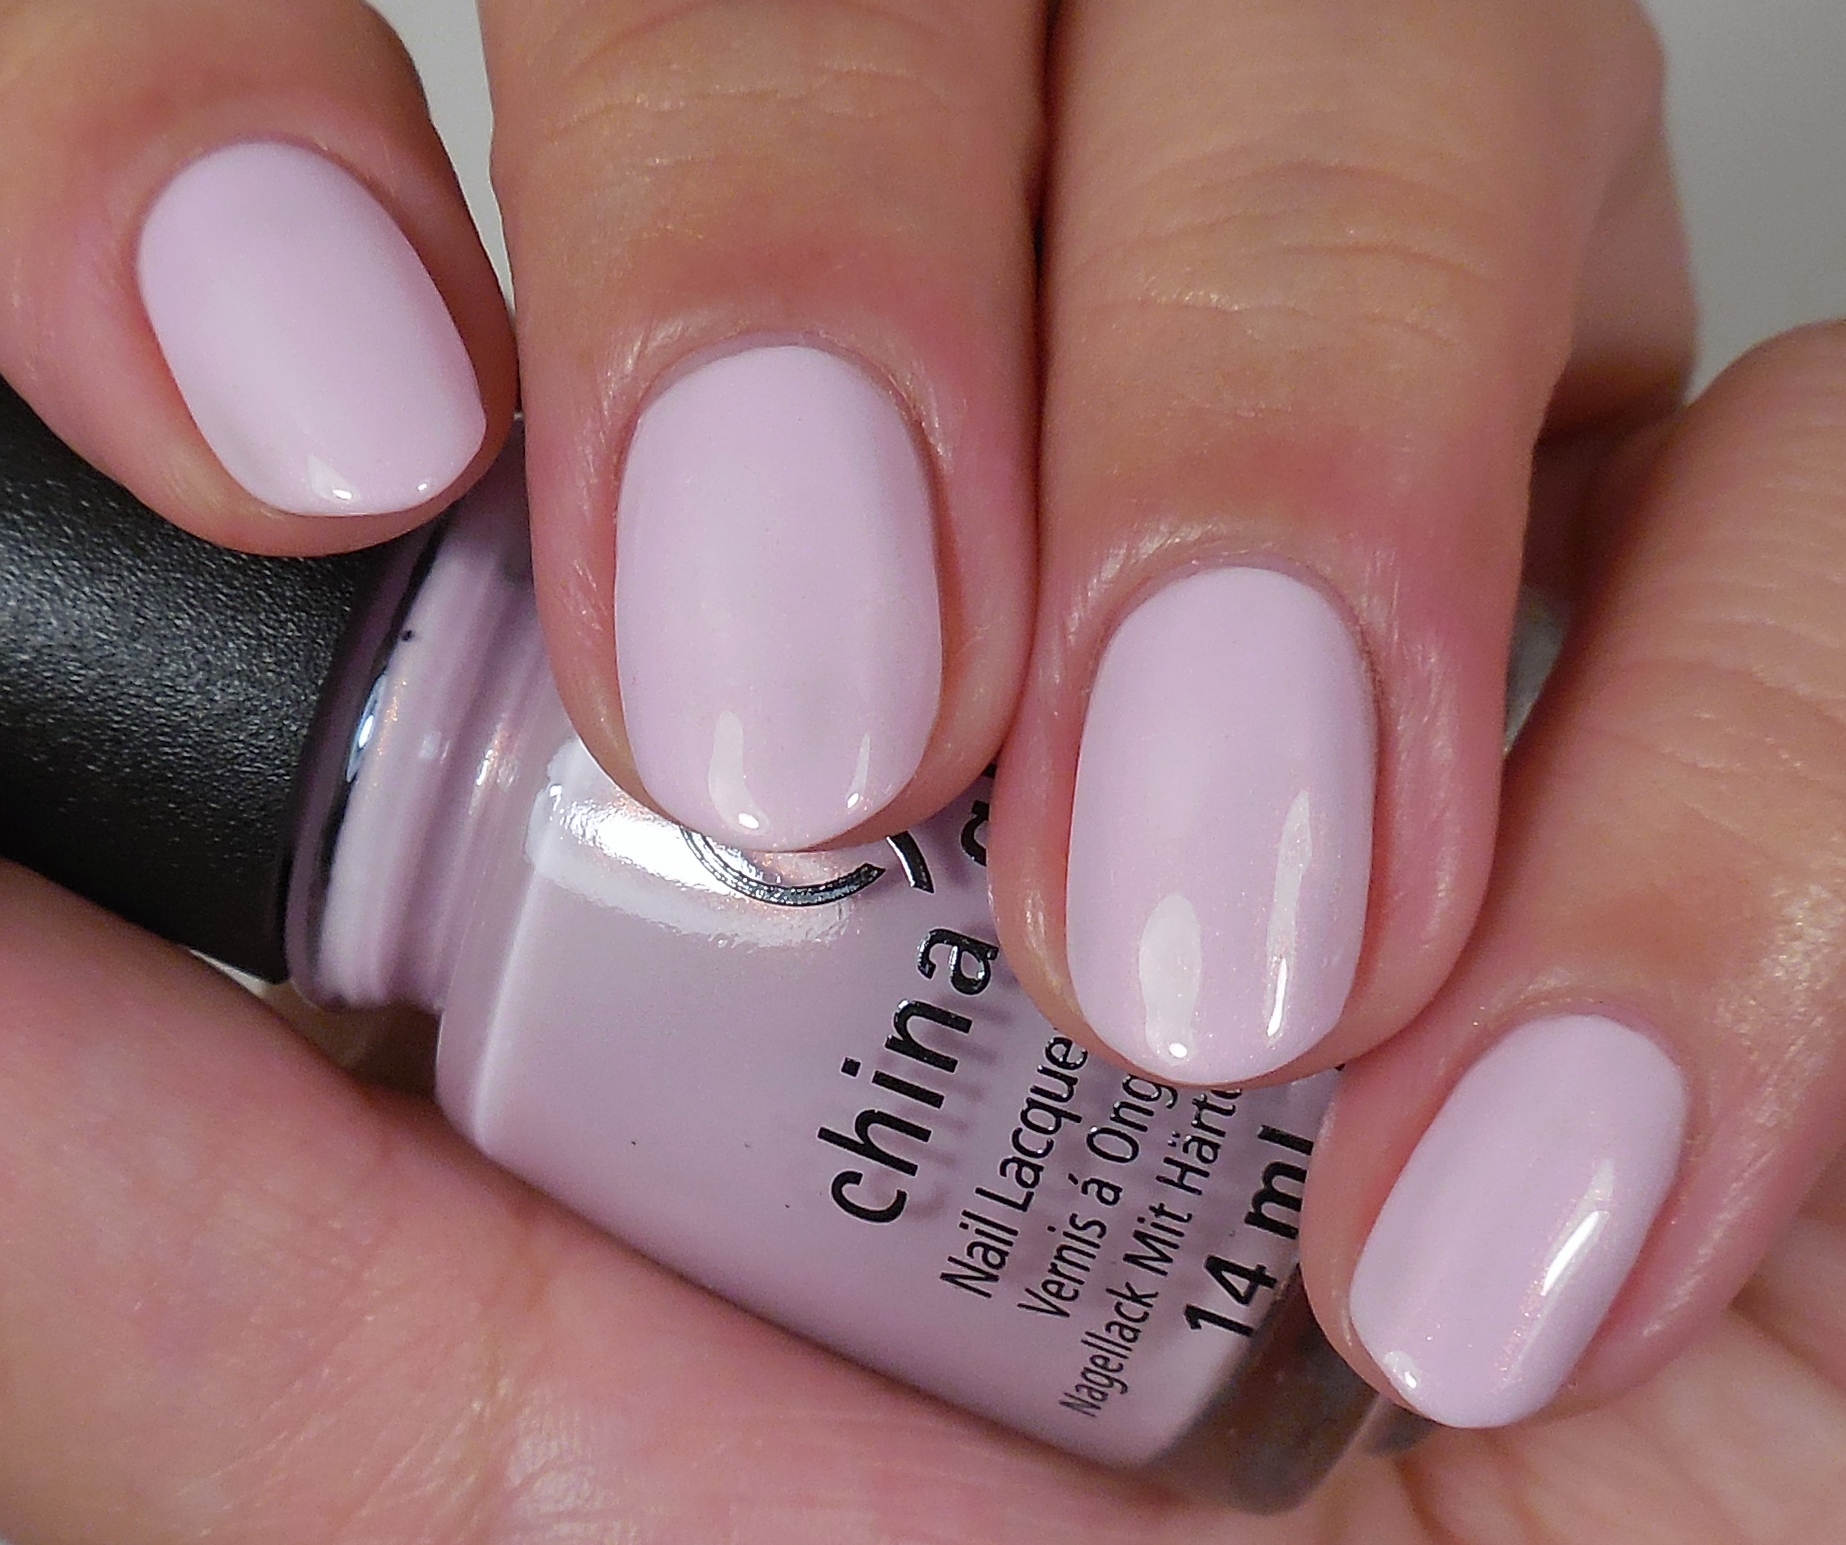
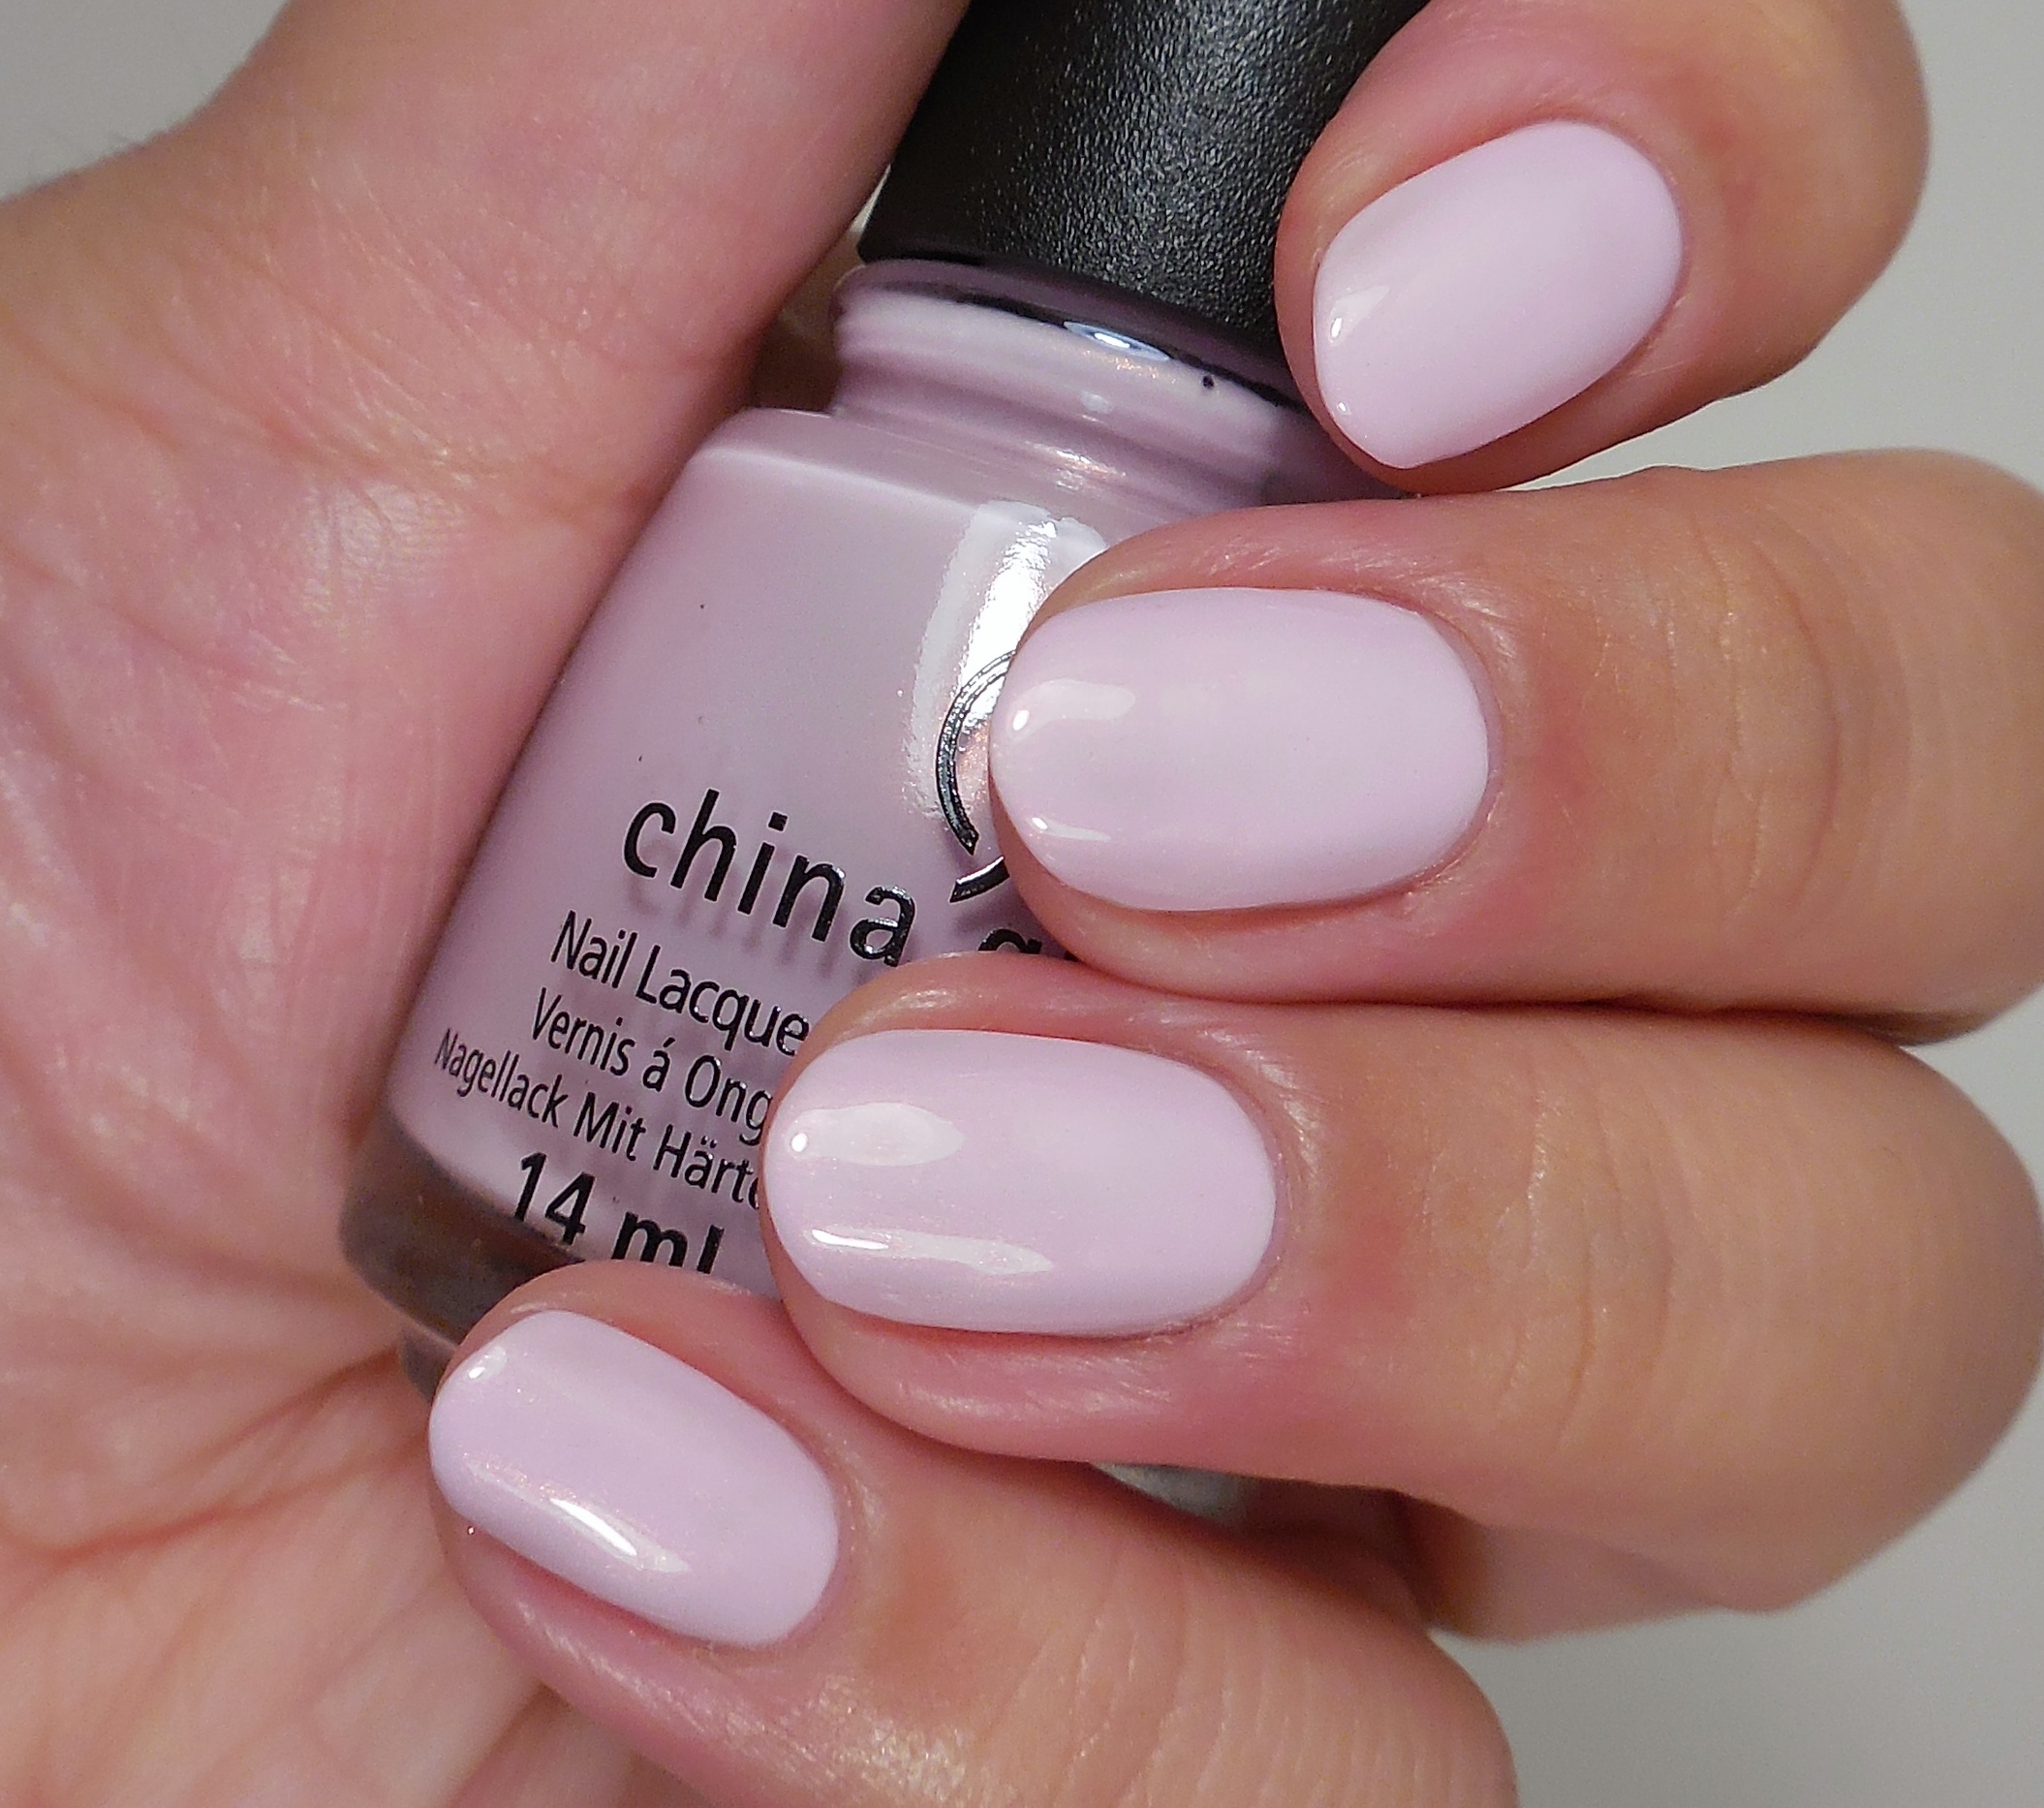
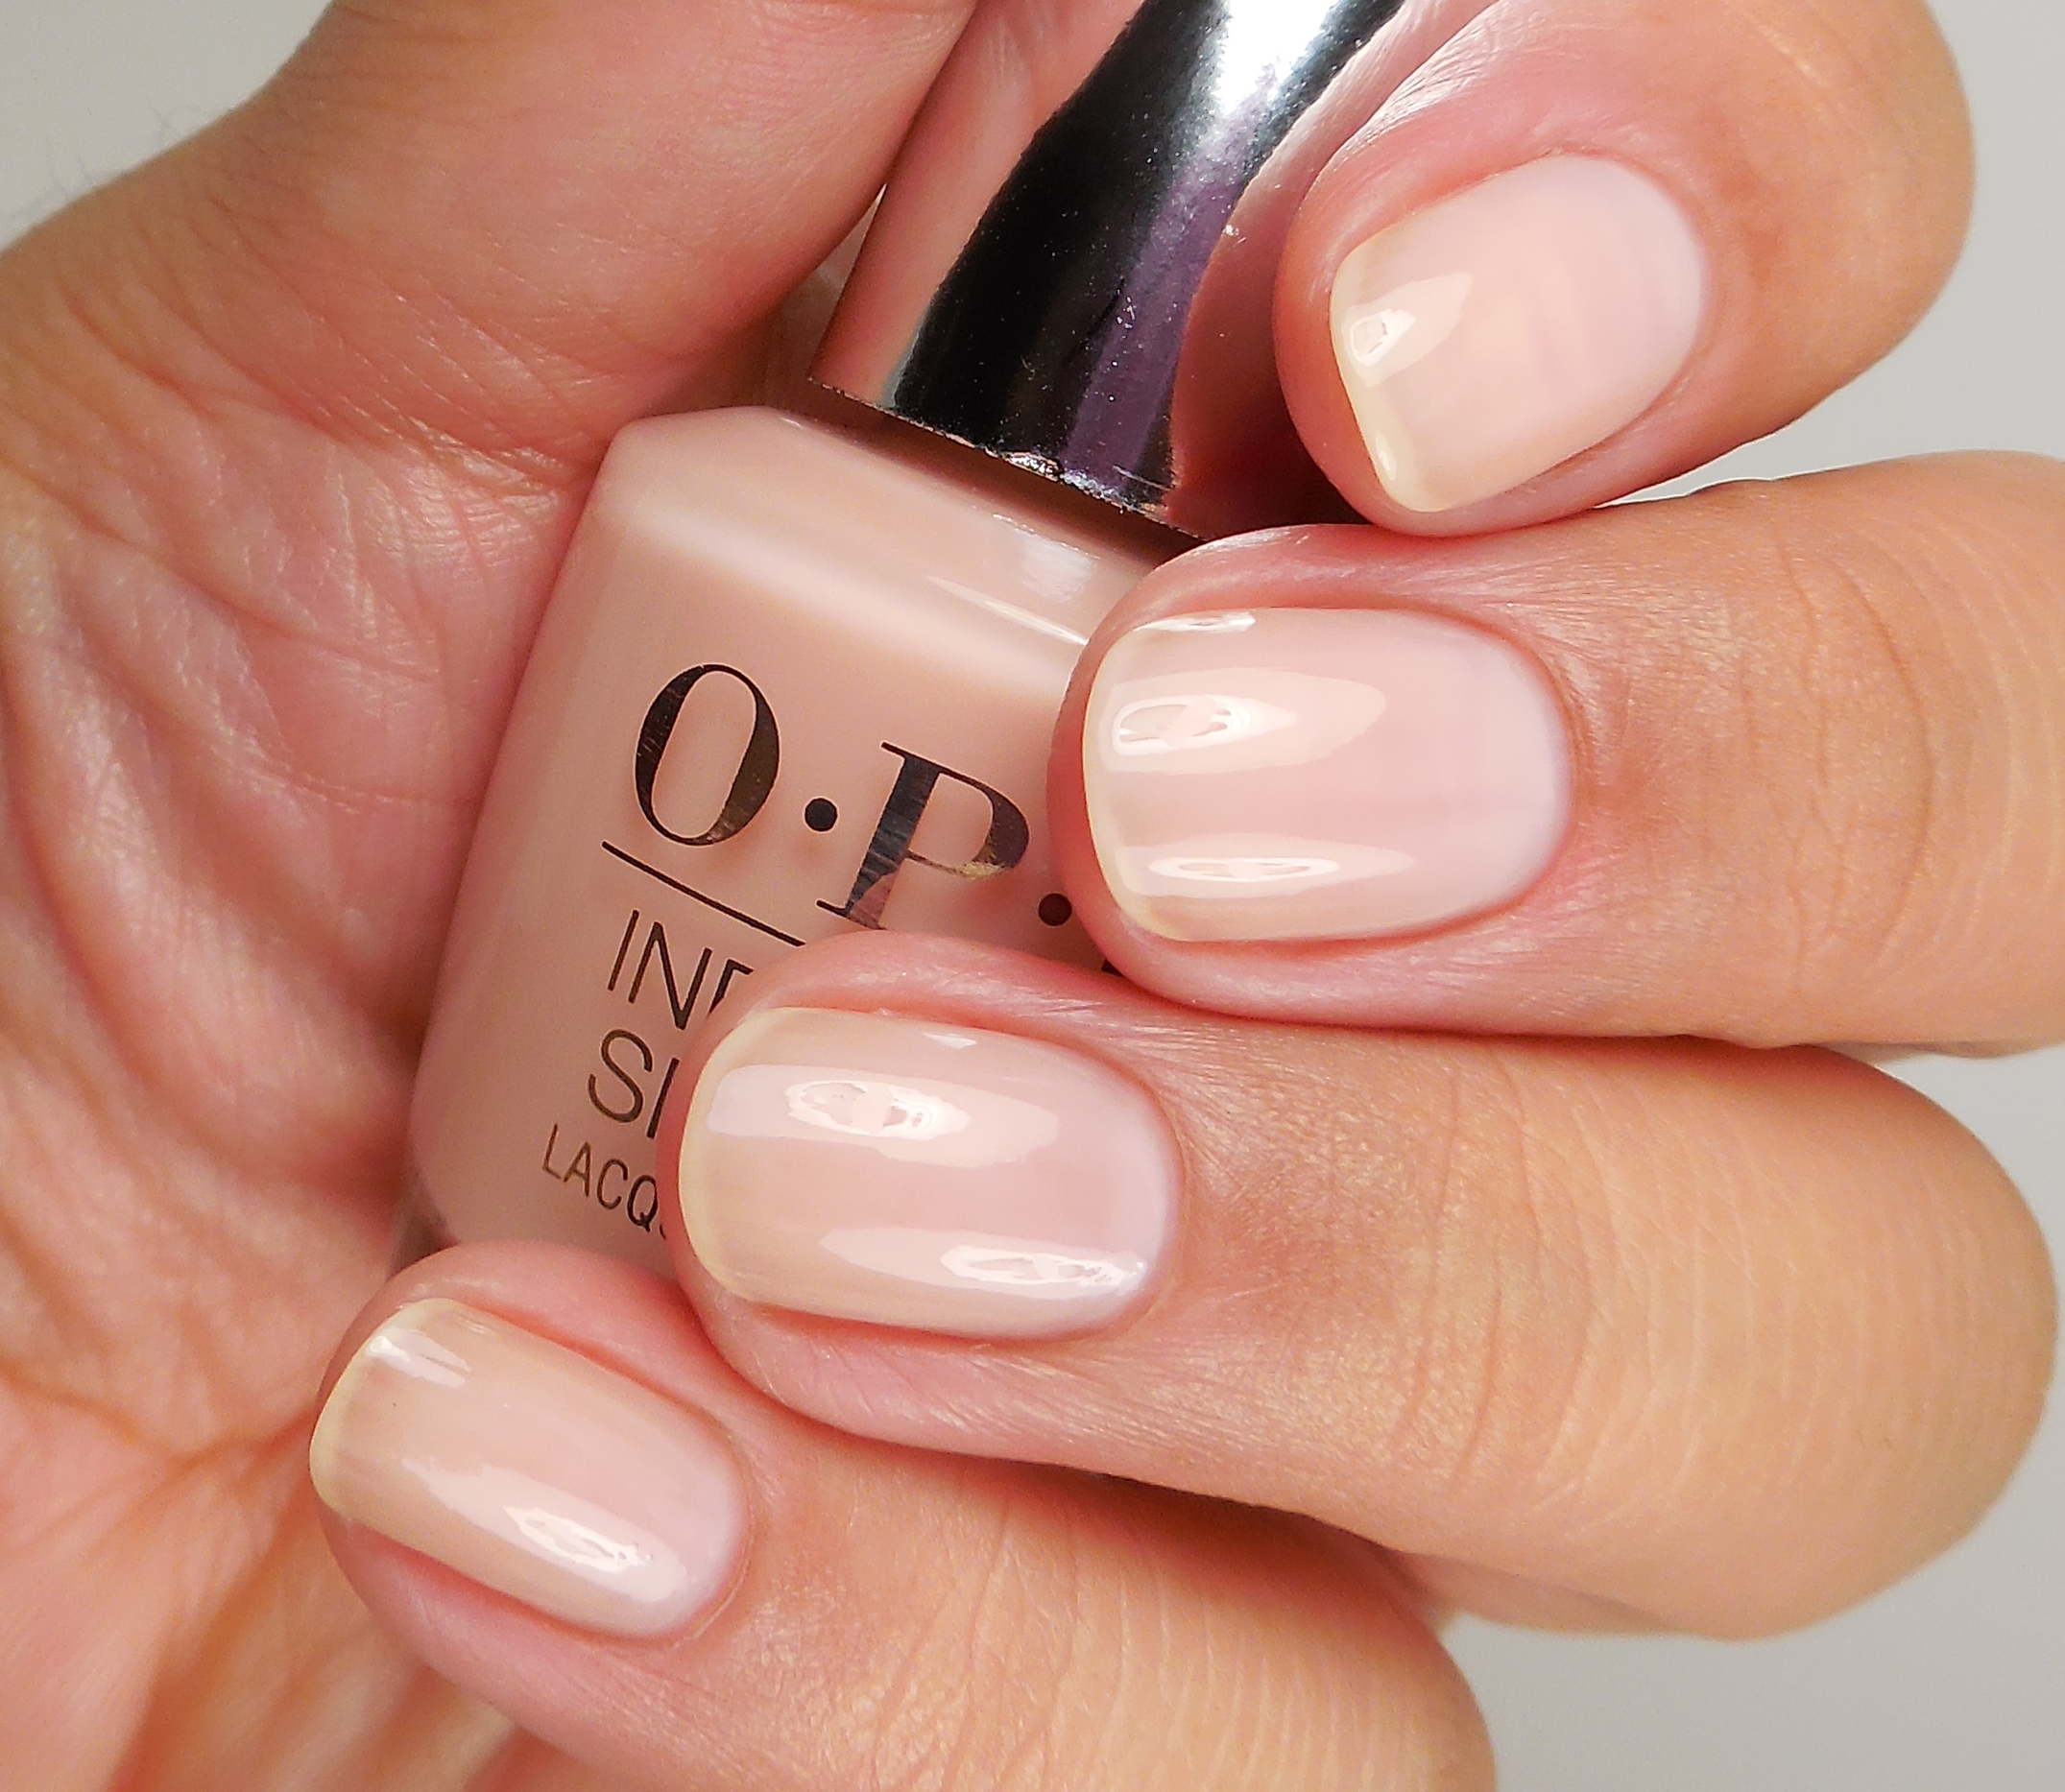
OPI Infinite Shine Beyond the Pale Pink

1112
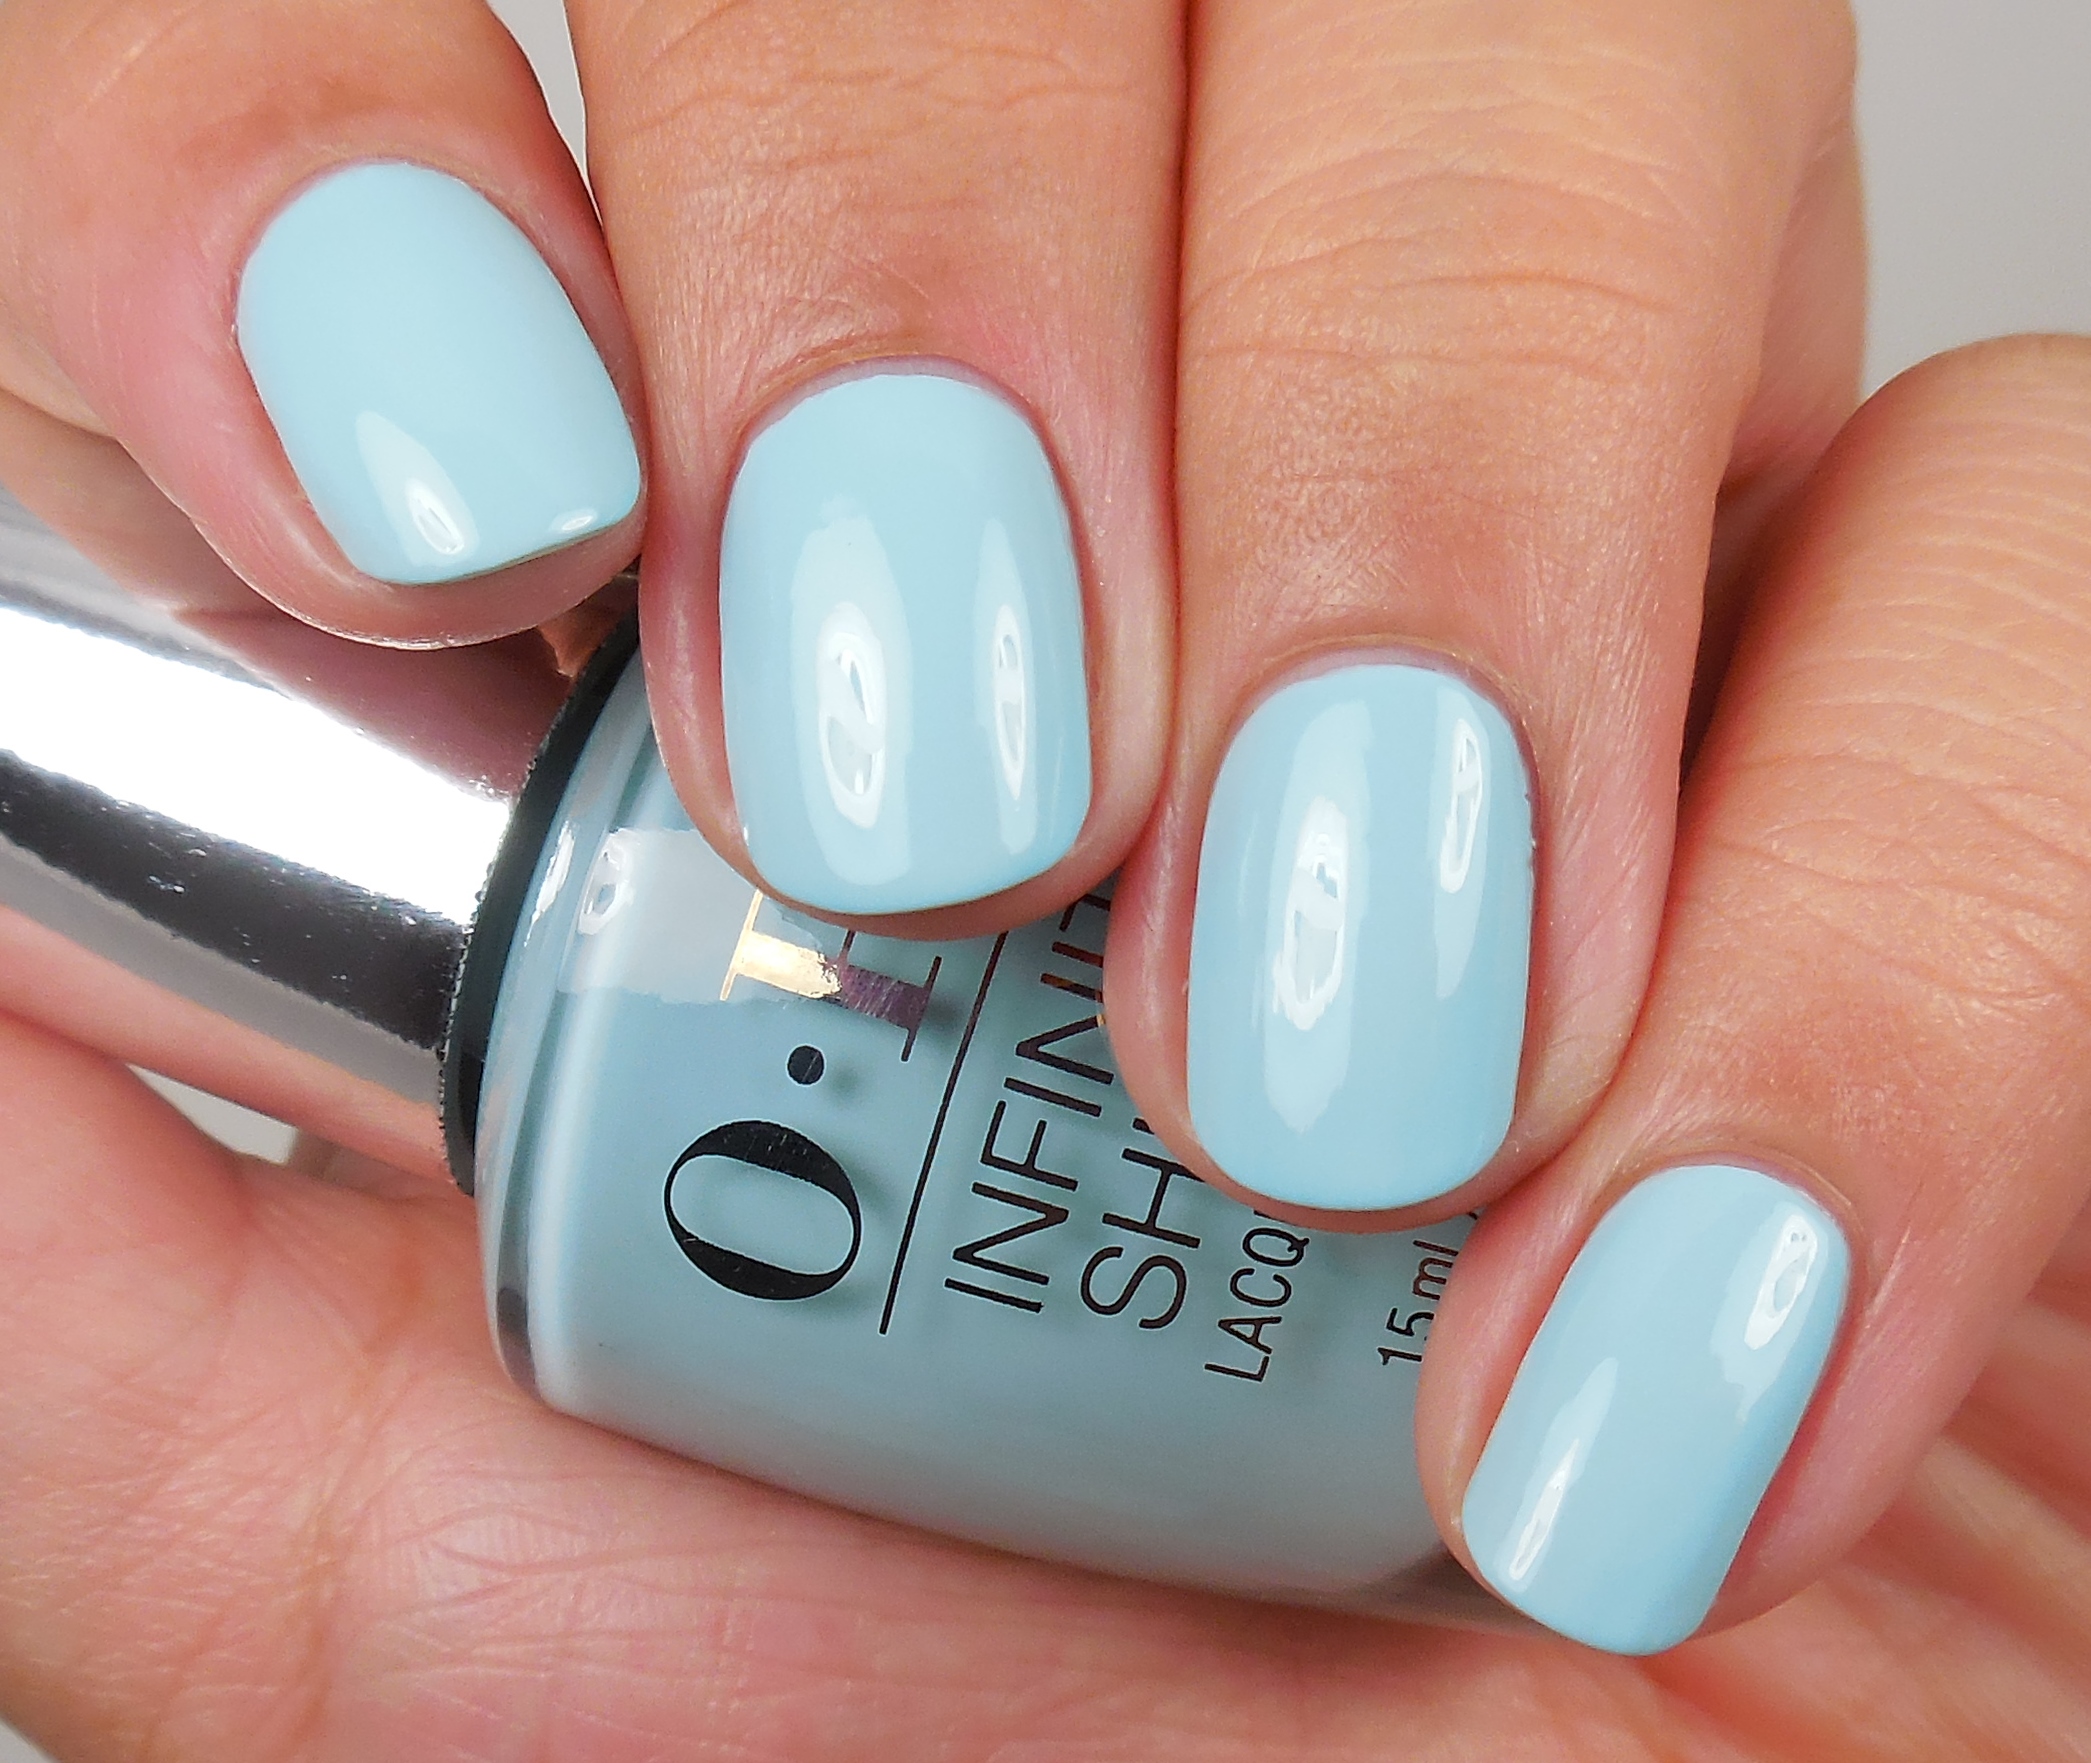
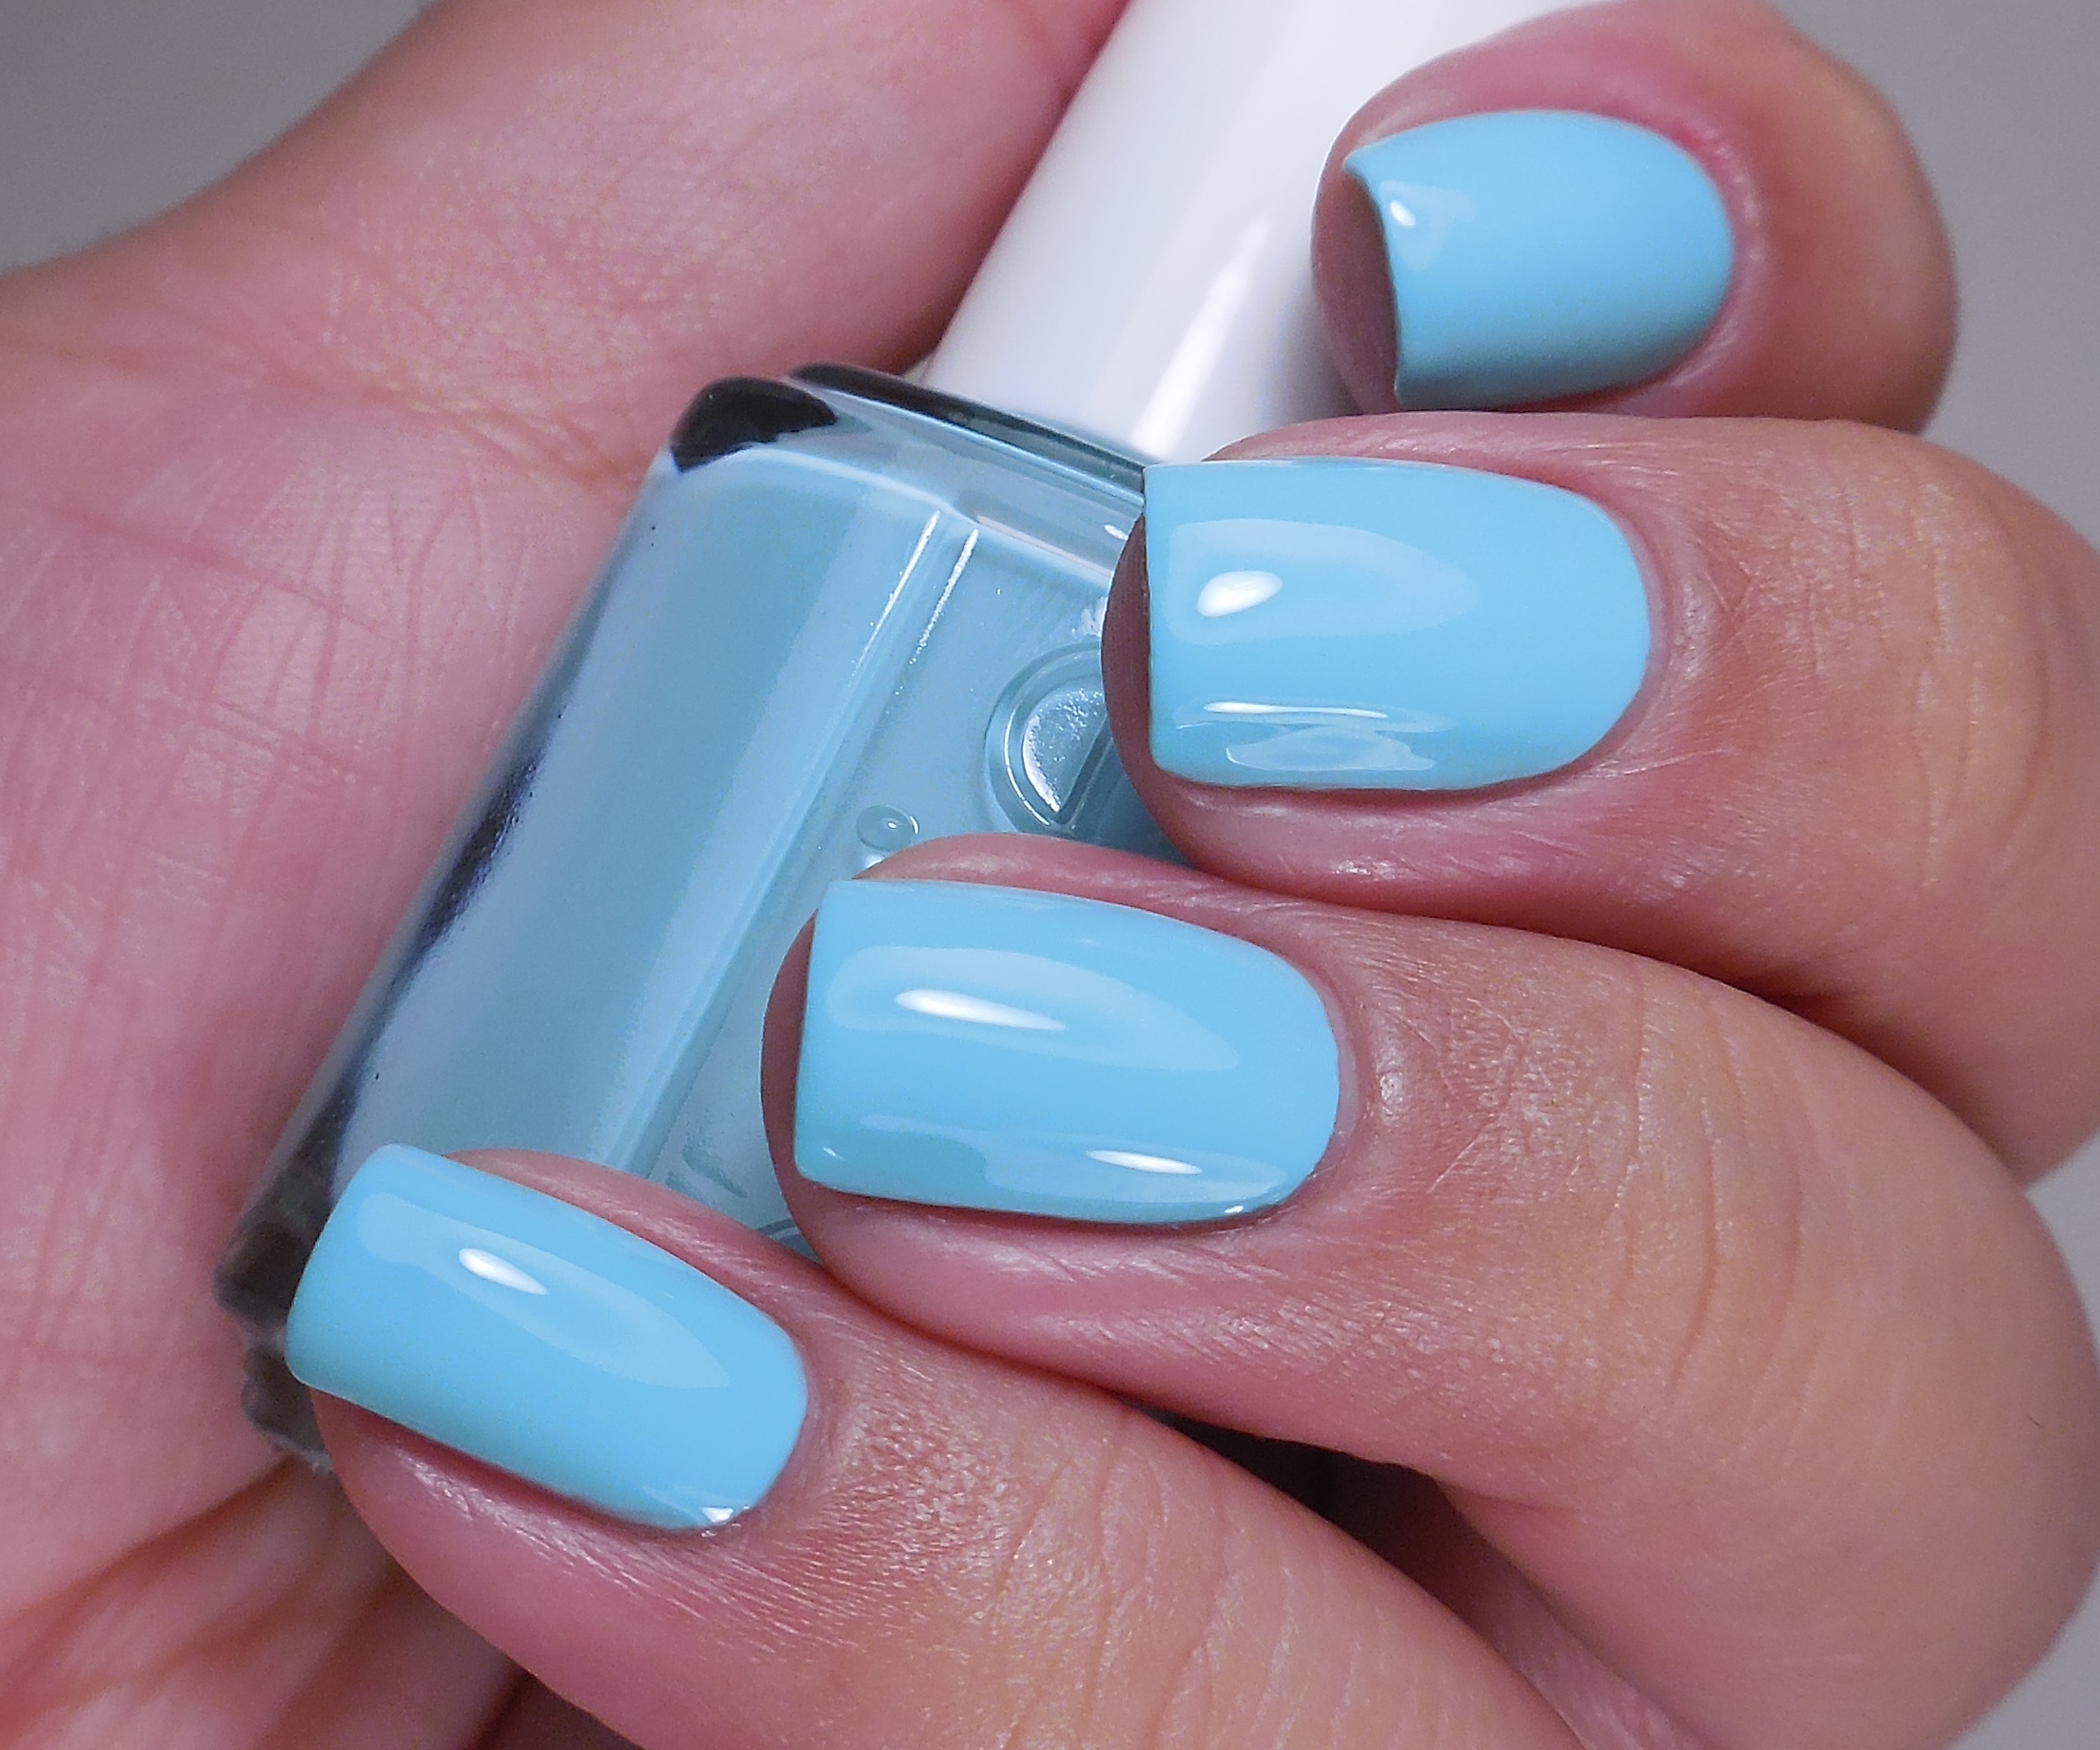
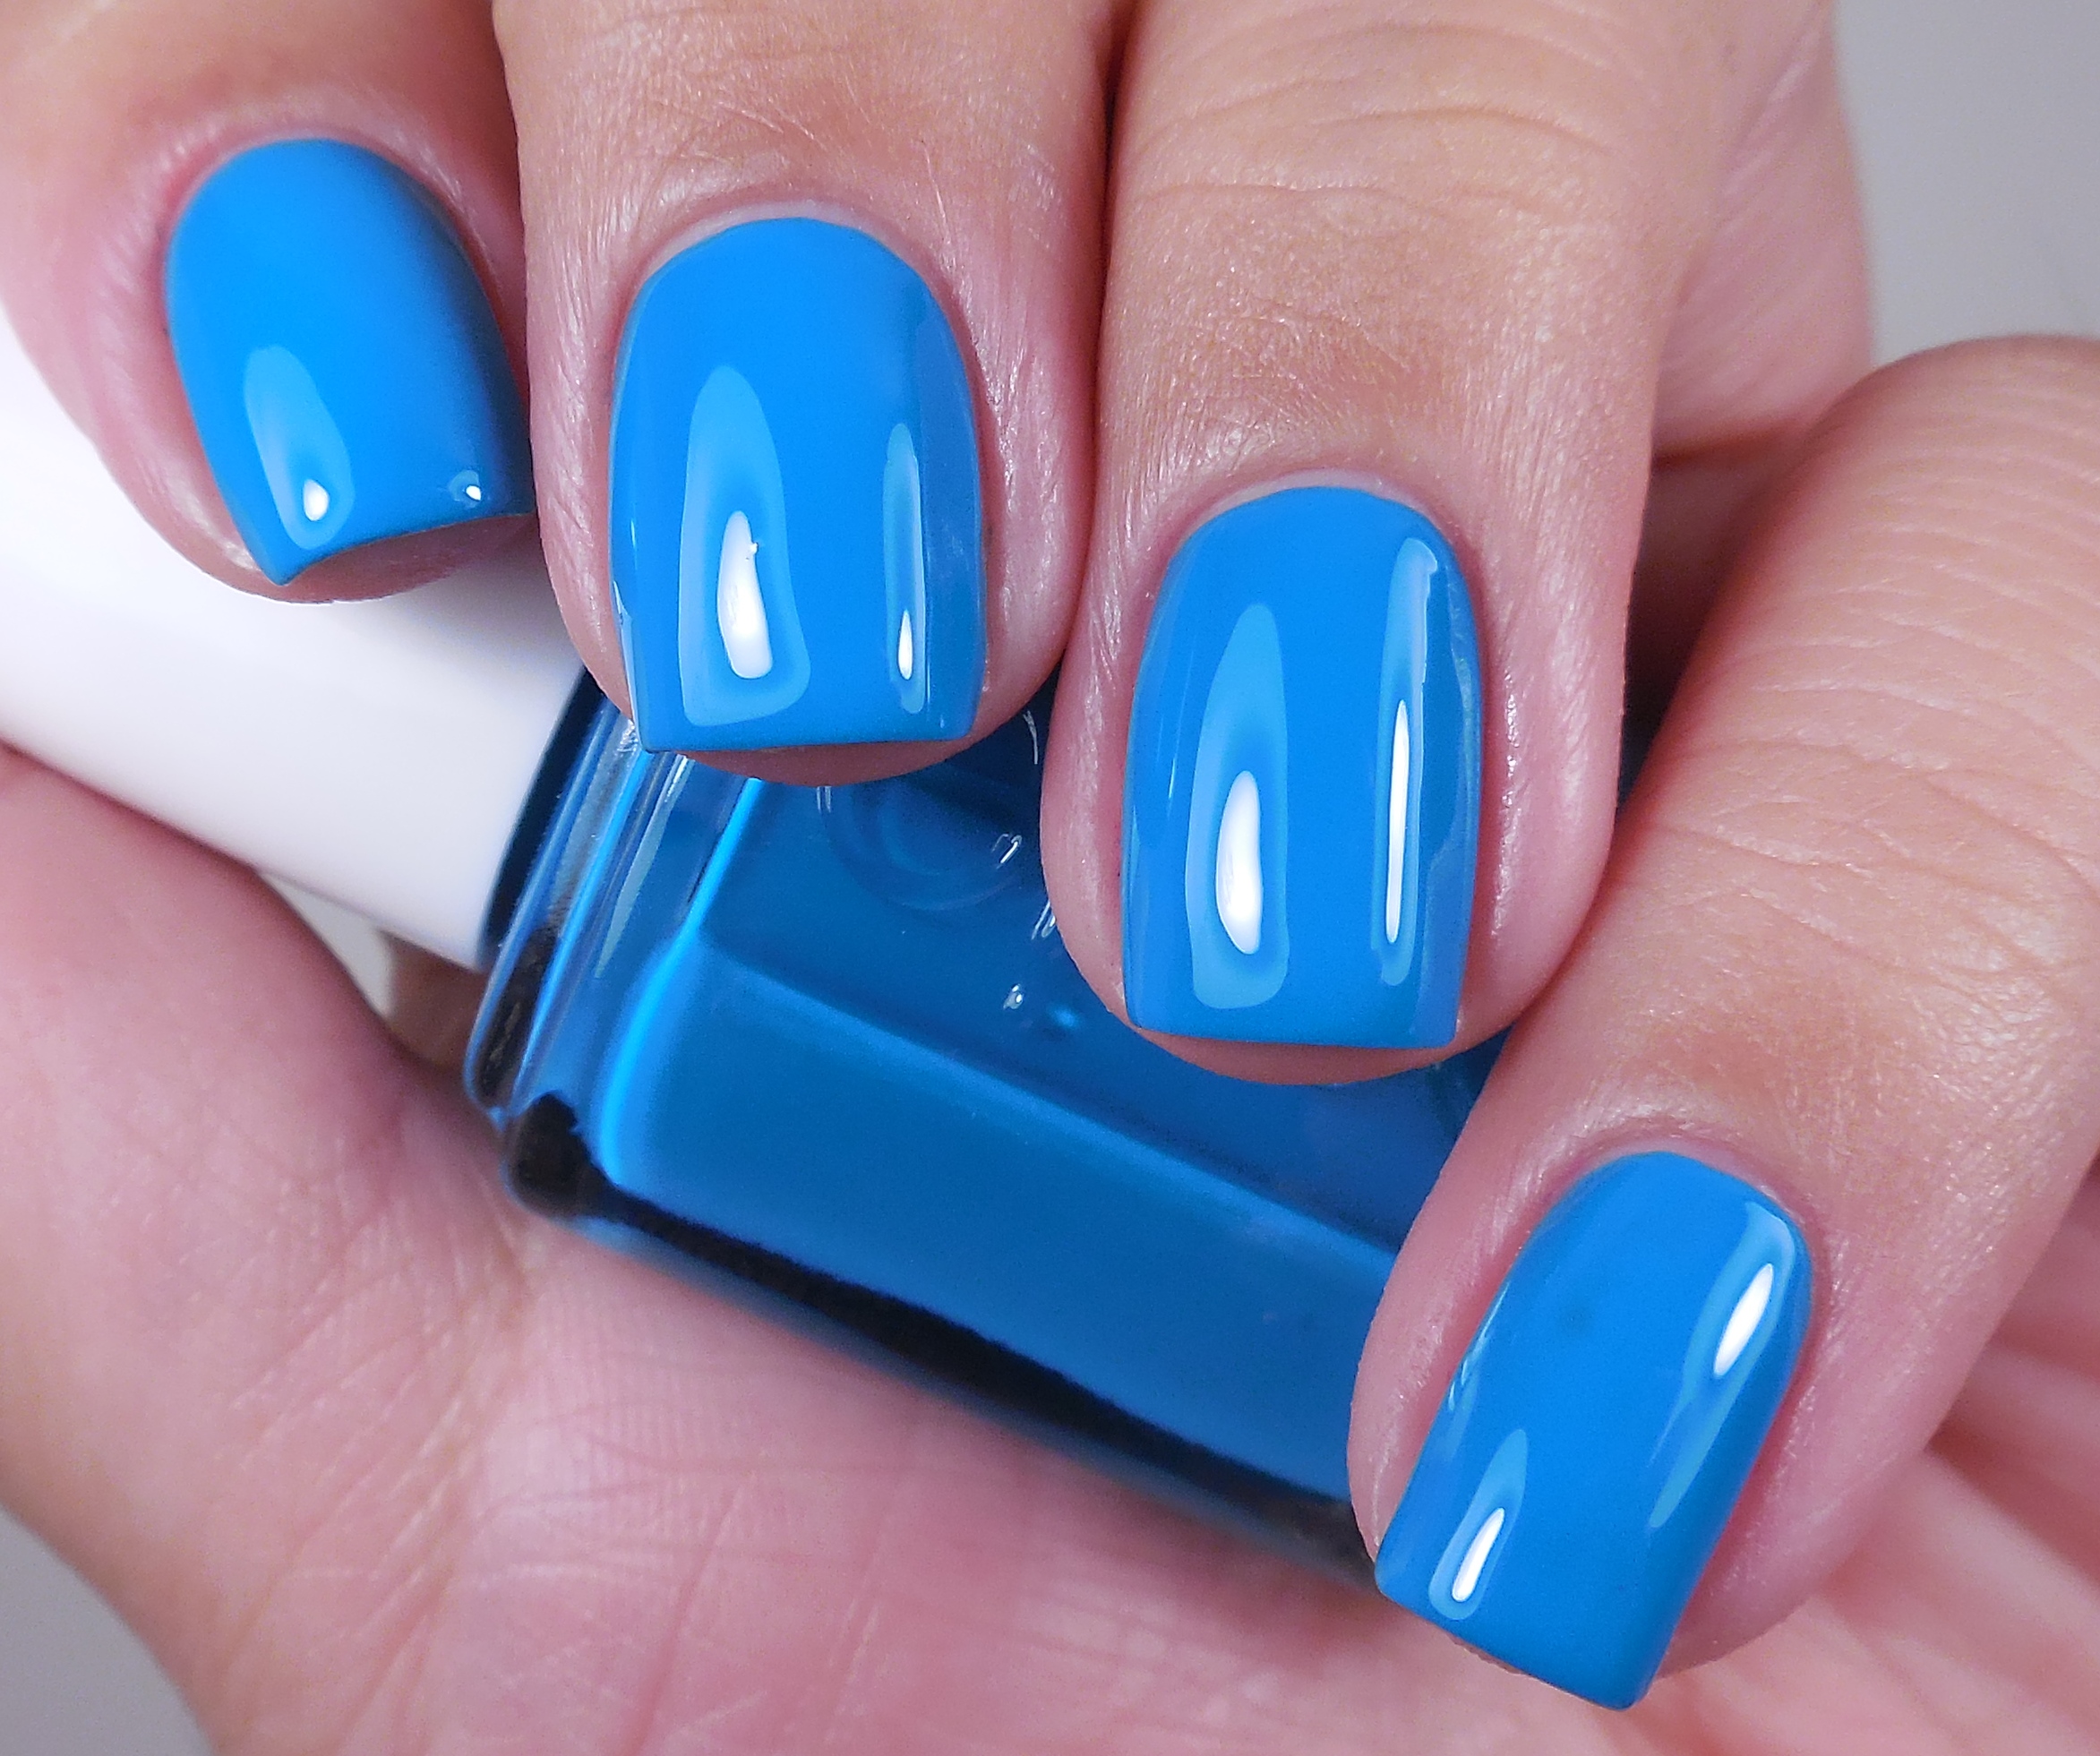
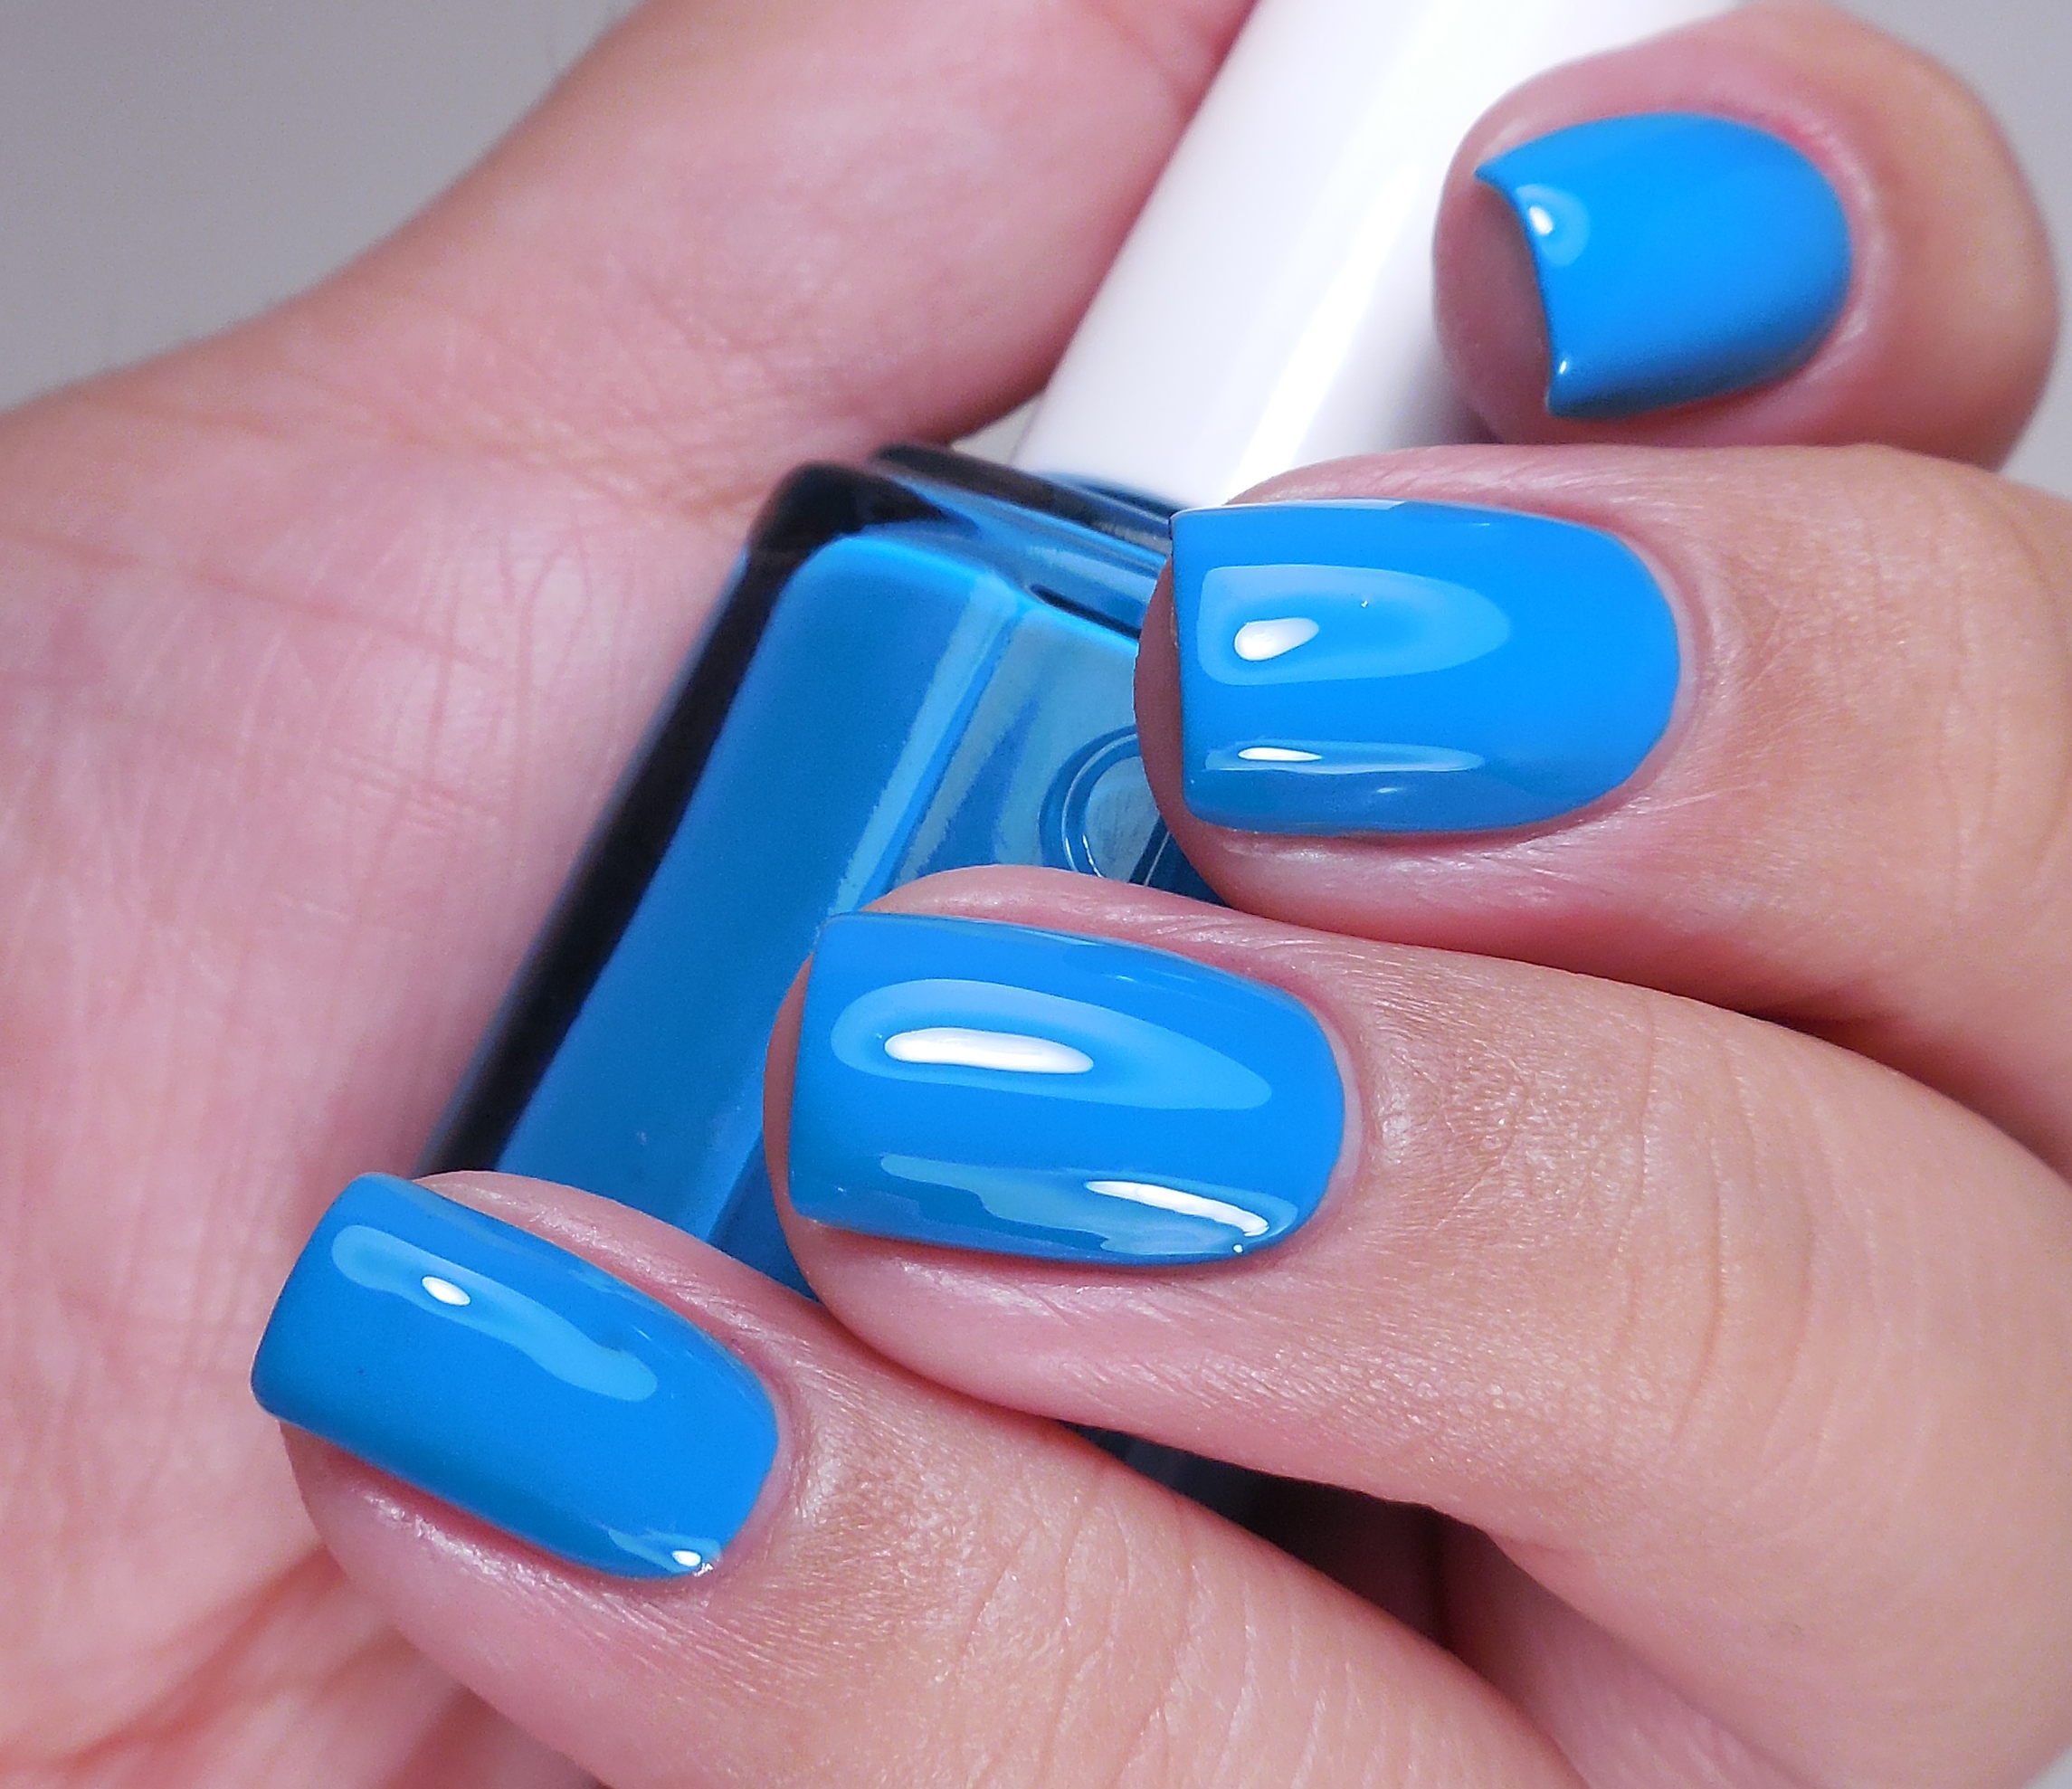
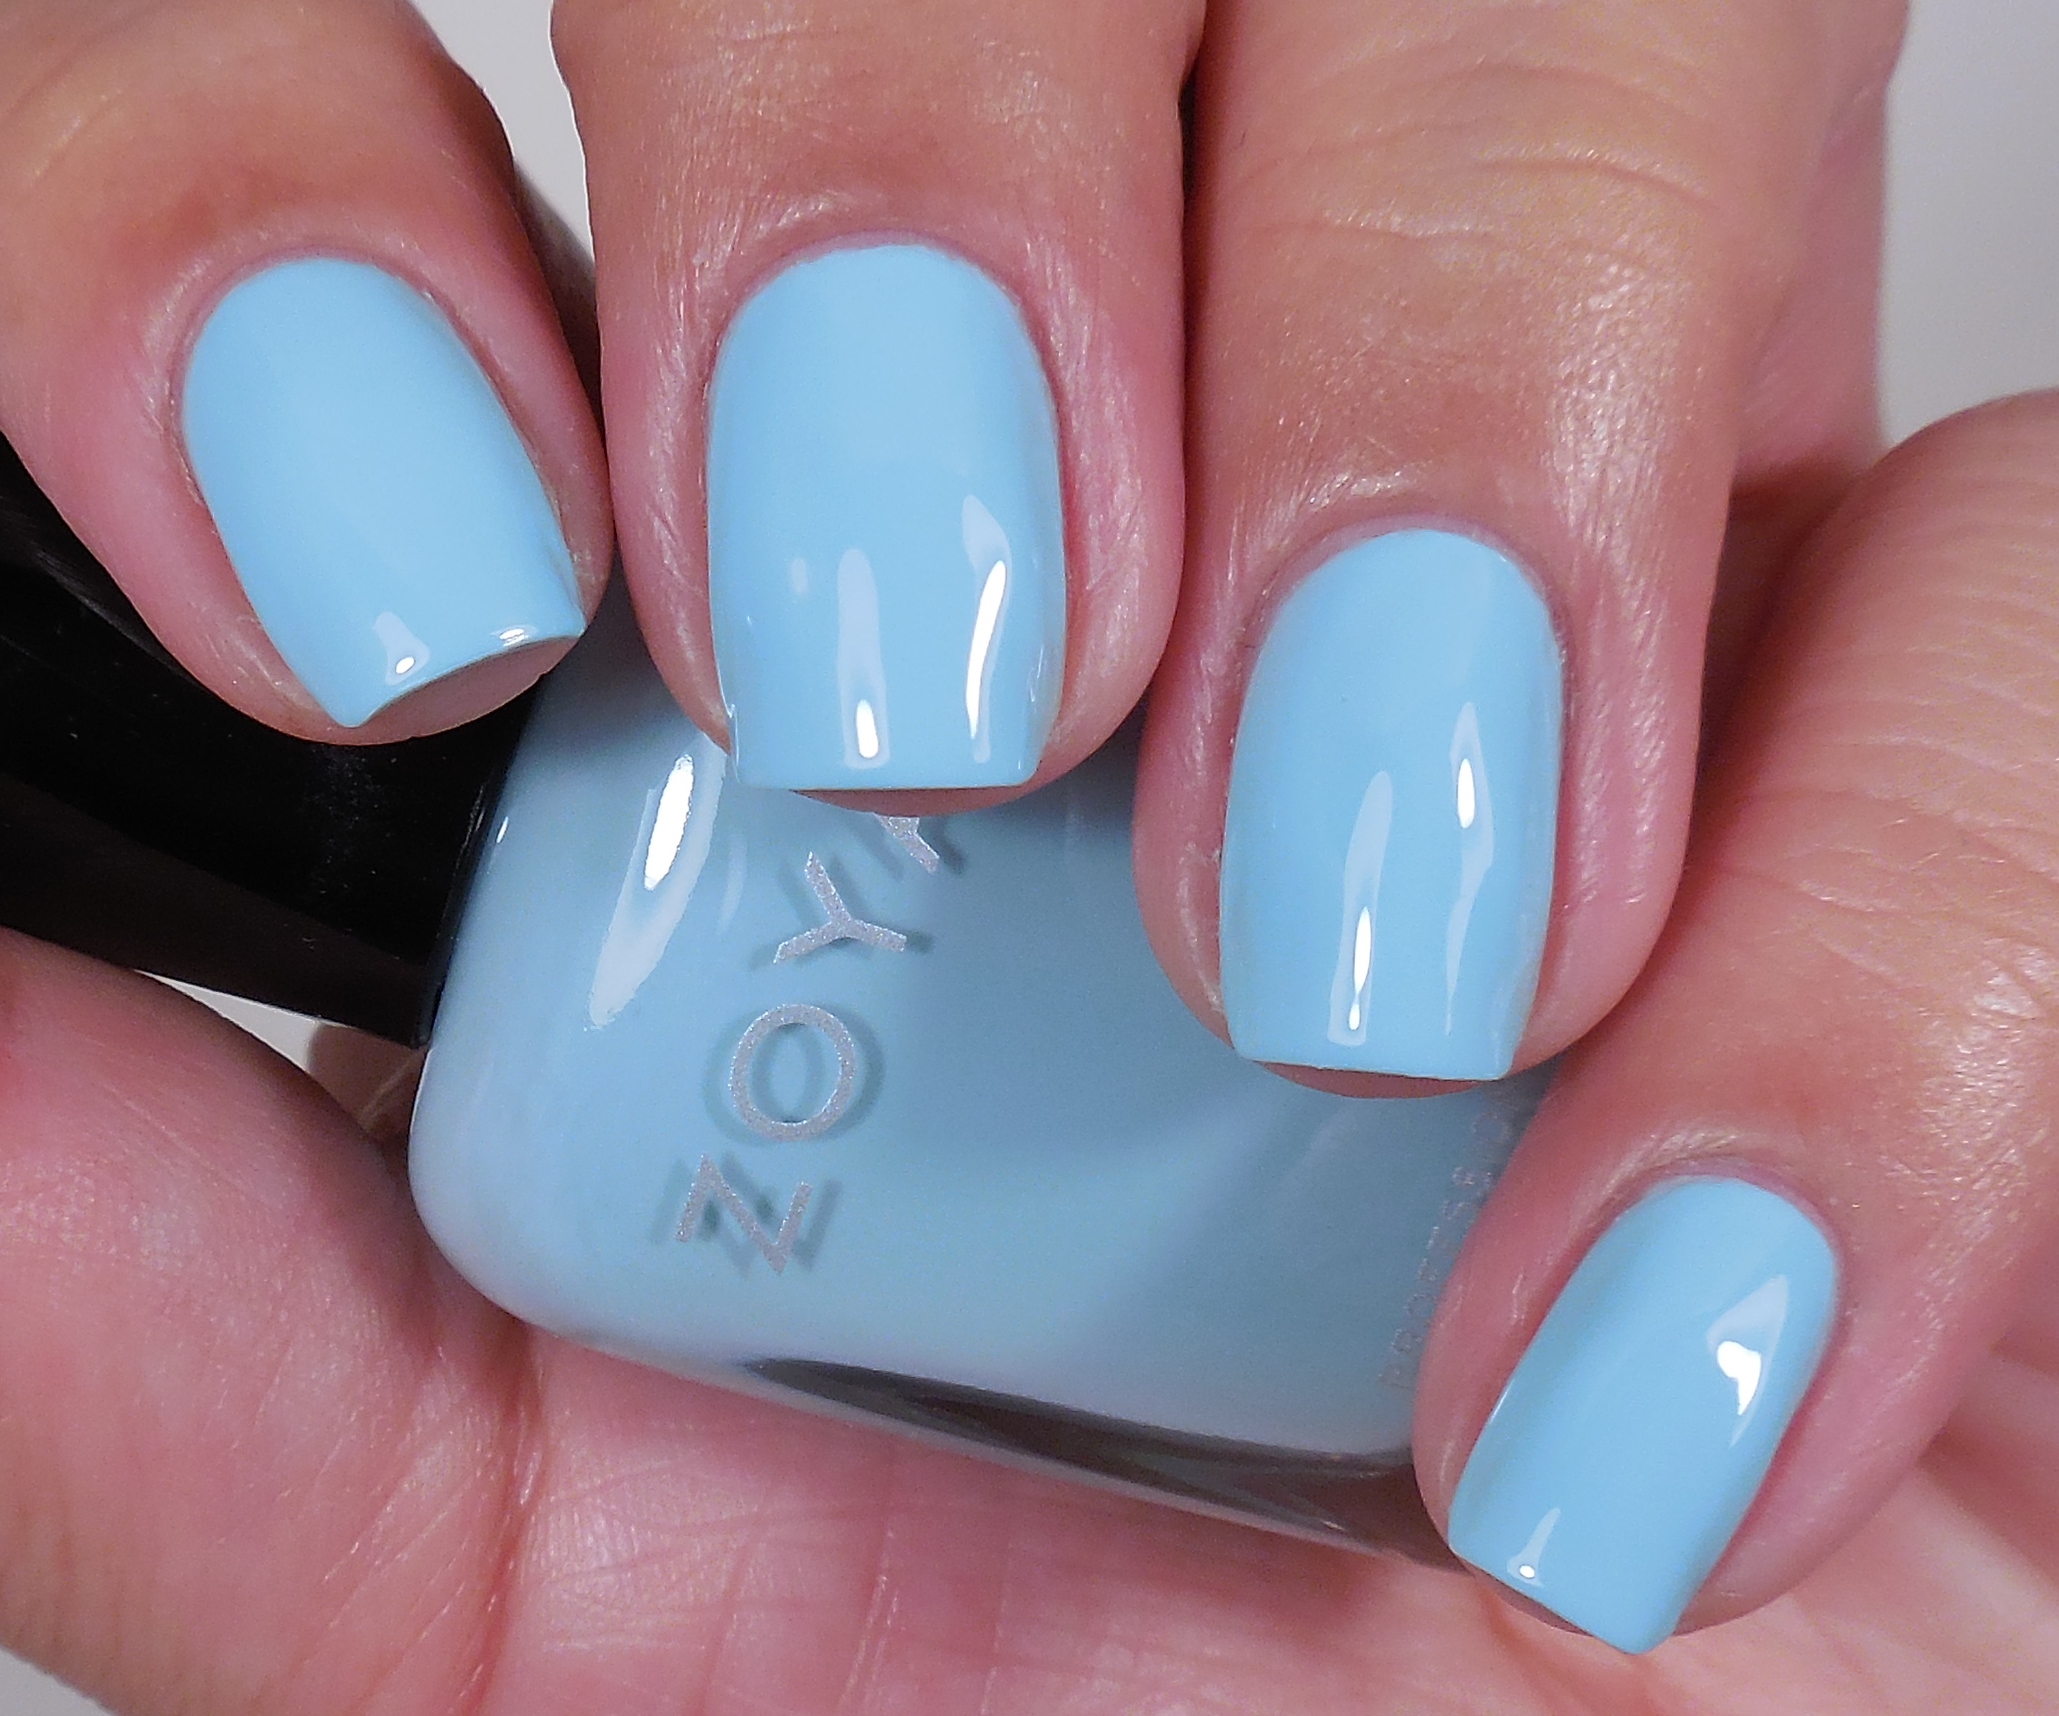
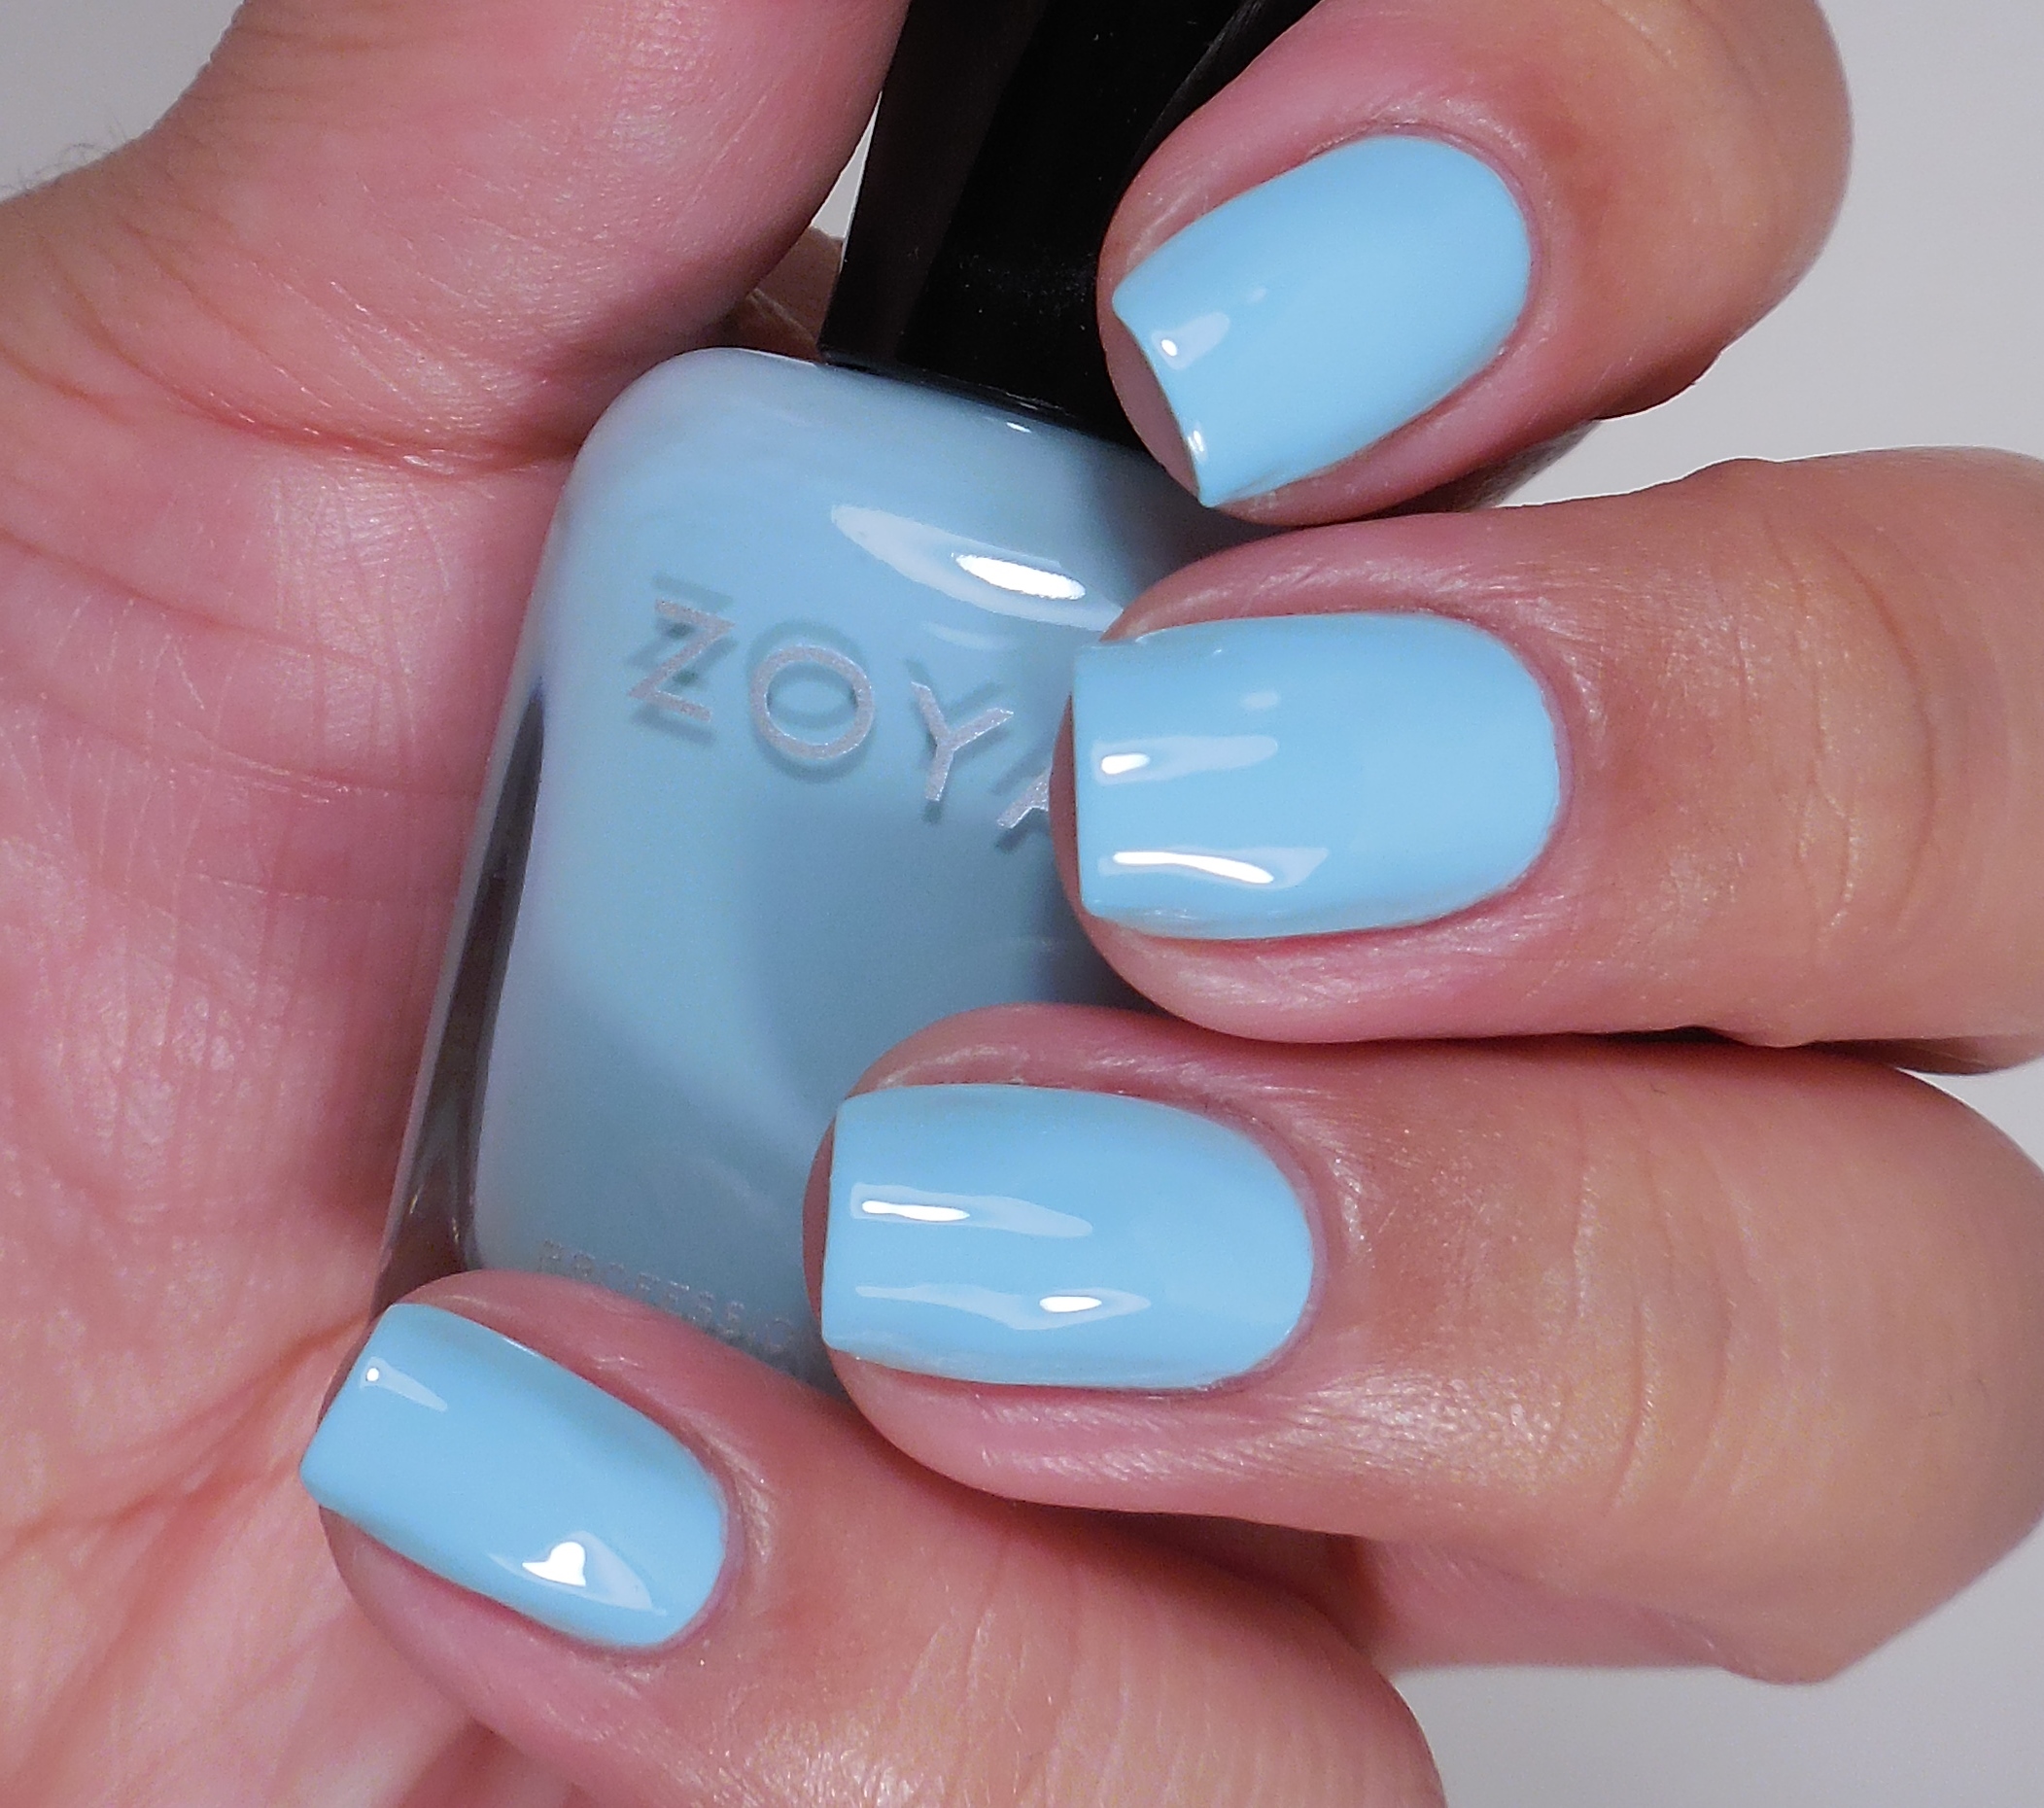
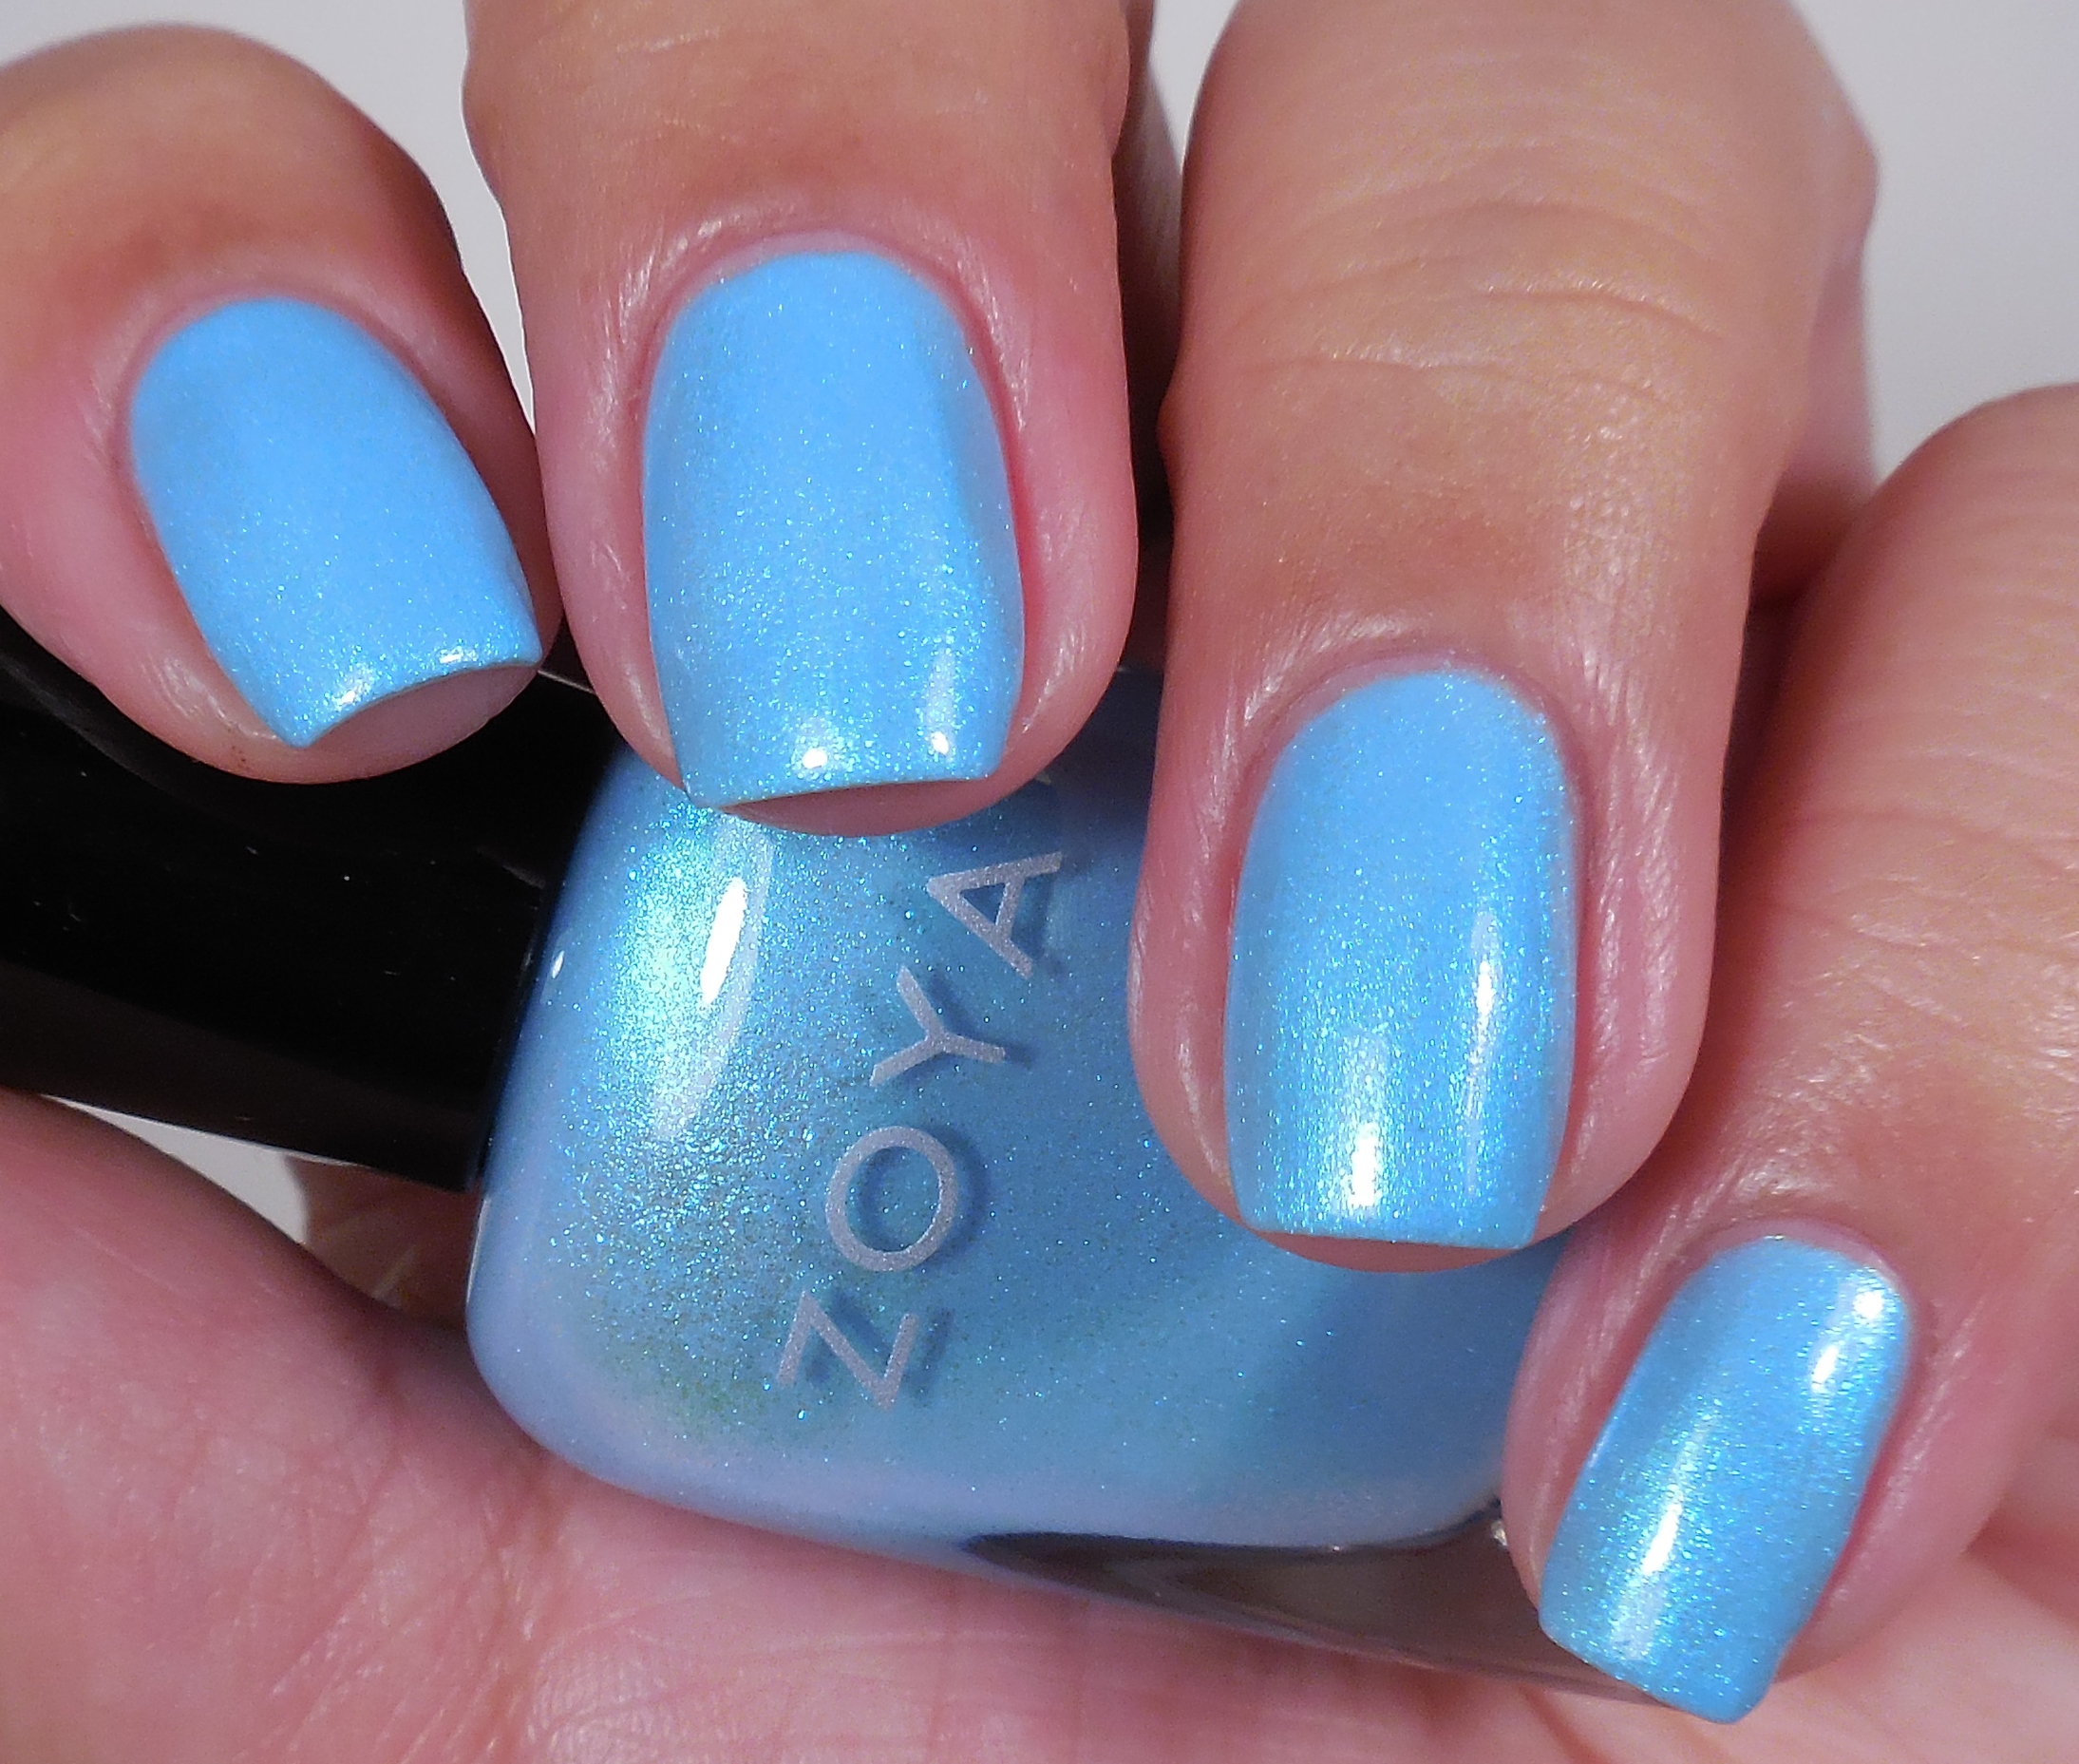
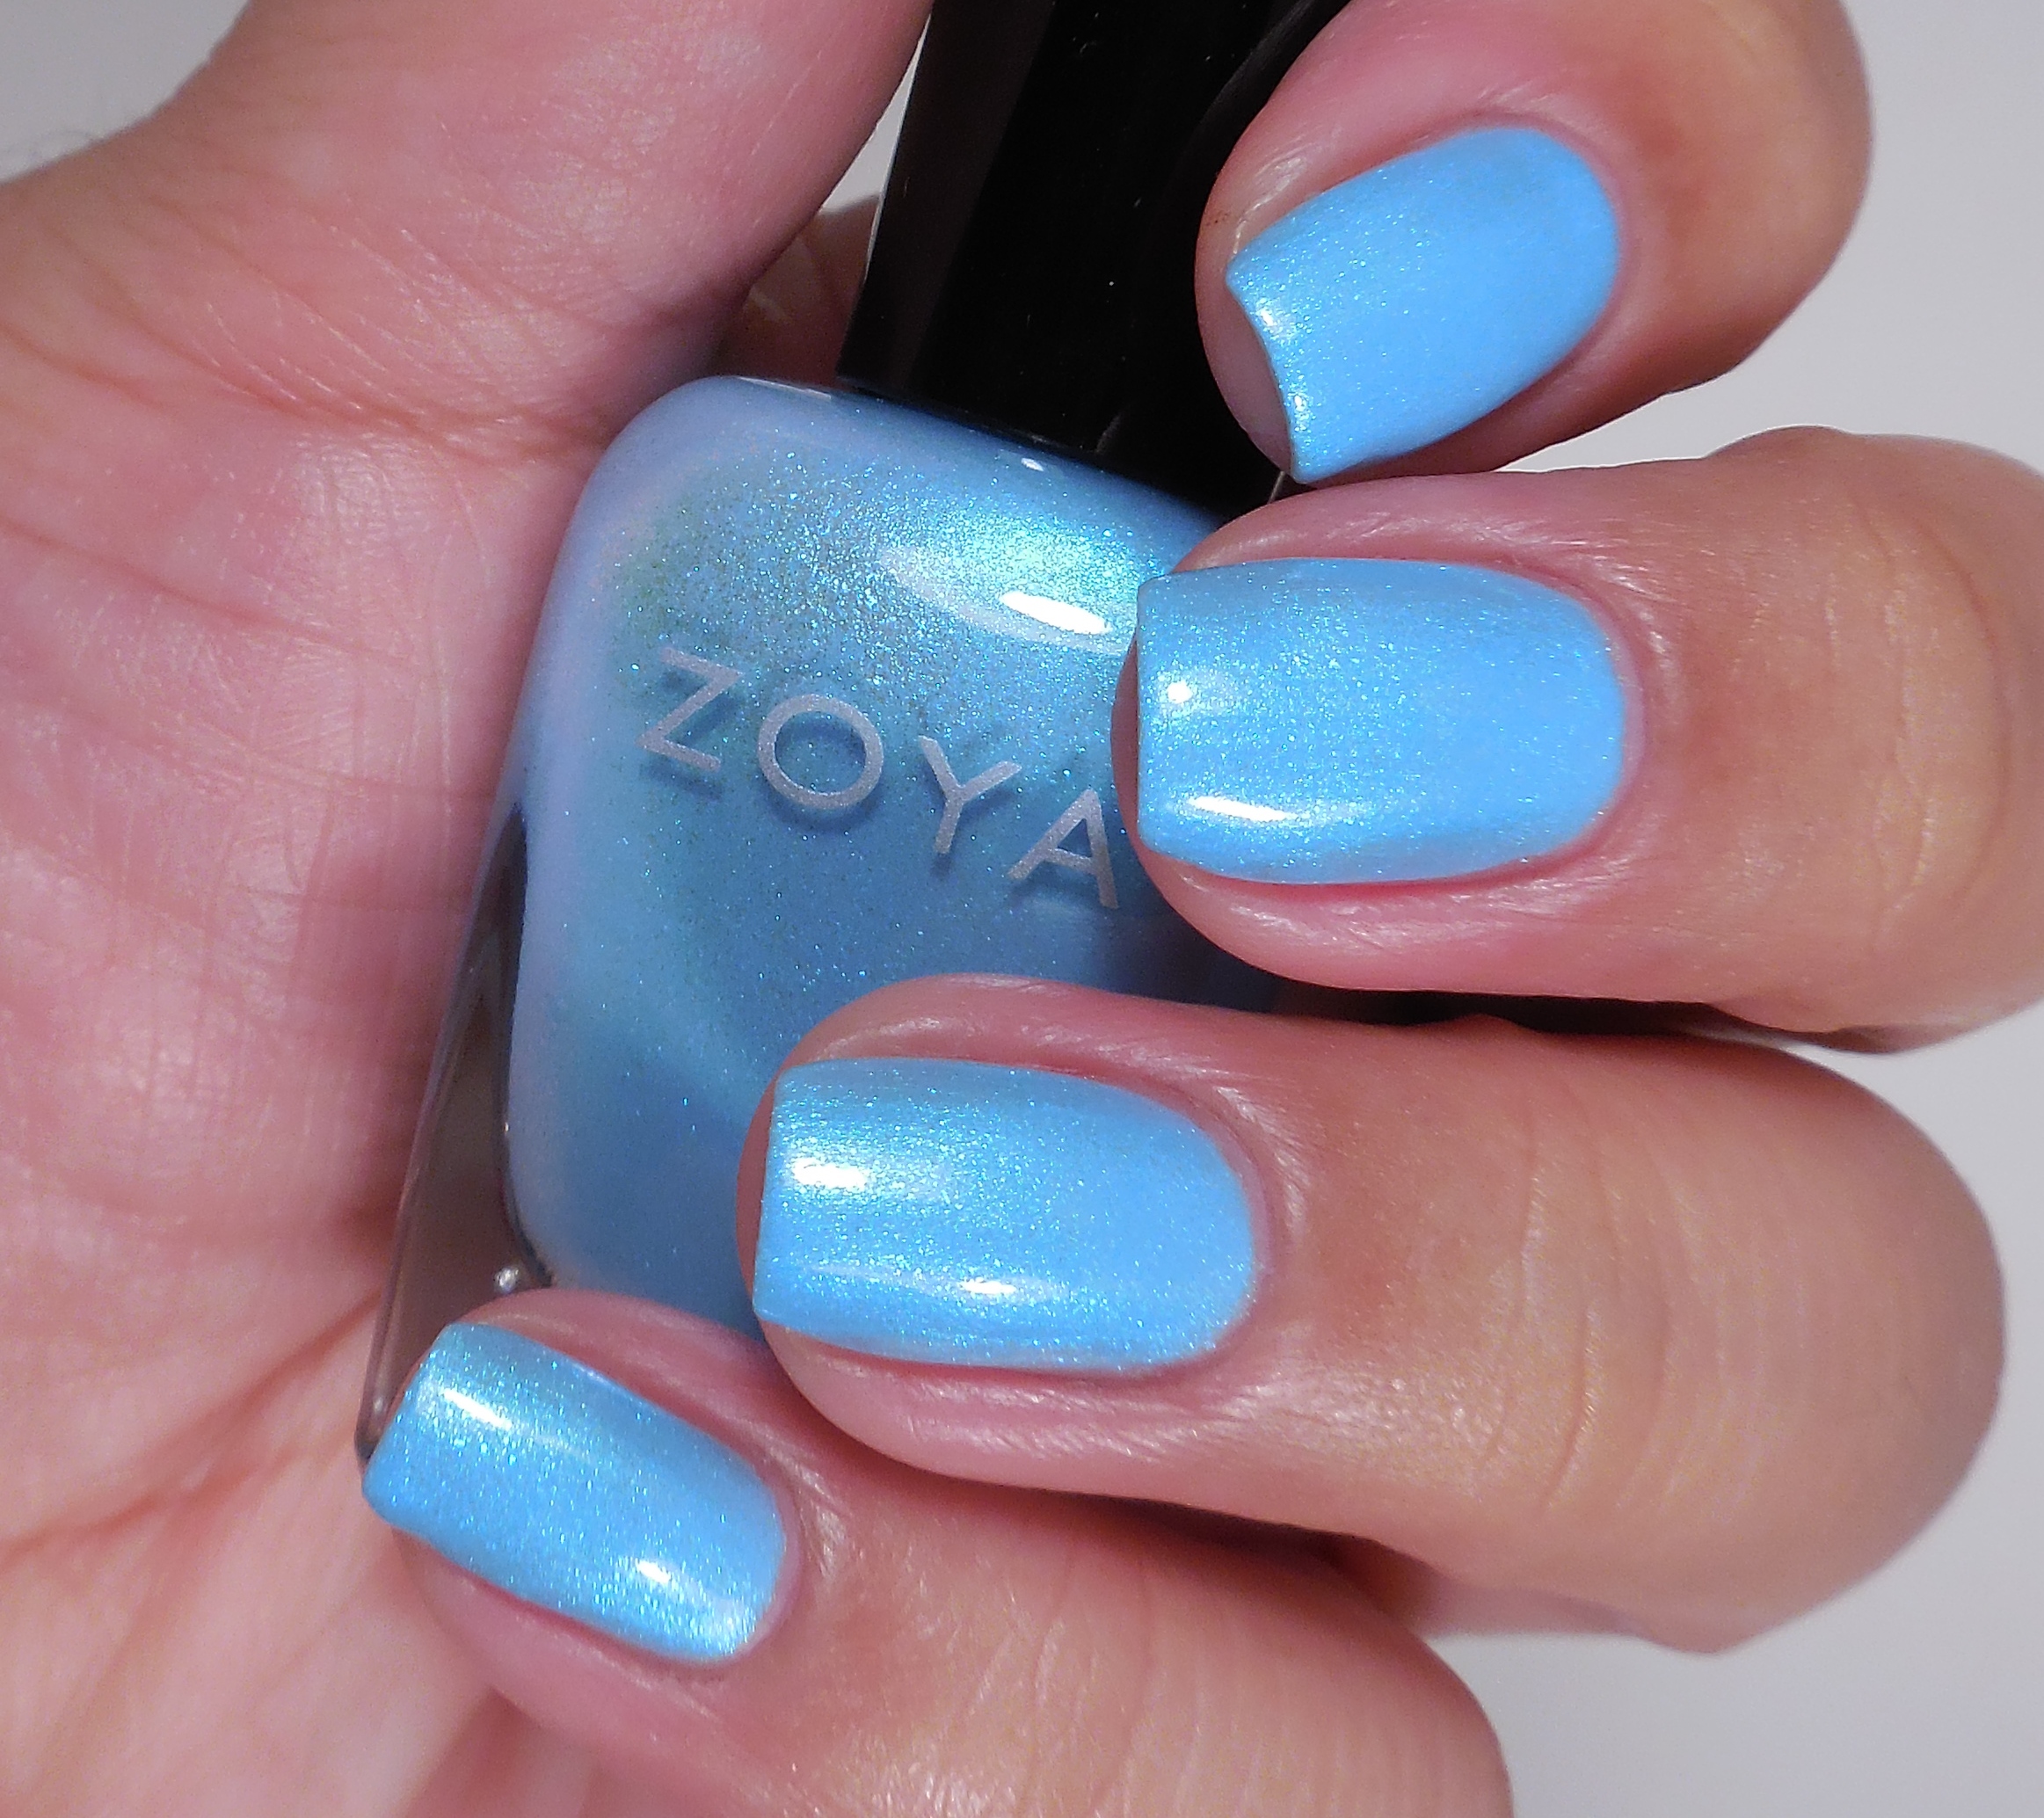
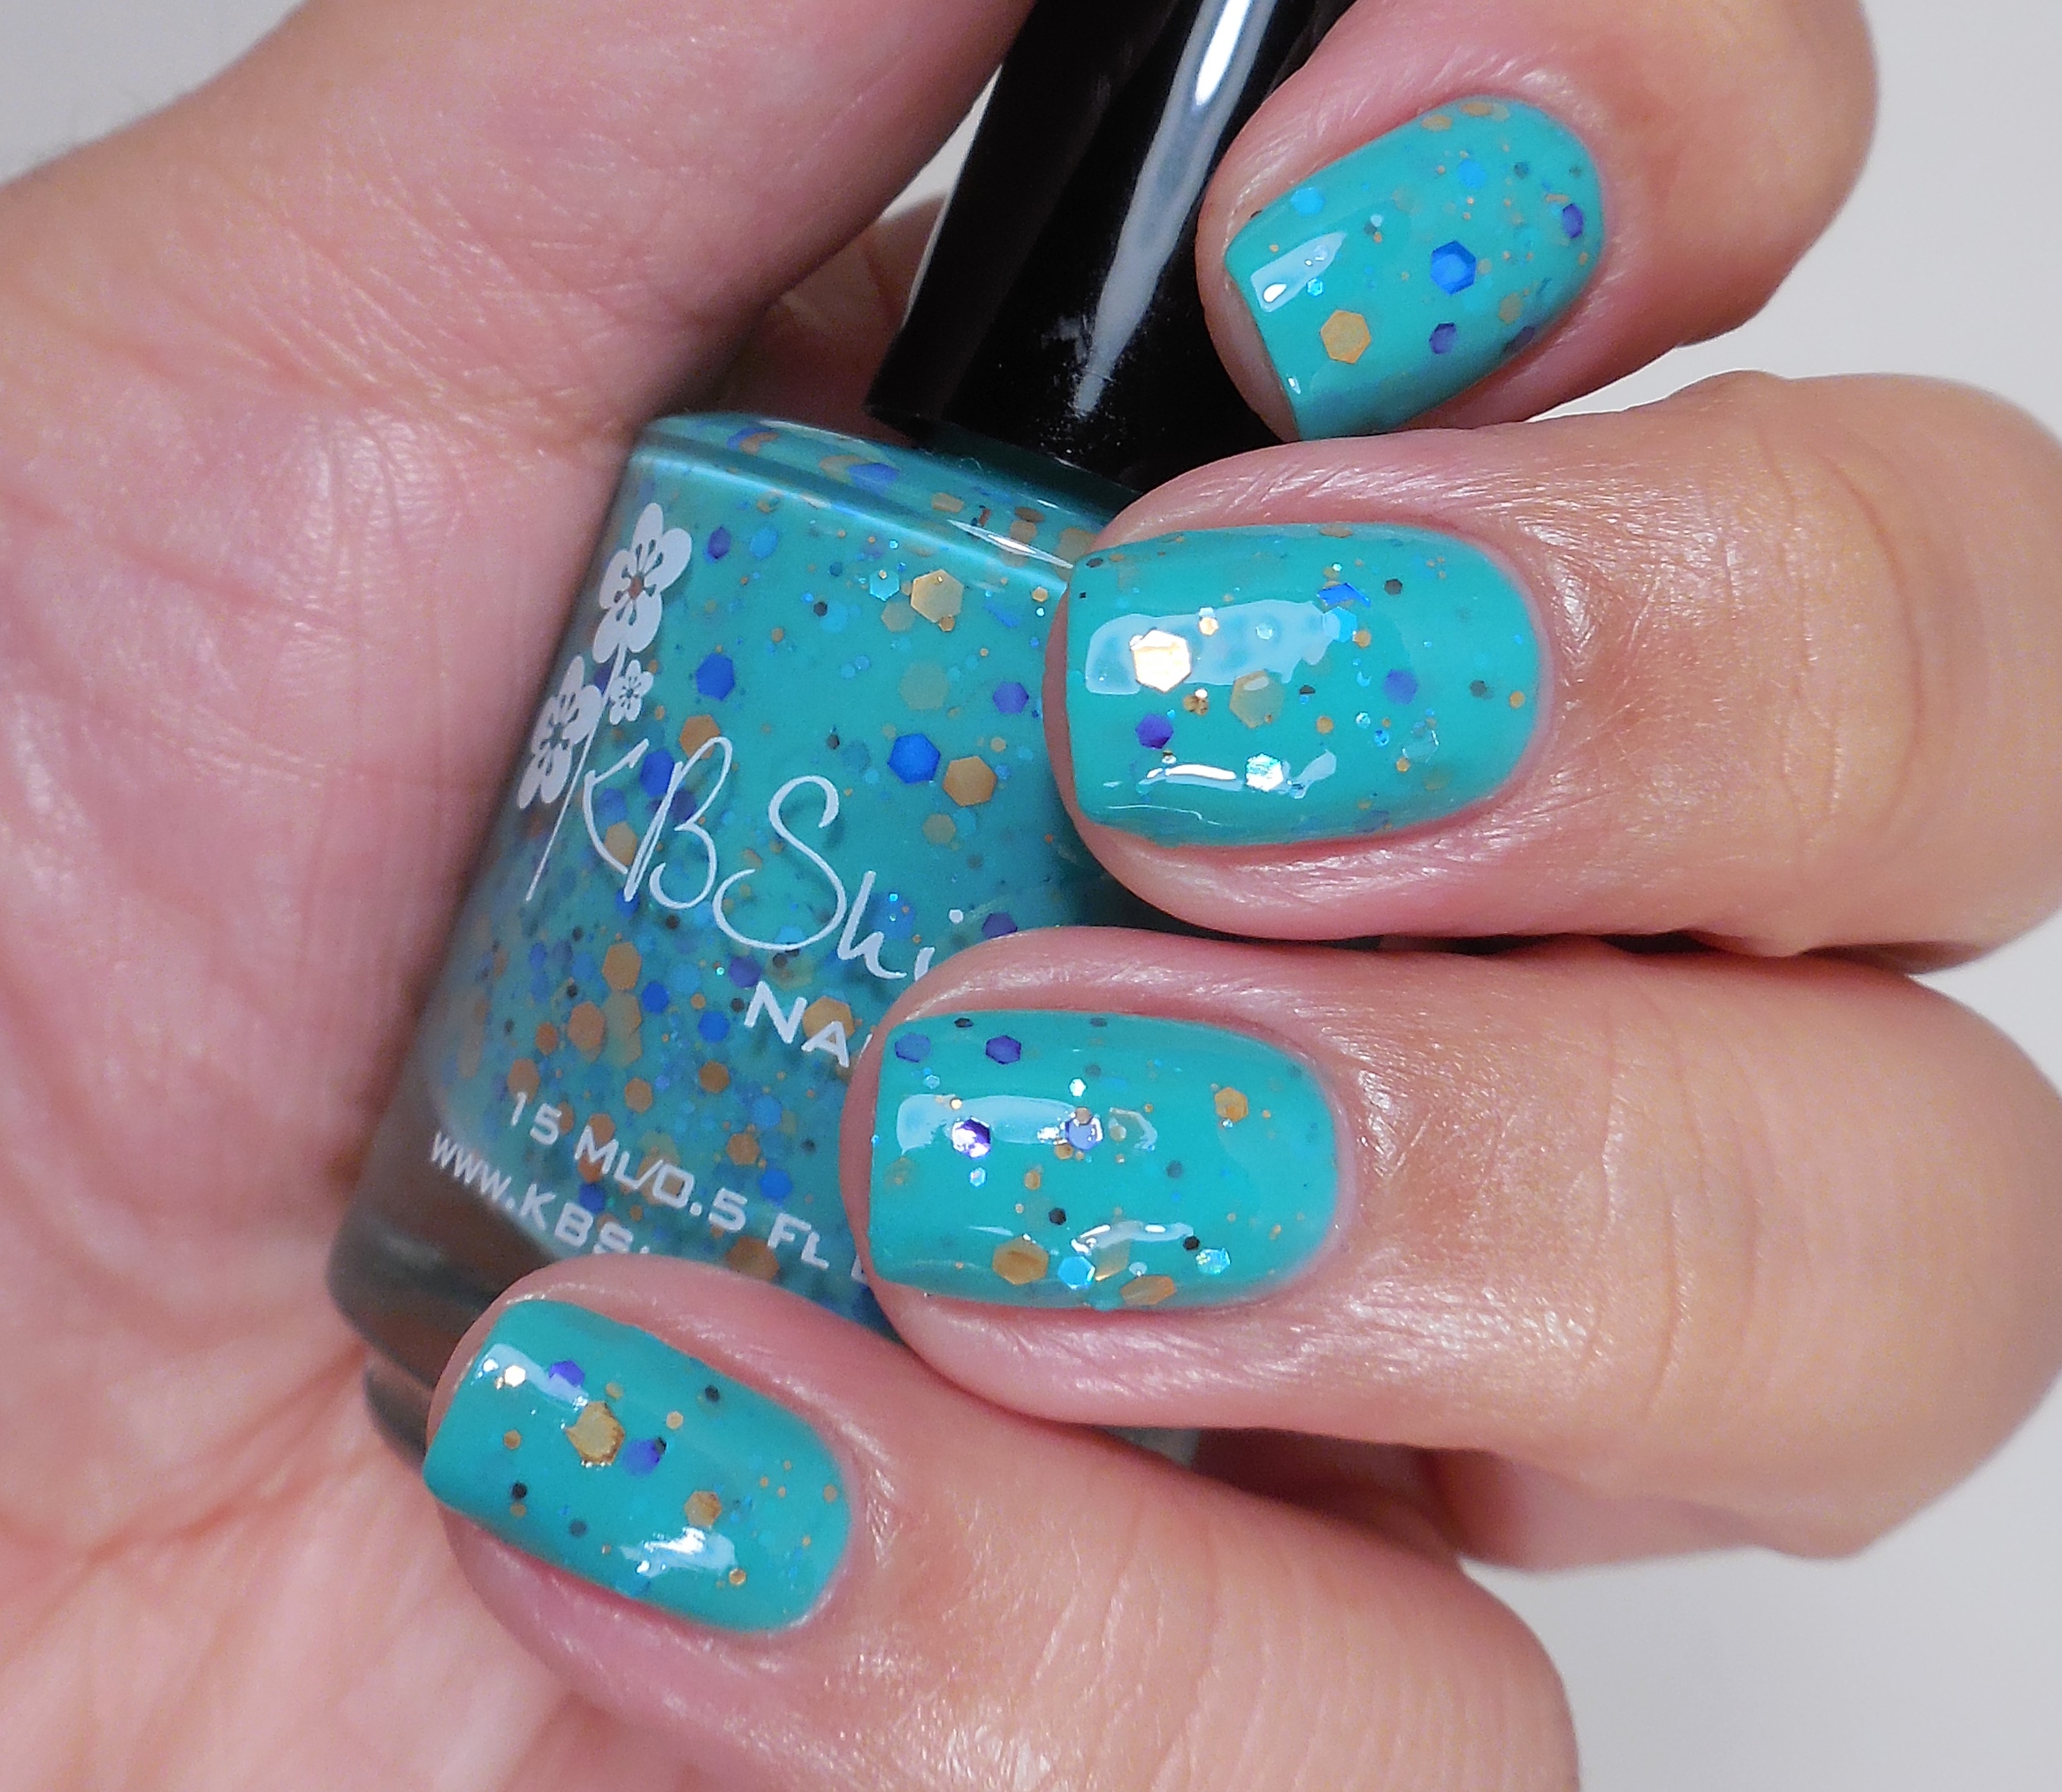
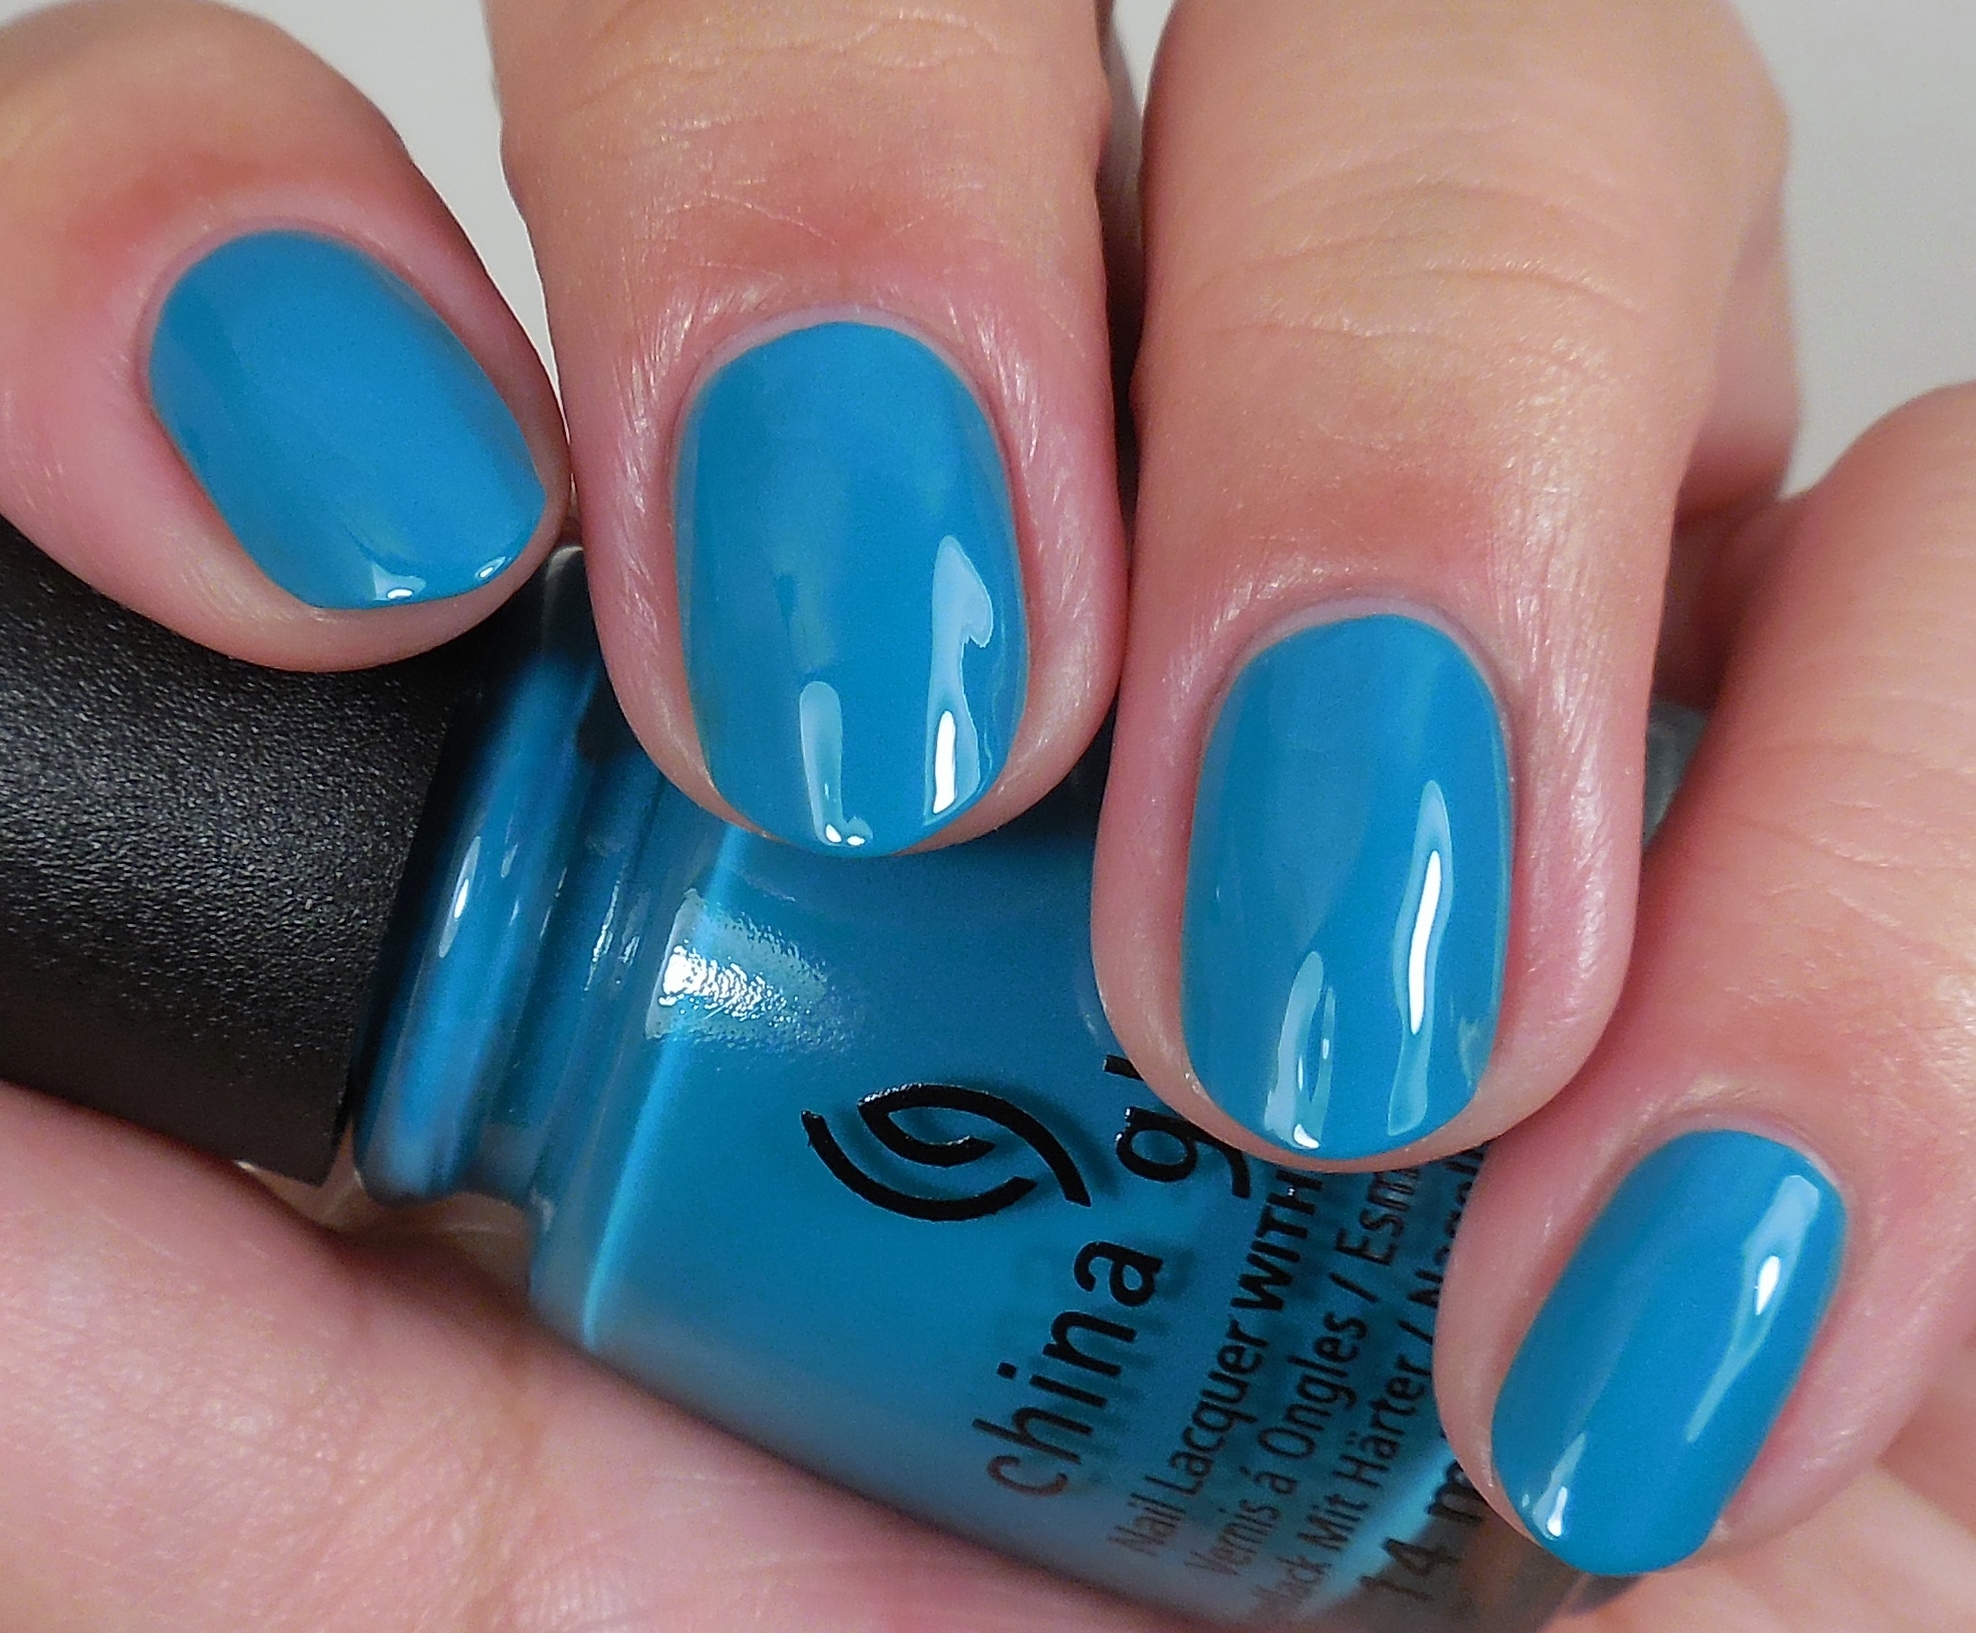
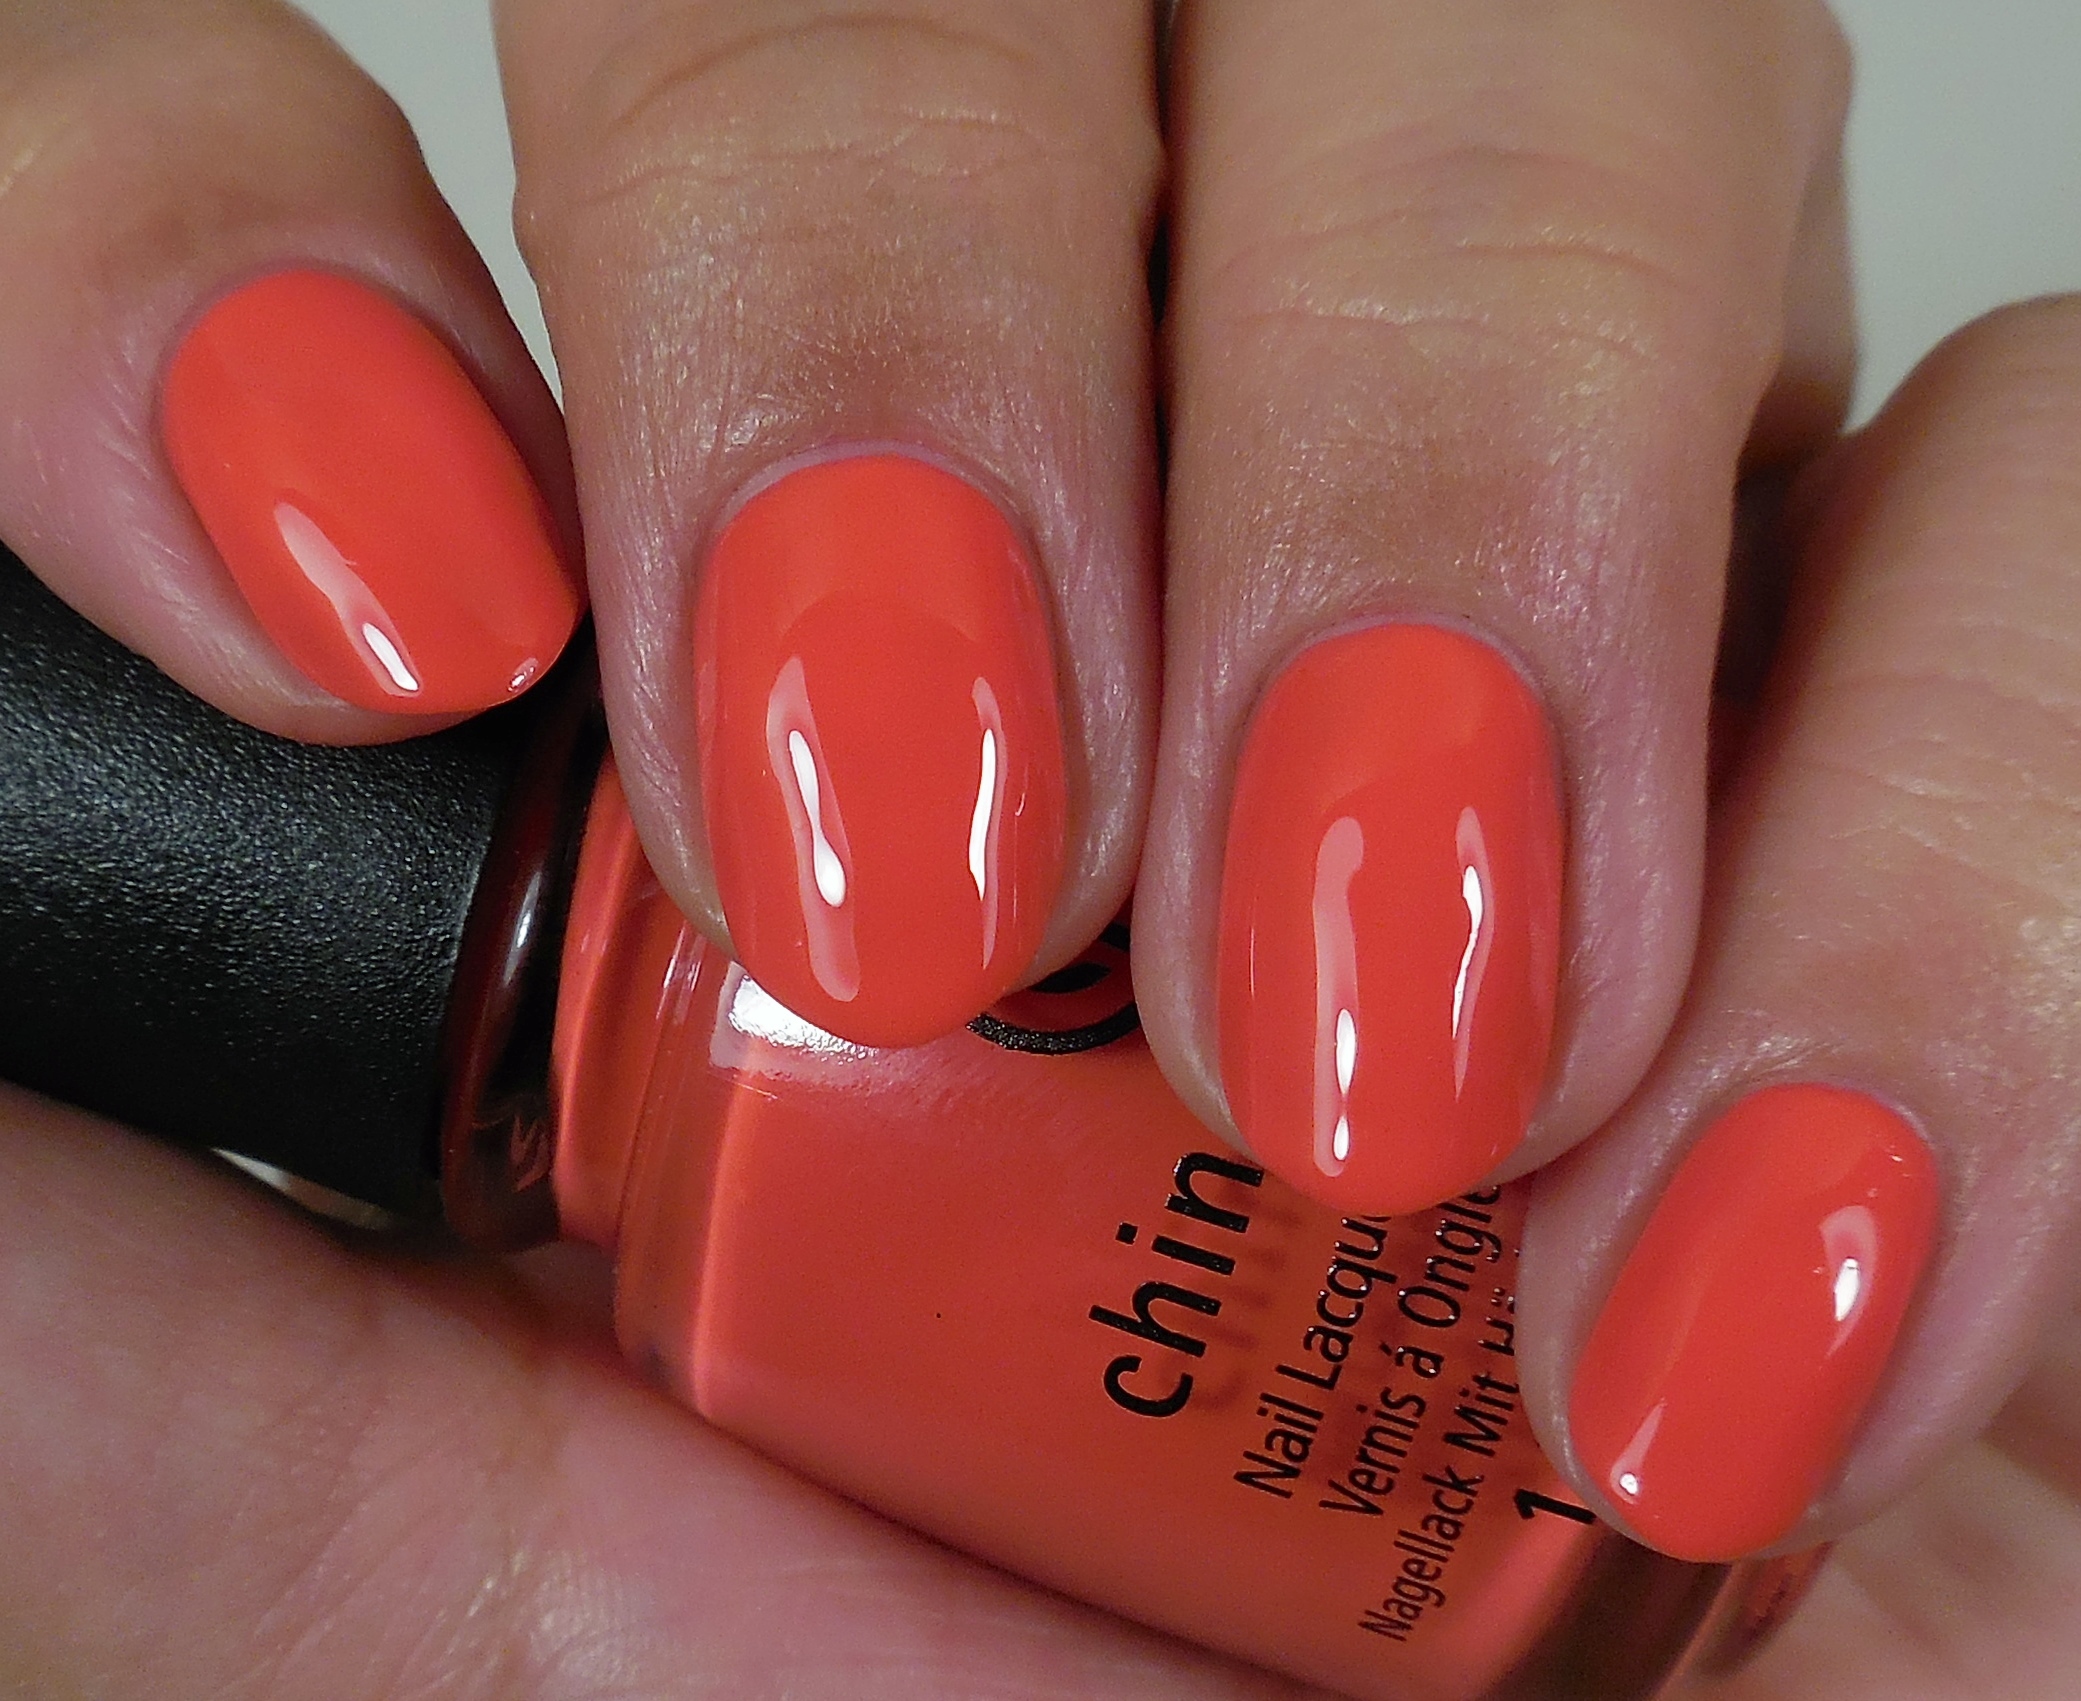
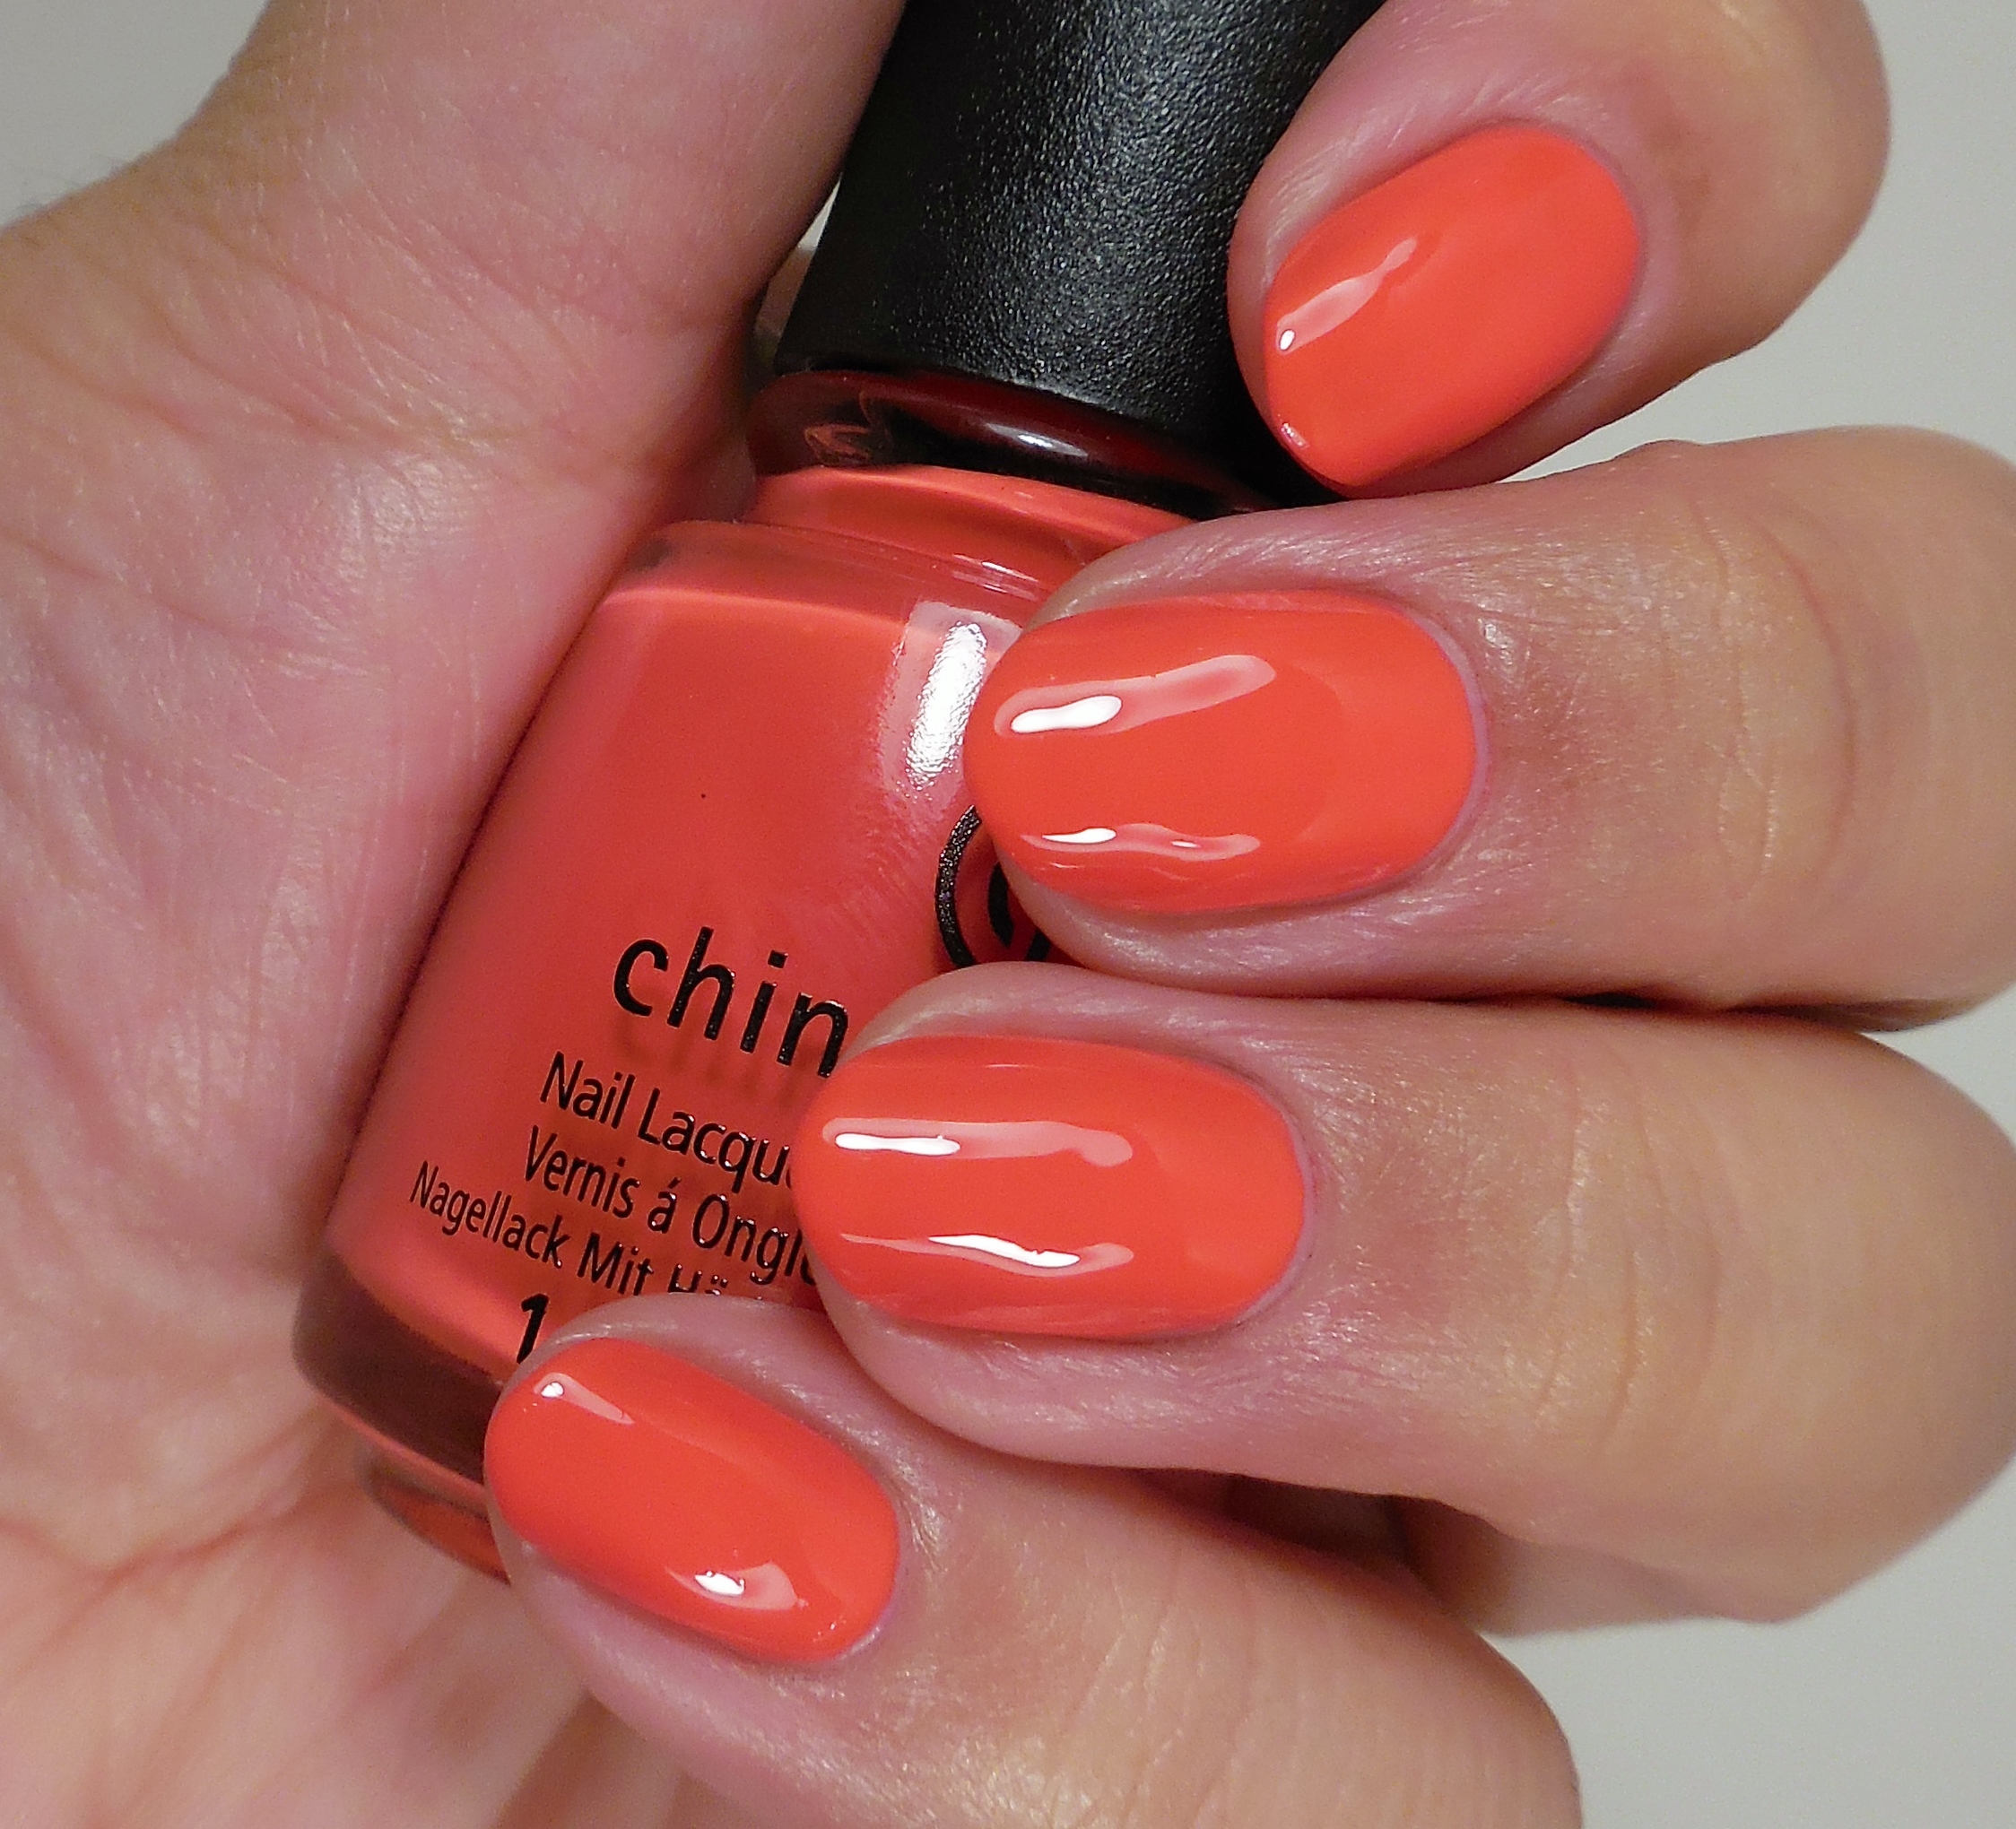
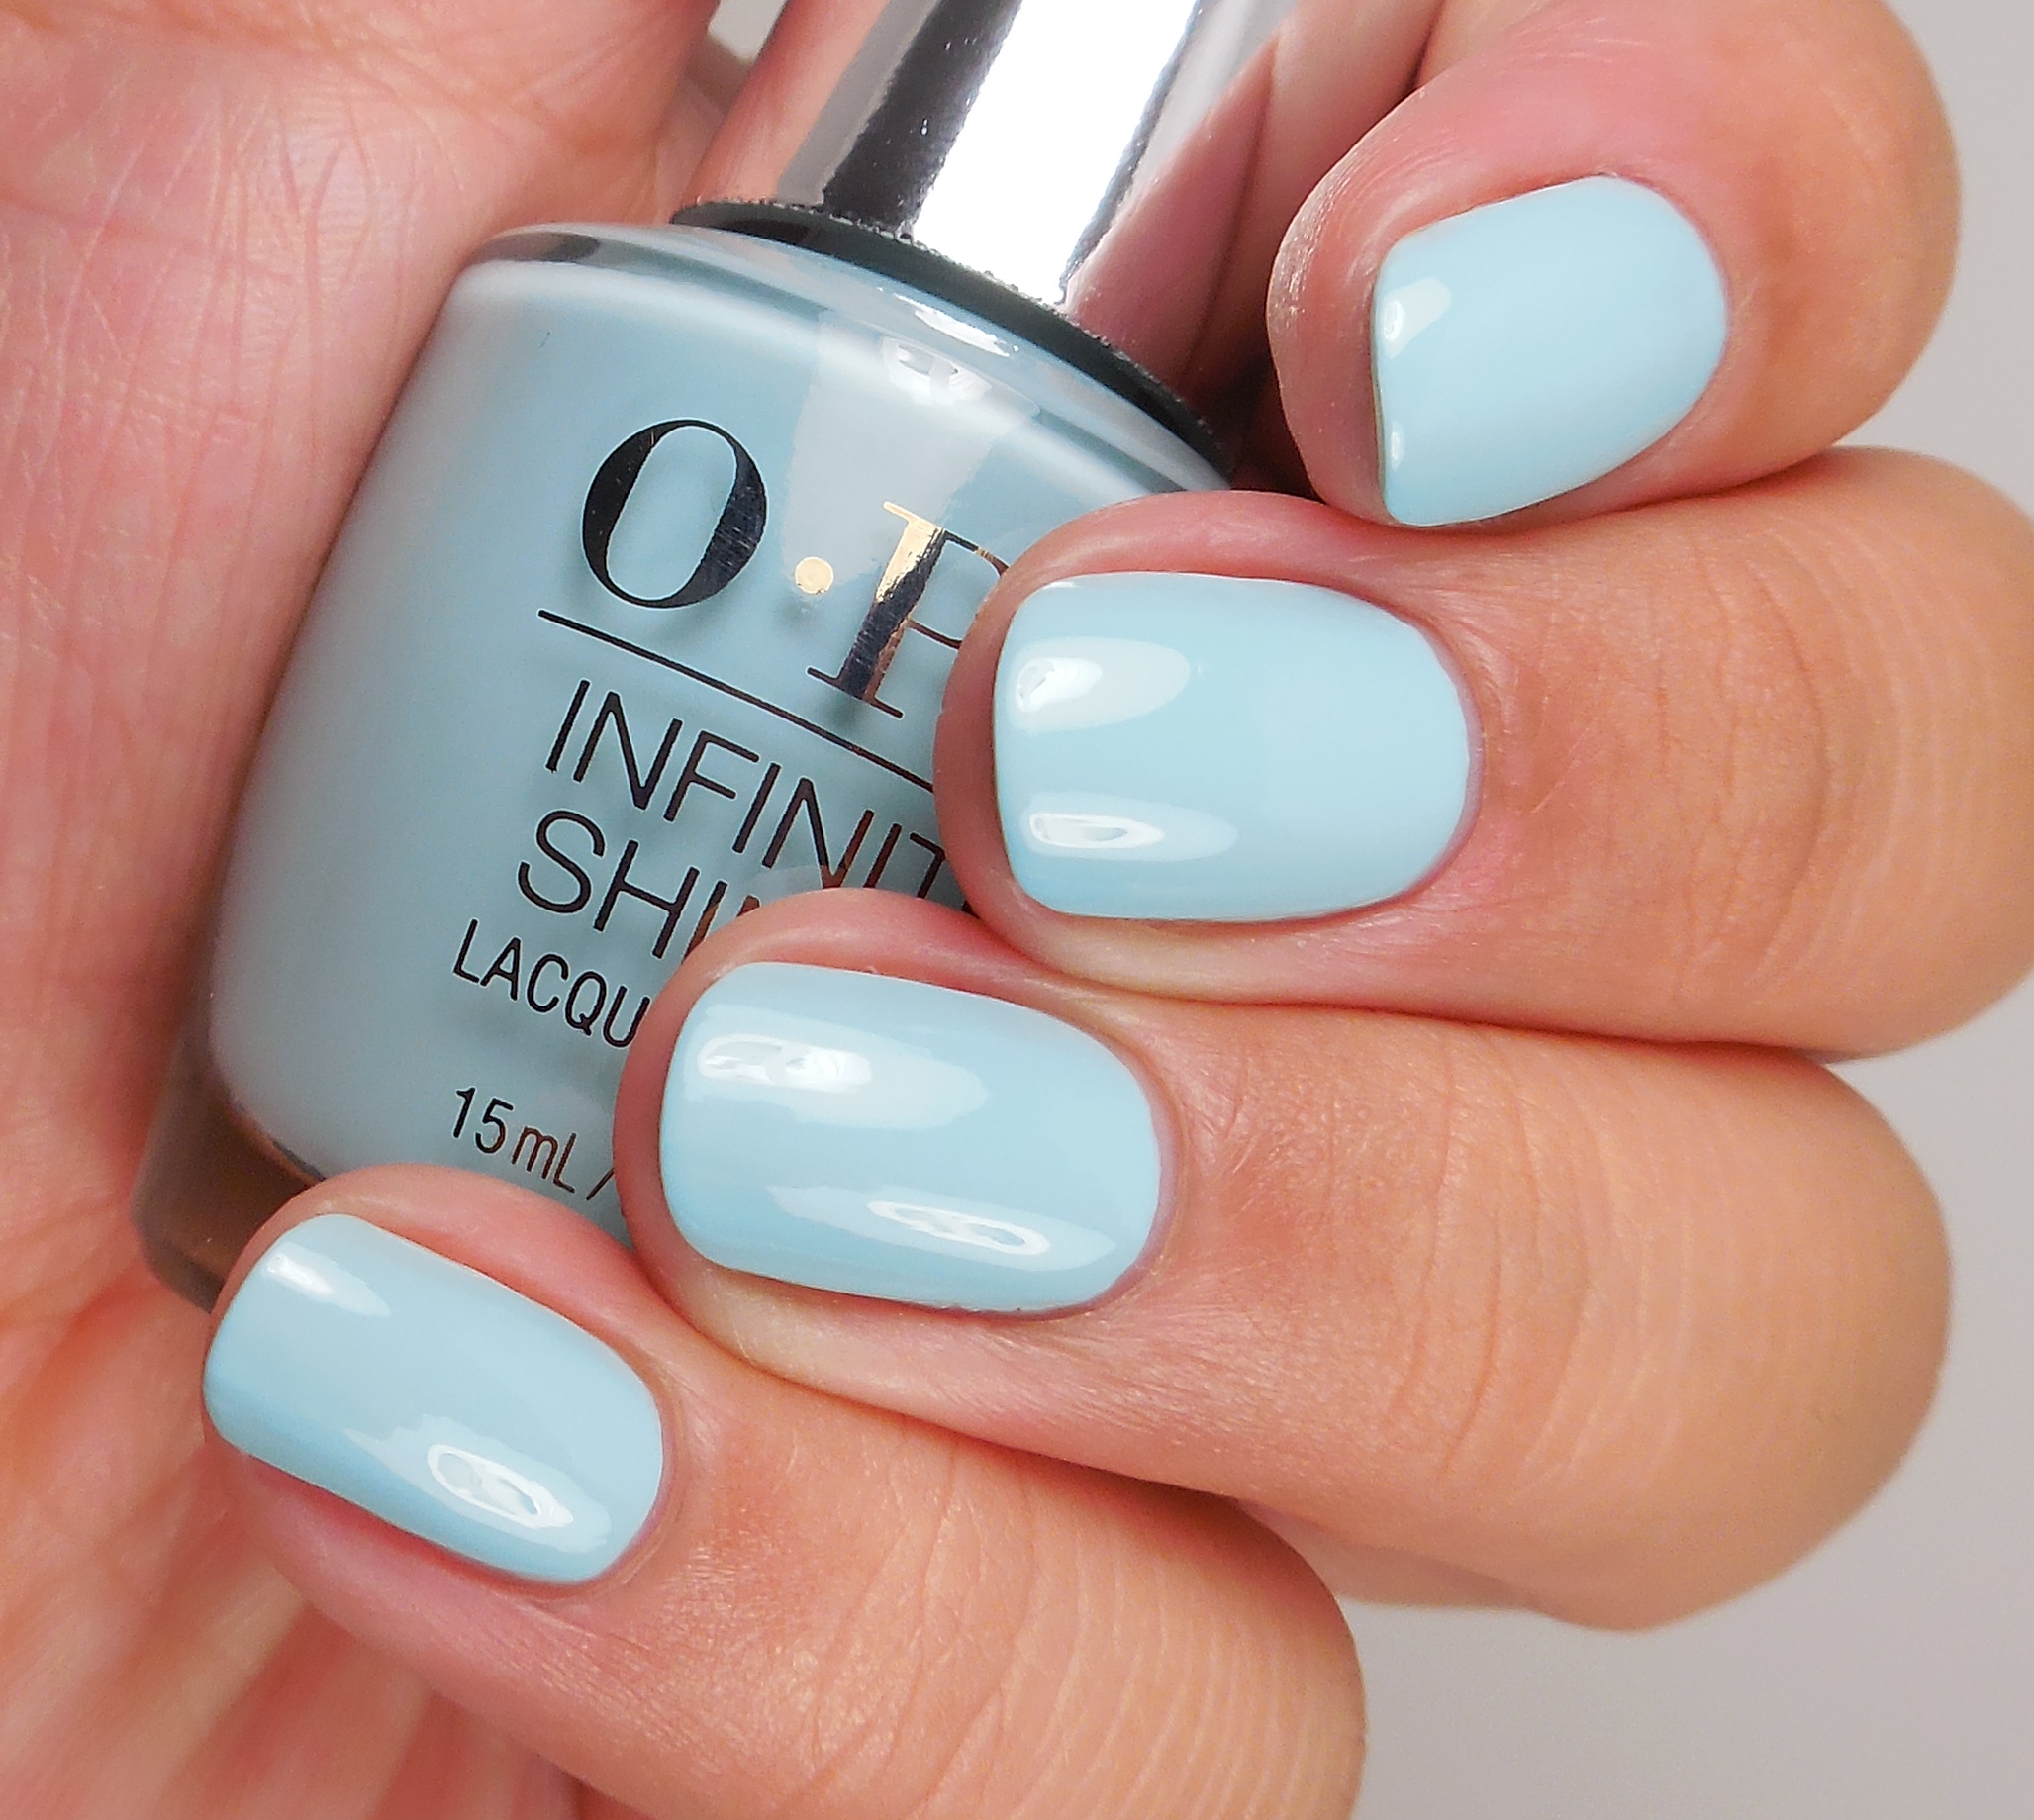
OPI Infinite Shine Eternally Turquoise

First of all, let me say that this collection is incredibly cohesive. They go well together and every single shade screams Spring to me. The formula on these is pretty typical of the Infinite Sine formula: rather opaque and a tad thicker than regular OPI. I have been experimenting with using my own quick dry top coat with these and so far it has worked well. I did notice that the OPI Infinite Shine top coat does stay glossy longer, though. I’m still freaking experimenting with my lighting set up and with my nail shape so I’m not that happy with how these swatch pictures turned out overall. Maybe I’m just being too picky. Overall, I am happy with this collection and can recommend these if you don’t already have something similar. I think that my favorite here is Eternally Turquoise and maybe Beyond The Pale Pink if you’re looking for something clean but not completely white. Let me know what you think of this collection. Did you pick up any of these already? Thanks so much for stopping by today, and I will talk to you soon.

Essie Flowerista Collection Spring 2015

Essie Flowerista Collection Spring 2015

PurchasedMyself


Hello friends! I hope you’re doing well today and that you’re ready for this post easter Monday. I had a nice Sunday with my family and we ate waaaaaaaaaay too much which is what usually happens when we get together for any holiday. Since Lent ended on 4/2, I immediately went out to purchase a bunch of polishes as I documented on Instagram. I was really dying to get my hands on the Essie Flowerista Collection for Spring 2015 so of course it was the first collection I decided to swatch. You already know that I have a love/hate relationship with Essie because I love the brand so much yet I end up hating the formulation on the polishes many times. I know you’re all on pins and needles waiting to hear what the final verdict is (not), but let me show you the polishes first.

Essie Perennial Chic 1Essie Perennial Chic 2Essie Perennial Chic

Essie Picked Perfect 1Essie Picked Perfect 2Essie Picked Perfect

Essie Petal Pushers 1Essie Petal Pushers 2Essie Petal Pushers

Essie Flowerista 1Essie Flowerista 2Essie Flowerista

Essie Blossom Dandy 1Essie Blossom Dandy 2Essie Blossom Dandy

Essie Garden Variety 1Essie Garden Variety  2Essie Garden Variety

Before I move forward with my thoughts, I wanted to share two pictures that are a little more color accurate. I took them with my phone camera so the quality isn’t the same but I did want to show you the way Blossom Dandy and Garden Variety lean more green than what my pictures above show. My camera is so difficult when it comes to blues and greens so I just have to deal with it.

Blossom DandyGarden VarietyIn real life, Blossom Dandy is more minty pale green and Garden Variety is more teal-leaning. So there you have it.

Uhm, I just don’t even know where to start: this collection is freaking out of this world gorgeous! I loved every single shade and to make the whole thing even sweeter, the formula on these polishes is NOT problematic. I used two coats for all of my swatches with a coat of Seche to shine it all up. Does Rebecca Minkoff have the magic touch?  Essie Collections this good–formulawise–are a little rare so I’m hoping this becomes a trend. I did not experience a single issue with these polishes, but I did allow plenty of dry time in between coats to avoid creating any bald spots. In case you haven’t realized it yet, I think this collection is peachy keen, the bee’s knees, totally tubular and any other silly saying you can think of. I’m super happy that Essie rebounded with this after the Cashmere Matte disappointment–I won’t lose the faith! So what do you think about this collection? Will you be picking up any of these colors? Thanks so much for stopping by today, and I will talk to you soon!

Watermarble Tips

Watermarble Tips

I will be the first one to admit that I have a really hard time with different nail art techniques. I really started out as a swatcher, so that is what I am most comfortable with. However, I don’t want my blog and passion for nails to stagnate so I do try to do things that are outside of my comfort zone. Stamping was one of the first things that I tried so it became something that I have continued to enjoy because I find it easy and fun. Enter watermarble. I have been dealing with trying to watermarble for probably a year if not longer. I went through phases where I tried, gave up for a while, tried again and gave up again. It was just so frustrating because it seemed that no matter what I did, nothing worked. Finally, I am here to tell you that you can master this technique because if I can, anyone can! While there is no one technique that will guarantee success, I will be sharing with you what worked for me.

Water

You would never think that choosing the right water would make such a huge difference. There are people who will say that tap water works just fine or that you have to use distilled water. I’ve tried both and tap water never worked for me. I guess it could be that tap water differs from region to region, but distilled water is the only thing that has worked for me. The temperature of the water was also important because only room temperature water seemed to work well.

Polishes

Once you have the water issue figured out, you have to figure out what polishes work well for marbling. This is all about trial and error because not all polishes work well and some don’t work well together. Personally, the best polishes for marbling that I have used are OPI cremes. They spread well, are very pigmented and don’t dry too quickly. I’ve tried some cheaper polishes and they seem to dry out quickly. Certain holos and shimmers work very nicely as well, but to be honest, you just have to play around with polishes to see which ones will work best.

Creating your design

So you got the water right and your polishes spread nicely into rings. YAY! This is where my next womp womp moment occurred. I could not, for the life of me, get a nice even design. The easiest and most common design is the flower design where you drag your needle from the outside in and join the petals at the center. Well, I could not get this right. I figured out that my issue was that I was trying to drag from the outermost ring which was already beginning to set so I was breaking up the rings and just ruining everything. This might seem like common sense, but I was constantly messing up on this. I also wasn’t cleaning my needle/toothpick in between each drag so the excess polish on the tool wasn’t letting me create clean lines. Why must this be so hard???

The Big Dipper

You’re almost there, right? WRONG. Now you have to figure out how to dip your fingers into the design and not mess it up. I also managed to mess this up time and again. It’s easy enough to line up the design, but if you dip your fingers like a dumbass, you can get a big old mess. I also always got a billion air bubbles on my design which would then pop and ruin the design. The only solution for this, in my experience, is to dip your fingers at an angle and pull out your fingers very slowly.

After all this, why would anyone want to even bother with watermarbling? Well because when you get it right, it looks awesome. Let me show you what I did for my last watermarble.

1First you will want to paint your nails a solid color. White works well most of the time so I’ve used one of my favorite whites: Sation Strumming My Nails (press sample) which is a dupe for OPI MBSW. I think the formula on this one is slightly better than the OPI.

2Then you are going to want to tape up your finger to protect your skin from all the mess. I also applied a little glue around my cuticle area that would still be exposed to make clean up easier–especially because the polishes I chose have a lot of shimmery particles.

4For this watermarble I used the three shimmers from the Zoya Delight Collection (press sample): Daisy, Leslie and Rayne which work beautifully. In fact, the cremes from this collection also work perfectly.

5Imagine if you didn’t tape up your finger…you would have all this polish on your skin.

6With the glue and tape, this is what my clean up job ended up being. Not bad, right?

78And this is the finished mani after all the clean up was done. This looks like Easter exploded on my nails, but I think it looks pretty.

So do you think this technique is worth all the fuss? Do you have any other tips that might help others who are watermarble challenged? Thanks so much for stopping by today, and I will talk to you soon!


Have you entered my giveaway? Click the image below to enter!

giveawaycollage

Zoya Delight Collection Spring 2015

Zoya Delight Collection Spring 2015

PressSample


I meant to have this post up on Monday, but it just didn’t happen. My parents are visiting so everything went to hell. On Friday I had the worst stomach bug ever, and I’m still wondering if it was stress or something else. Fortunately it was gone by Sunday because I would have missed out on my mom’s cooking the first day–oh man my mom is the best cook in the world. So besides my parents being in town and my getting some extra time with the Peanut Brat, everything has been going ok. My nails are still in recovery mode. The damage is growing out rather quickly, but I’m nearing the point where the most severe damage is near the tips of my nails now so I’m expecting a lot of breaks and issues in the next couple of weeks. My nail bed is horribly uneven still so I’m experiencing issues with applying polish evenly since it always looks off because my nails are jacked up. Oh well…I’ll just have to deal with it and take my punishment for being dumbass. This weekend I managed to squeeze in some time to swatch the Zoya Delight Collection and boy was it a…delight? Read on to find out what I thought!

12Zoya Eden

34Zoya Lillian

56Zoya Tiana

78Zoya Leslie

910Zoya Rayne

1112Zoya Daisy

Saying that I really enjoyed the Zoya Delight Collection isn’t enough–I really loved it. The combination of 3 creamy and delicious cremes with 3 metallic shimmers is genius because it gives us almost two collections without being overwhelming. I loved the delicate colors and really enjoyed the welcome pop of shimmer in one half of the collection. I didn’t have problems with the formula despite the light color which is really exciting to me. I’ve also been caught up in my own watermarble world that I used the three cremes for an accent watermarble nail:

I think that it turned out really nice. What do you think?

1314Overall, this collection gets a big thumps up from me. What do you think if these polishes? Will you be picking up any of these colors? If I had to pick a favorite, it would have to be Leslie for sure! The Zoya Delight Collection can be purchased on zoya.com where they retail for $9 a bottle. Thanks so much for stopping by today, and I will talk to you soon!

KBShimmer Spring Collection 2015

KBShimmer Spring Collection 2015

PressSample


Well, I wanted to get this post up early–even last night, but as usual, I got sidetracked. I had the funkiest dreams last night and I ended up oversleeping big time. I was planning to be up by 7 and I got up at 10:30. Womp womp. Now I have to rush through all my errands, laundry and cleaning. I hate Sundays. Let me tell you how excited I am to share these beauties with you!!! KBShimmer always puts out the most amazing polishes and I can already tell you that this new collection is no exception–I love the musicality of that phrase. Anyway, let me show you the pretties before I jump out of my skin. Behold the beauty of the KBShimmer Spring Collection!

56KBShimmer Funky Cold Patina

34KBShimmer Wind Swarm

12KBShimmer Eyes White Open

78KBShimmer Blush Money

910KBShimmer Blue-d Lines

1112KBShimmer Ins And Sprouts

1314KBShimmer Thistle Be The Day

Ghaaaaaaaaaaaaaaaaaaaa! These are gorgeous. There is not a single problematic polish in this lot–they were all opaque at two coats an applied smoothly. I changes my lighting up a bit for the holographic polishes so I apologize for the shine on my skin in these pictures. The holos are just so mesmerizing–can we ever get enough of holos? I don’ know what else to tell you about this collection besides I’m sorry….I’m sorry that your wallet/bank account is about to get lighter because you will want every single one of these. The collection consists of 12 polishes total and they are all just as amazeballs. The polishes will retail for $8.75 each and will be available on Friday, February 6th, 2015 at www.kbshimmer.com. Will you be getting any of these? Let me know what you think. Thanks for stopping by today, and I will talk to you soon!

Follow KBShimmer

WebsiteFacebookInstagramTwitter

China Glaze Road Trip Collection – Spring 2015

China Glaze Road Trip Collection – Spring 2015

PurchasedMyself


Hello! This is kind of a late night post for me since I usually like to post in the morning, but I’ve been kind of out of it lately so I figured that since I got a burst of energy now, I might as well write this up right now before I go to bed. If you’ve been following my blog for a while, you know that I love China Glaze. You also know that I never miss out on a collection because…well…I am a freak and have no self control. When I first saw the promo shots for the China Glaze Road Trip Collection for Spring 2015, I just about pissed myself just because I love spring collections, I love China Glaze and I love anything that remotely hints at travel. As soon as my beauty supply got these in, I got the whole lot so I could try them all out. Well, how do you think it went? Let me show you the colors before I get into the dirty details.

China Glaze My Way or the Highway 1China Glaze My Way or the Highway 2China Glaze My Way or the Highway

China Glaze License & Registration Pls 1China Glaze License & Registration Pls 2China Glaze License & Registration Pls

China Glaze Boho Blues 1China Glaze Boho Blues 2China Glaze Boho Blues

China Glaze Dashboard Dreamer 1China Glaze Dashboard Dreamer 2China Glaze Dashboard Dreamer

China Glaze Sun's Up Top Down 1China Glaze Sun's Up Top Down 2China Glaze Sun’s Up Top Down

China Glaze Trip of a Lime Time 1China Glaze Trip of a Lime Time 2China Glaze Trip of a Lime Time

China Glaze Pop The Trunk 1China Glaze Pop The Trunk 2China Glaze Pop The Trunk

China Glaze I Break for Colour 1China Glaze I Break for Colour 2China Glaze I Break for Colour

China Glaze Pack Lightly 1China Glaze Pack Lightly 2China Glaze Pack Lightly

China Glaze More To Explore 1China Glaze More To Explore 2China Glaze More To Explore

China Glaze Pinking Out The Window 1China Glaze Pinking Out The Window 2China Glaze Pinking Out The Window

China Glaze Wanderlust 1China Glaze Wanderlust 2China Glaze Wanderlust

While some of you may think that these colors are kind of boring and that you’ve seen them all before, let me tell you that even for a nail polish freak like me that really has one of EVERYTHING, I really REALLY loved these colors. Maybe it’s because it’s one of the first Spring collections that I have gotten my hands on after a bunch of Fall and Winter colors, but I really fell hard for this collection. It just seems so cohesive and just plain pretty.  The blue shades are gorgeous, the pink/peach colors are a gradient selection made in heaven. Hell, I even loved the yellow…and the green…the green! Ahhh…seriously, I really loved these colors. But. BUT! I hate using the word but because I always feel that everything that comes after the word but basically negates everything that came before it. However (a fancy but), I found the formula on these–not ideal. I don’t know if all of a sudden I suck at applying polish, but all of these felt kind of streaky. The only ones that didn’t really give me any trouble were My Way or the Highway, Boho Blues and License & Registration Pls which only required 2 thin coats. The rest of the polishes required 3 coats…some of them thickish. That definitely did not make me happy. If you’re a person that uses base coat and top coat, that’s like 5 coats of polish on each nail!!! 5 coats of polish make me a sad panda. I haven’t seen too many reviews of these polishes out yet so I don’t know if I just suck at doing my nails now or if others will also find them a bit streaky. Most of these polishes have a really lovely microshimmer that doesn’t show up too much in my pictures but man they look pretty when the light hits them just right. I don’t know about you, but when a polish is really pretty like some of these, I tend to be more forgiving for some formula issues. Ultimately, I would highly recommend the three blues that I mentioned above and a few others if you’re ok with some formula issues. This collection officially comes out in February, but I know that you can get them at a few places already. What do you think of this collection? Will you be getting any of these? Let me know! Thanks so much for stopping by today, and I will talk to you soon!